
Welcome to an in-depth guide on mastering algorithmic futures trading with NinjaTrader, inspired by expert trader Vinny Emini. This article distills the crucial insights from Day 7 of the Algo Futures Trading Course, where we explore advanced strategies, real-time order flow analysis, harmonic patterns, and confluence techniques to elevate your trading game.
Whether you’re a beginner aiming to shorten your learning curve or an experienced trader seeking to refine your approach, this step-by-step tutorial will equip you with actionable knowledge and practical tactics for trading smarter and faster. Expect detailed explanations, examples, and visual cues to help you apply these concepts effectively.
Table of Contents
- Step 1: Understanding the Piercer Strategy – Spotting Reversals with Precision
- Step 2: The Plover Strategy – Fast Scalping with Confluence
- Step 3: PRZ Cross Strategy – Harmonizing Structure and Order Flow
- Step 4: Navigating Trades Against NERD and Arrow Signals
- Step 5: PPRZ Ladders – Targeting with Precision
- Step 6: Identifying and Trading Traps – The Retail Psychology Edge
- Step 7: The Ritchie Pattern – A Price Structure Trap for Explosive Moves
- Step 8: Shark Back and Shark Tail – High-Probability Harmonic Trades
- Step 9: Embracing the Trade Nothing Alone Philosophy
- Step 10: Perfect Plays – Waiting for the Sweet Spot
- Step 11: Leveraging News Events and Market Context
- Step 12: The Titanic Zone – A High Probability Reversal Setup
- Step 13: Drawing Regions and Using Region Breakouts
- Step 14: Alpha Omega Clustering and Continuations
- Step 15: Super Alpha Omega and Super Moon Strategies
- Step 16: Using the Dream Panel – Automation and Time Filters
- Conclusion: Mastering Algorithmic Futures Trading with Confluence and Discipline
Step 1: Understanding the Piercer Strategy – Spotting Reversals with Precision
The Piercer strategy is a powerful technique that capitalizes on price reversals signaled by fib dots and real-time order flow cues. A classic example is the Enigma plus AudioBox combination, where a trap forms after a rapid move down, followed by a grinding move upward. This creates an ideal environment for a Piercer entry once the price pierces the back of a setup.
Vinny shares a memorable analogy to help remember market behavior: “Bulls take the stairs, bears jump out the windows.” This highlights the slower upward grind favoring bulls and the faster downward moves favoring bears.
Key elements of the Piercer strategy include:
- Identifying a fib dot that appears during a trap or reversal zone.
- Watching for real-time order flow signals, especially the AudioBox clacking, indicating momentum.
- Entering the trade as price pierces the back of the fib dot setup, typically in the opposite direction of the initial move.
- Placing tight stops just beyond the fib dot or Enigma level to minimize risk.
While Piercers often appear on fib dots, they can also occur on other harmonic patterns such as the cipher, butterfly, or crab. The key is to align the entry with higher timeframe bias and confirm with order flow signals.
Step 2: The Plover Strategy – Fast Scalping with Confluence
Originating from Australia and aptly named the Plover, this scalping strategy combines harmonic structure with real-time order flow for quick, high-probability trades. The setup requires:
- A smooth, straight leg movement on the price chart.
- A Flowmaster cross signal appearing during this leg.
- A Predicted Potential Reversal Zone (PPRZ) nearby, indicated by yellow shading.
The Plover is best executed at fast market speeds, confirmed by AudioBox signals and the speedometer indicator showing above-average velocity. It’s a perfect example of combining harmonics and order flow to scalp small but consistent profits.
Vinny advises that the Plover is not his favourite play but acknowledges its utility when it appears. The stop placement is typically behind the Flowmaster cross, with targets aligned to the PPRZ.
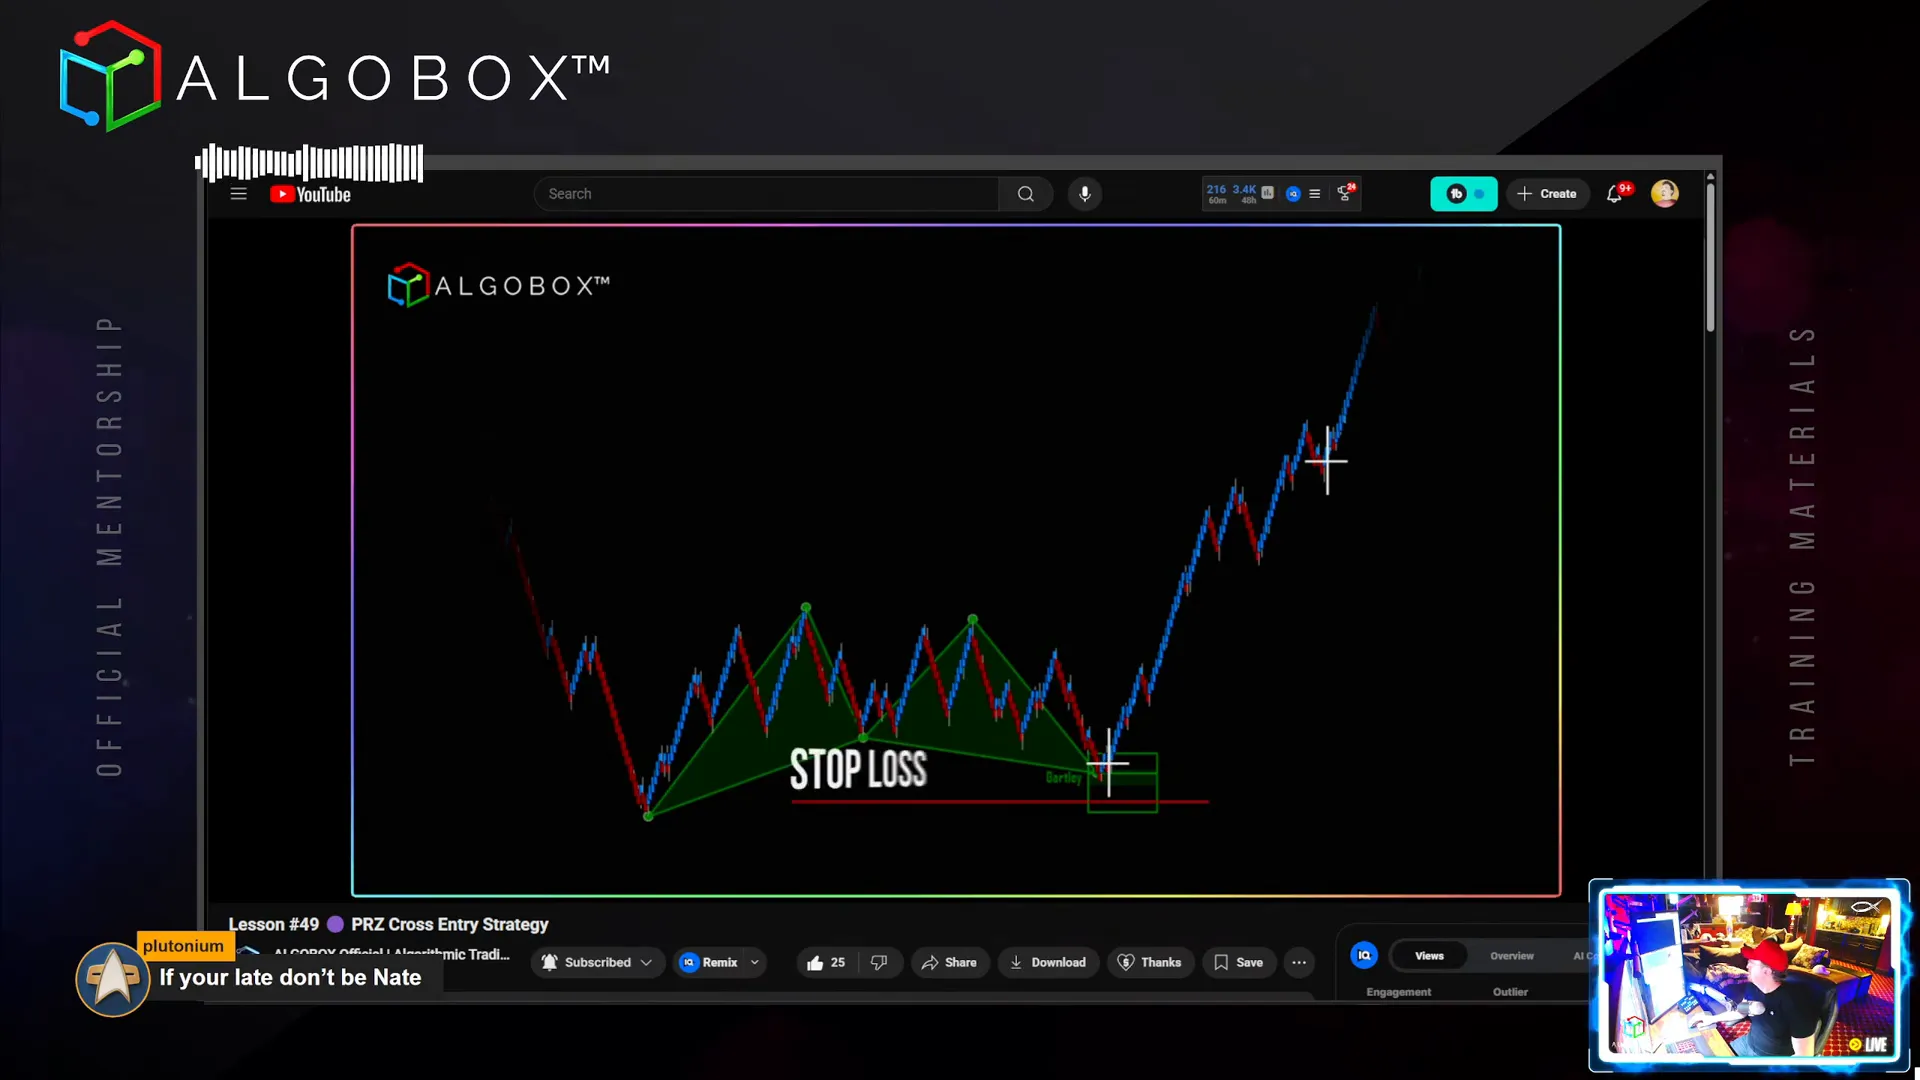
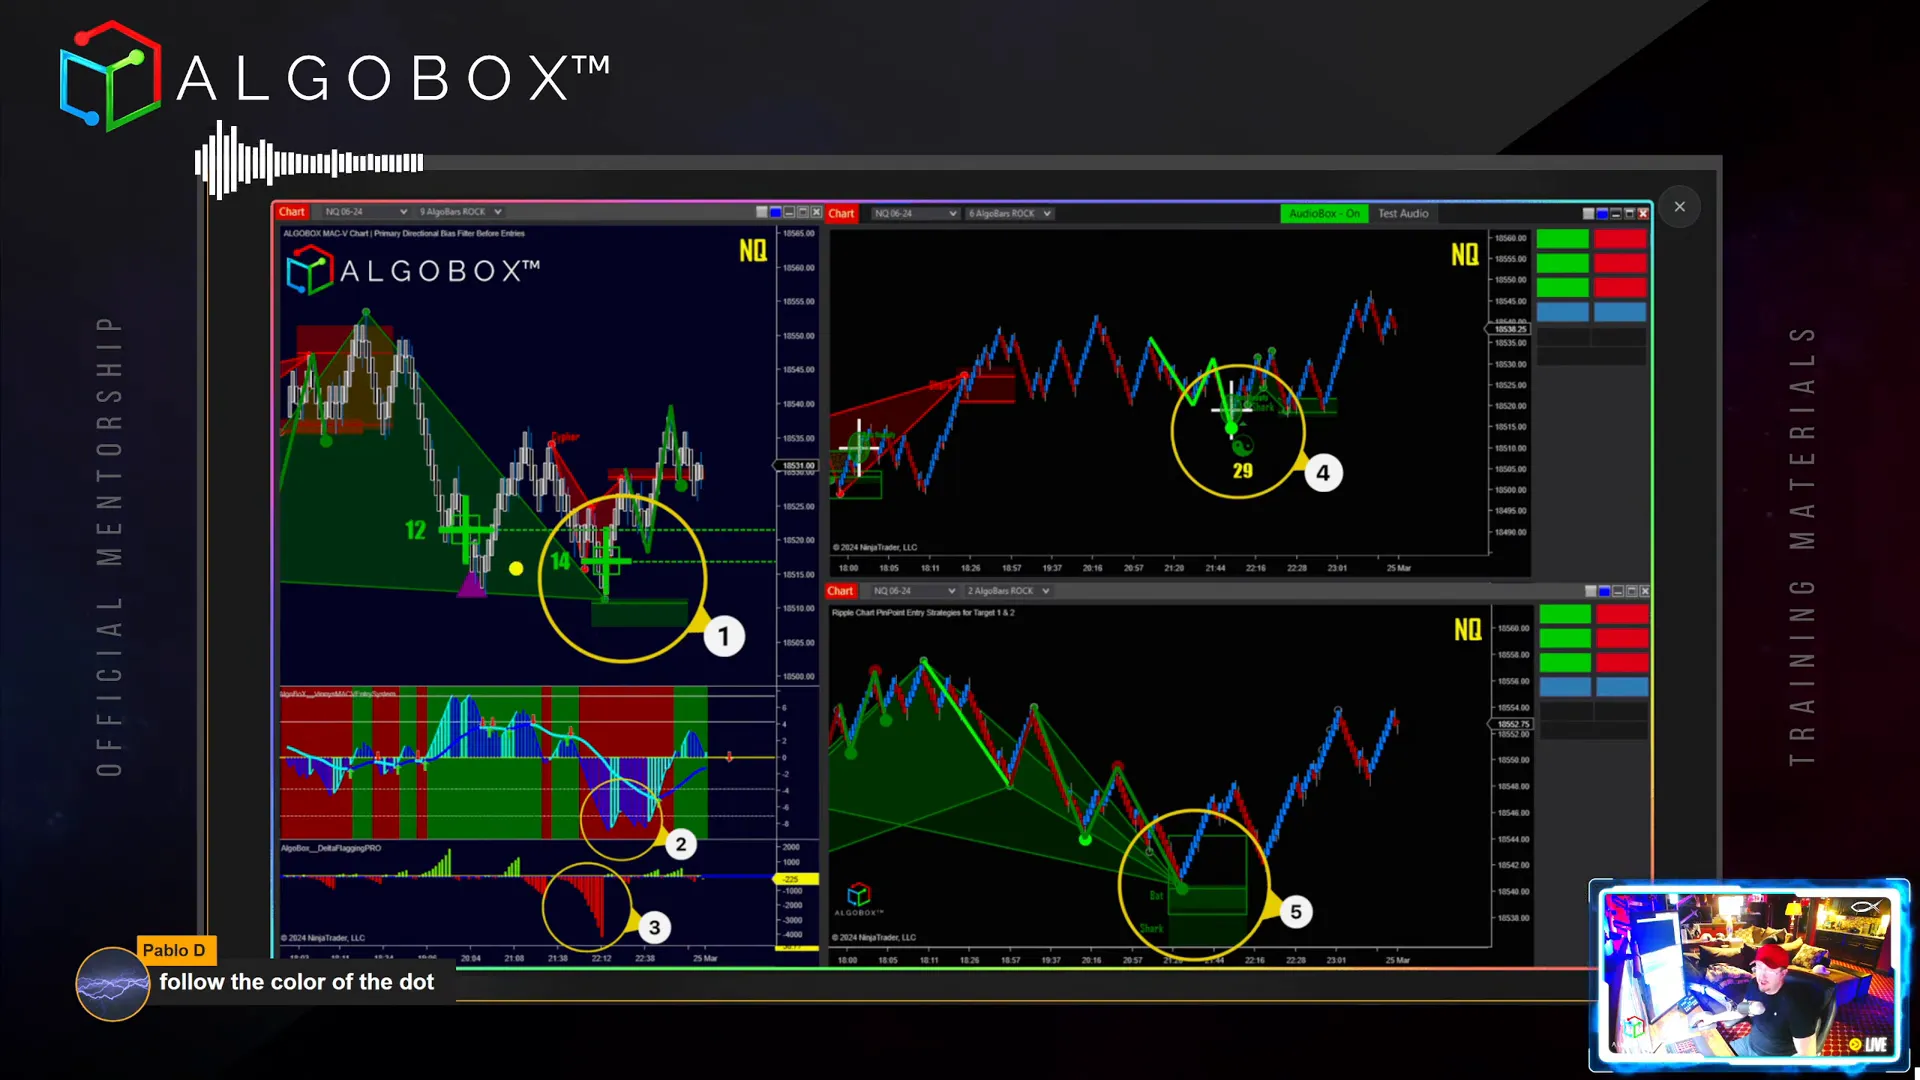
Step 3: PRZ Cross Strategy – Harmonizing Structure and Order Flow
The PRZ Cross strategy is foundational, marrying harmonic Potential Reversal Zones (PRZ) with real-time order flow analysis (RTOFA). Here’s how it works:
- Identify a bullish or bearish harmonic PRZ, such as a bat pattern.
- Wait for a Flowmaster cross signal to appear inside that PRZ.
- Enter trades in the direction of the harmonic pattern when the cross confirms.
- Place stops behind the Flowmaster cross to minimize risk.
- Use ATM strategies for small or big targets based on the Algo bar size and higher timeframe bias.
Vinny stresses the importance of patience and not taking every PRZ cross blindly. Adhering to the T1 and T2 targeting system and recognizing when to hold or exit based on the NERD and Arrow indicators is crucial.
Step 4: Navigating Trades Against NERD and Arrow Signals
Trading against the NERD (a momentum indicator) and Arrow (directional bias) signals is allowed but comes with caveats:
- Yes, you can trade against these signals, but risk management becomes paramount.
- Use smaller ATM settings (tiny or small) to capture quick scalp profits.
- Avoid holding positions too long; exit quickly if momentum reverses.
- If consistently behind on trades, consider moving to higher timeframes or practicing faster execution.
Vinny emphasizes, “If you missed the ideal entry, don’t superhero it—take the quick scalp and wait for the next trade.” This mindset protects capital and builds discipline.
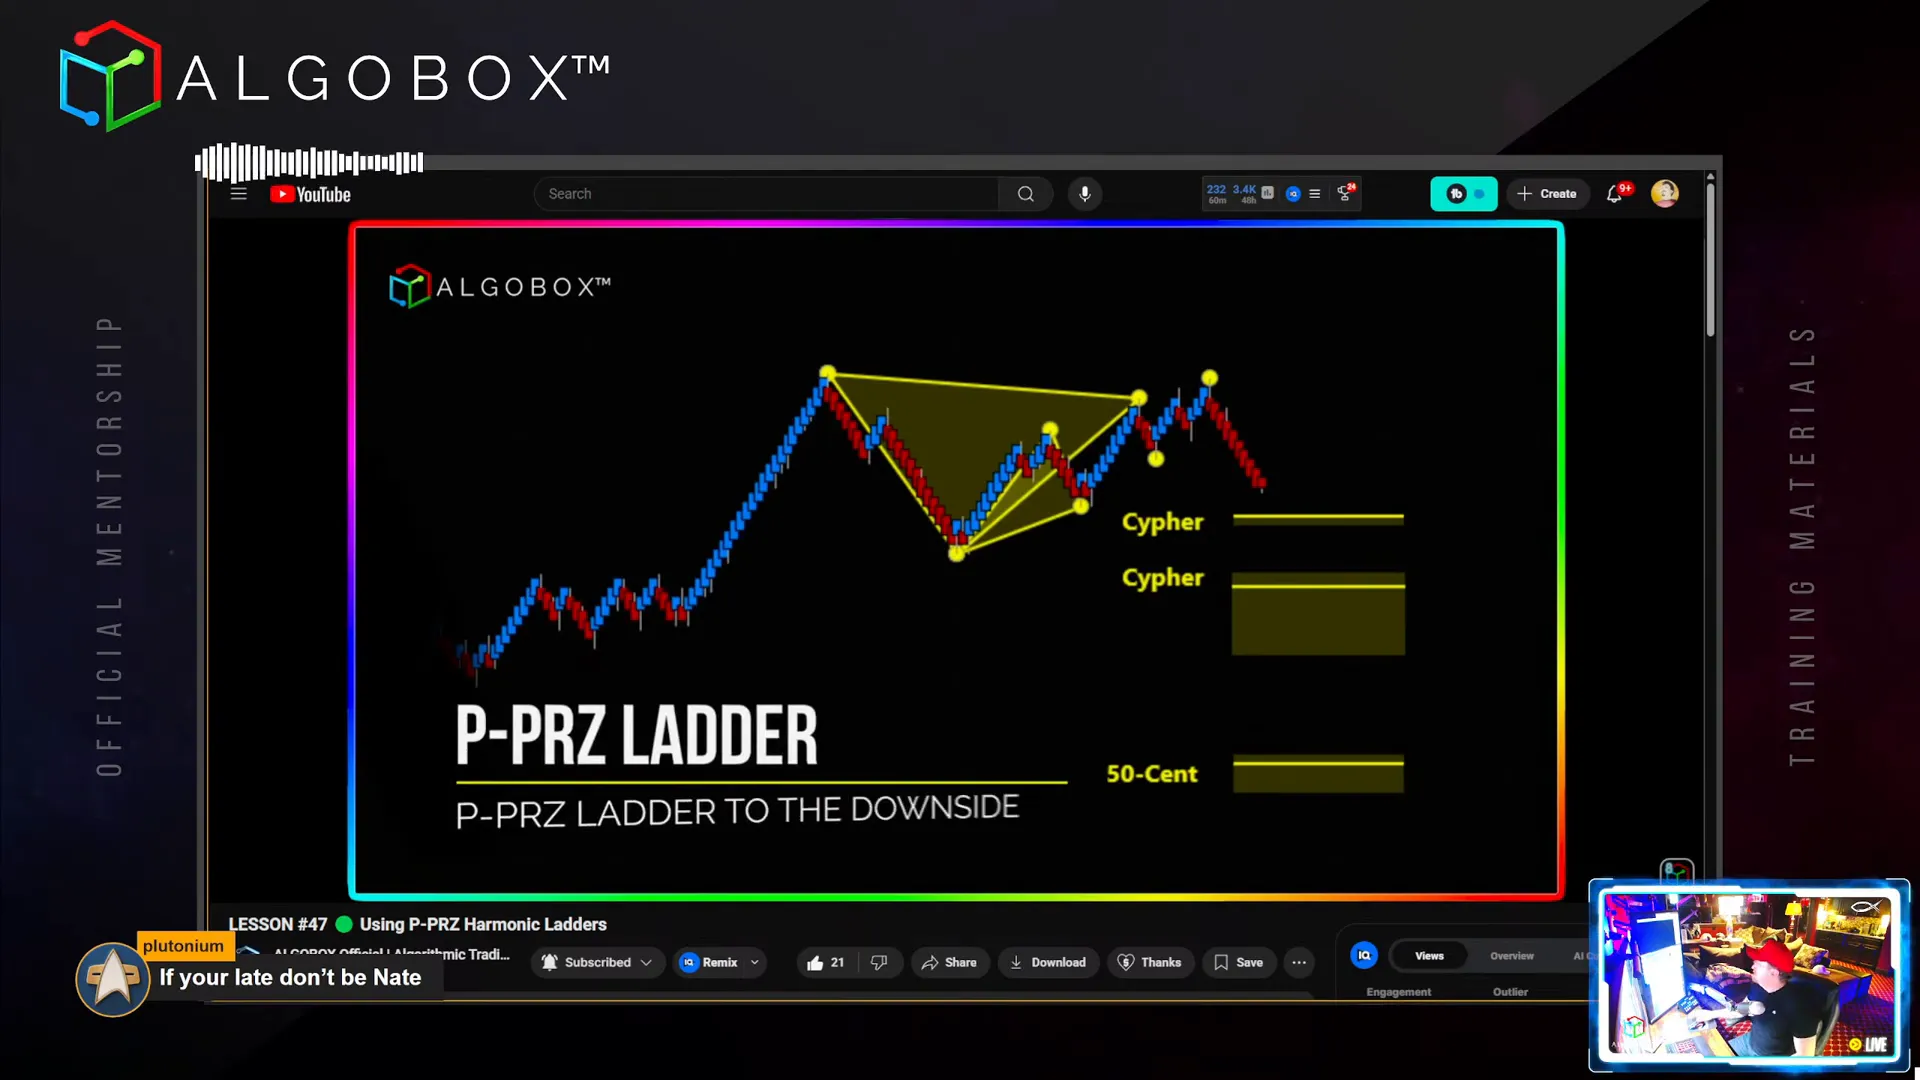
Step 5: PPRZ Ladders – Targeting with Precision
Predicted Potential Reversal Zone (PPRZ) ladders occur when multiple PPRZ levels stack together, creating a ladder-like structure. These are not entry signals but powerful tools for identifying potential target zones where price may accelerate or stall.
Visualize these ladders as magnets pulling price towards successive reversal zones. The bigger the ladder (more PPRZs stacked), the stronger the potential move.
Key points:
- Use PPRZ ladders for planning exits and profit-taking.
- Do not rely on PPRZ ladders alone for entries; combine with structure and order flow signals.
- The NERD and Arrow indicators override ladder bias for directional decisions.
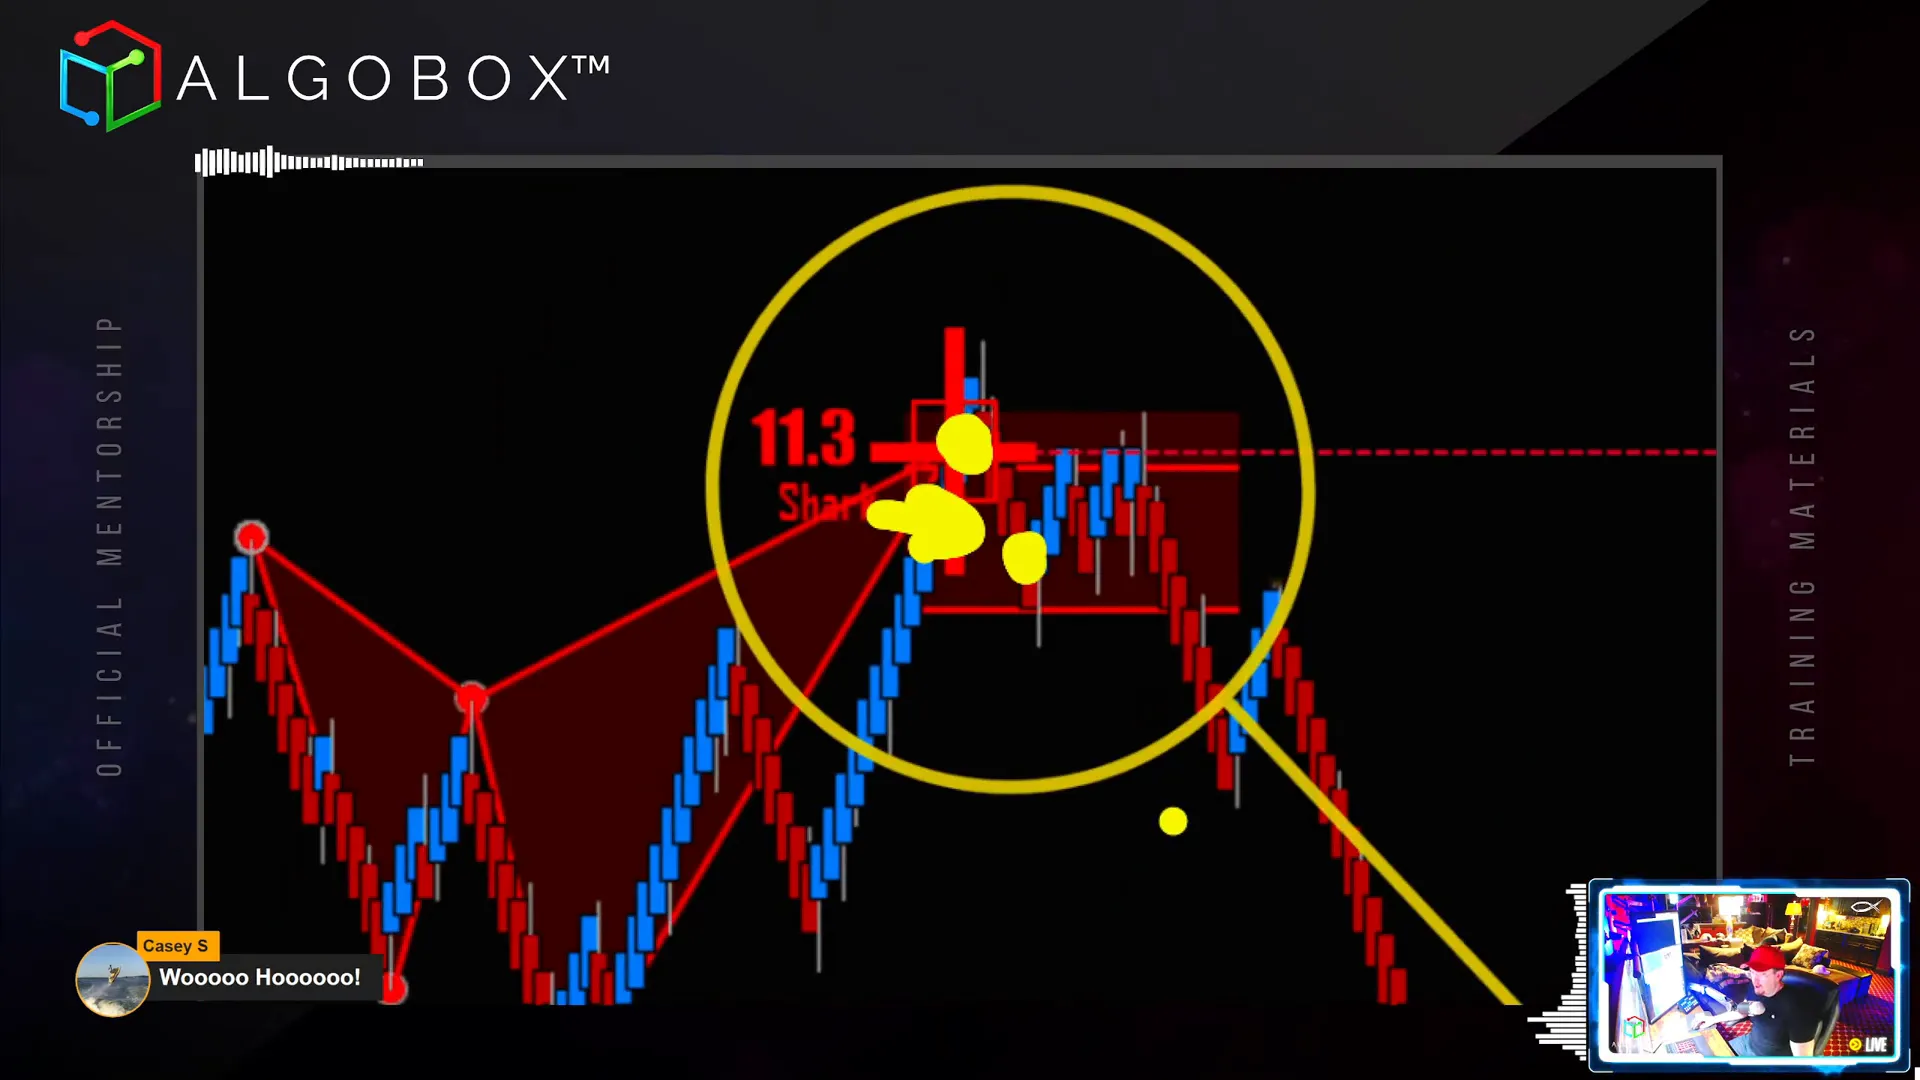
Step 6: Identifying and Trading Traps – The Retail Psychology Edge
Recognizing traps is a critical skill that separates professional traders from amateurs. A trap occurs when retail traders are convinced to take a position, only to be caught on the wrong side as price reverses sharply.
Vinny suggests thinking from the retail trader’s perspective:
“What does retail think right now? Would I have hit the button here? If yes, then this might be a trap.”
Traps are often characterized by:
- Strong, convincing moves in one direction (smooth, fast legs).
- Price action that entices traders to enter prematurely.
- Subsequent reversal that squeezes trapped traders out.
Tools like AlgoBox’s white crosses can confirm trapping by showing where traders expected continuation but got caught.
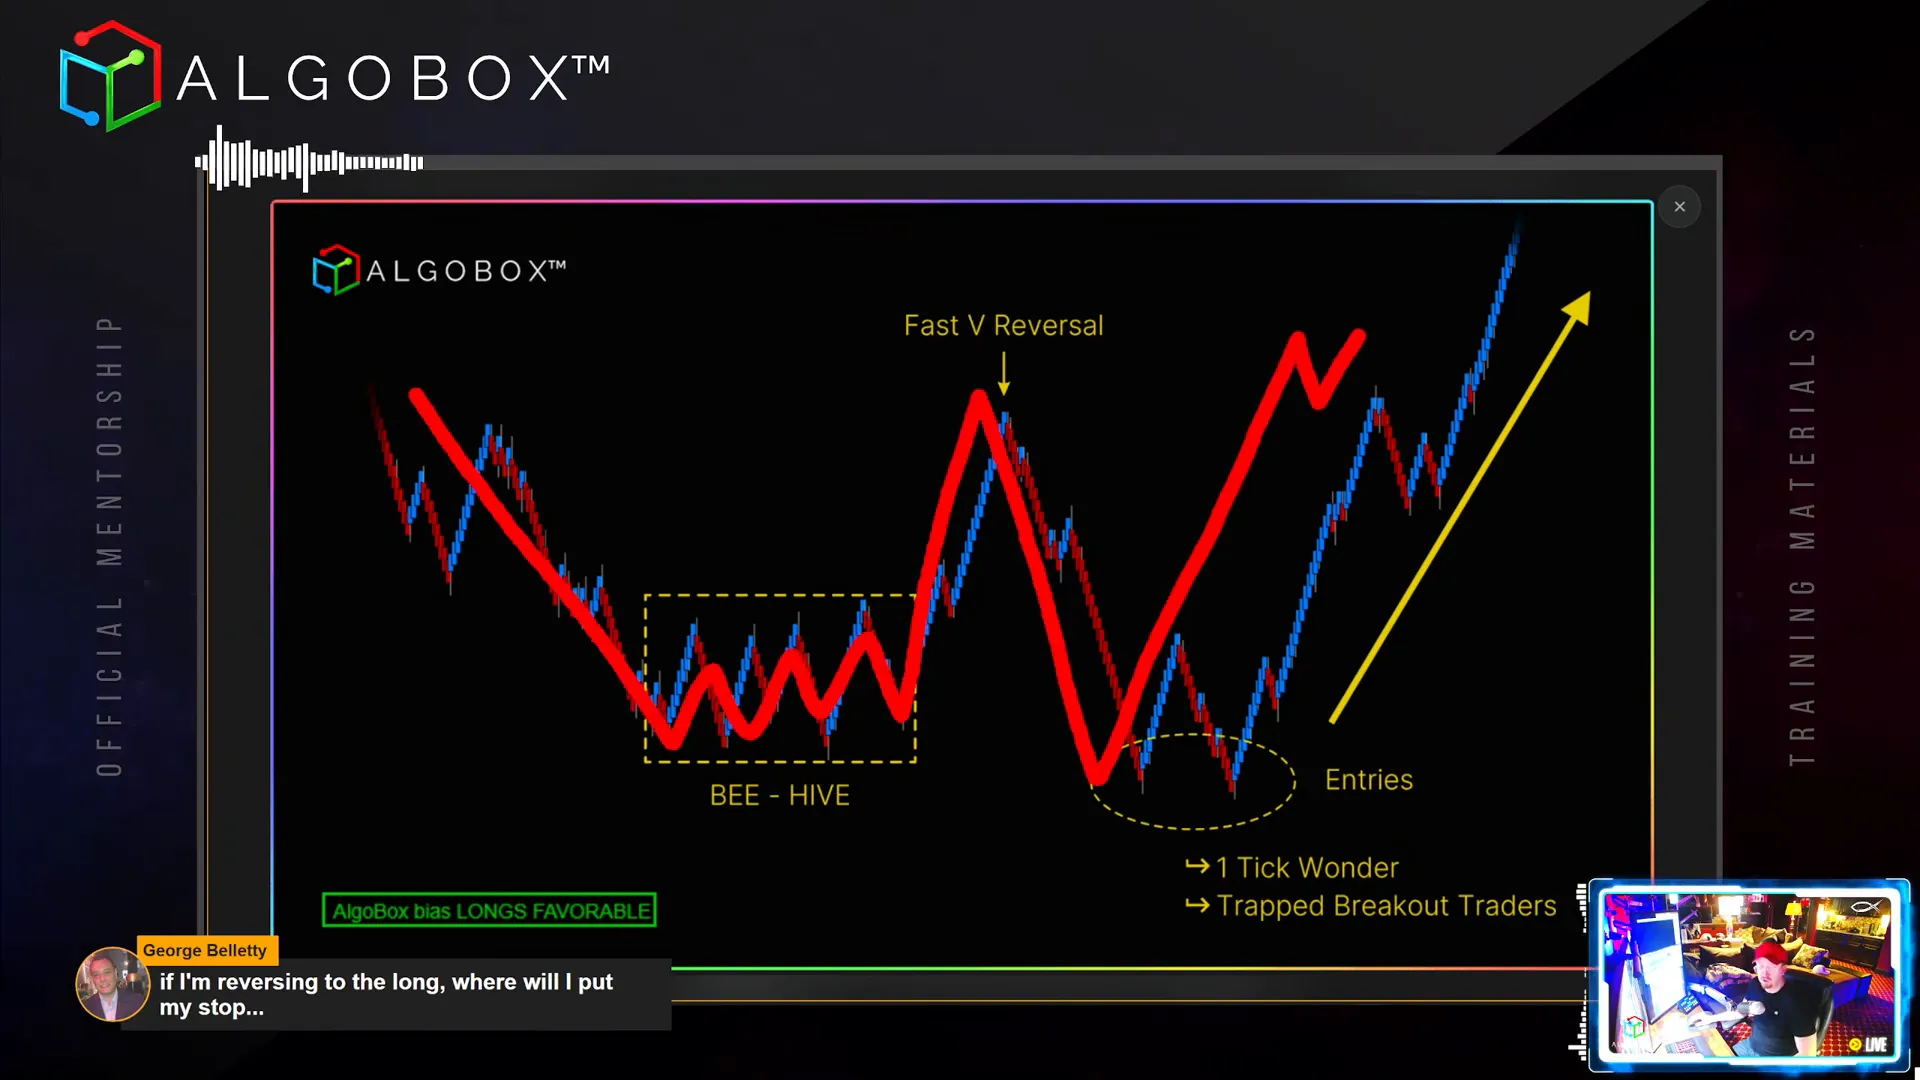
Step 7: The Ritchie Pattern – A Price Structure Trap for Explosive Moves
The Ritchie is a price structure trap pattern often involving a beehive formation, where confusion traps both buyers and sellers, setting the stage for a strong reversal. Key characteristics include:
- A big movement into the beehive zone.
- Gyration or sideways price action causing confusion (the Medusa effect).
- A fast V reversal with an upswing attracting new buyers and a swift down leg attracting sellers.
- Exit of short sellers near break even, adding to buying pressure.
Patience is essential; traders should stalk the pattern, waiting for confirmation aligned with higher timeframe bias, preferably when AlgoBox bias favors longs.
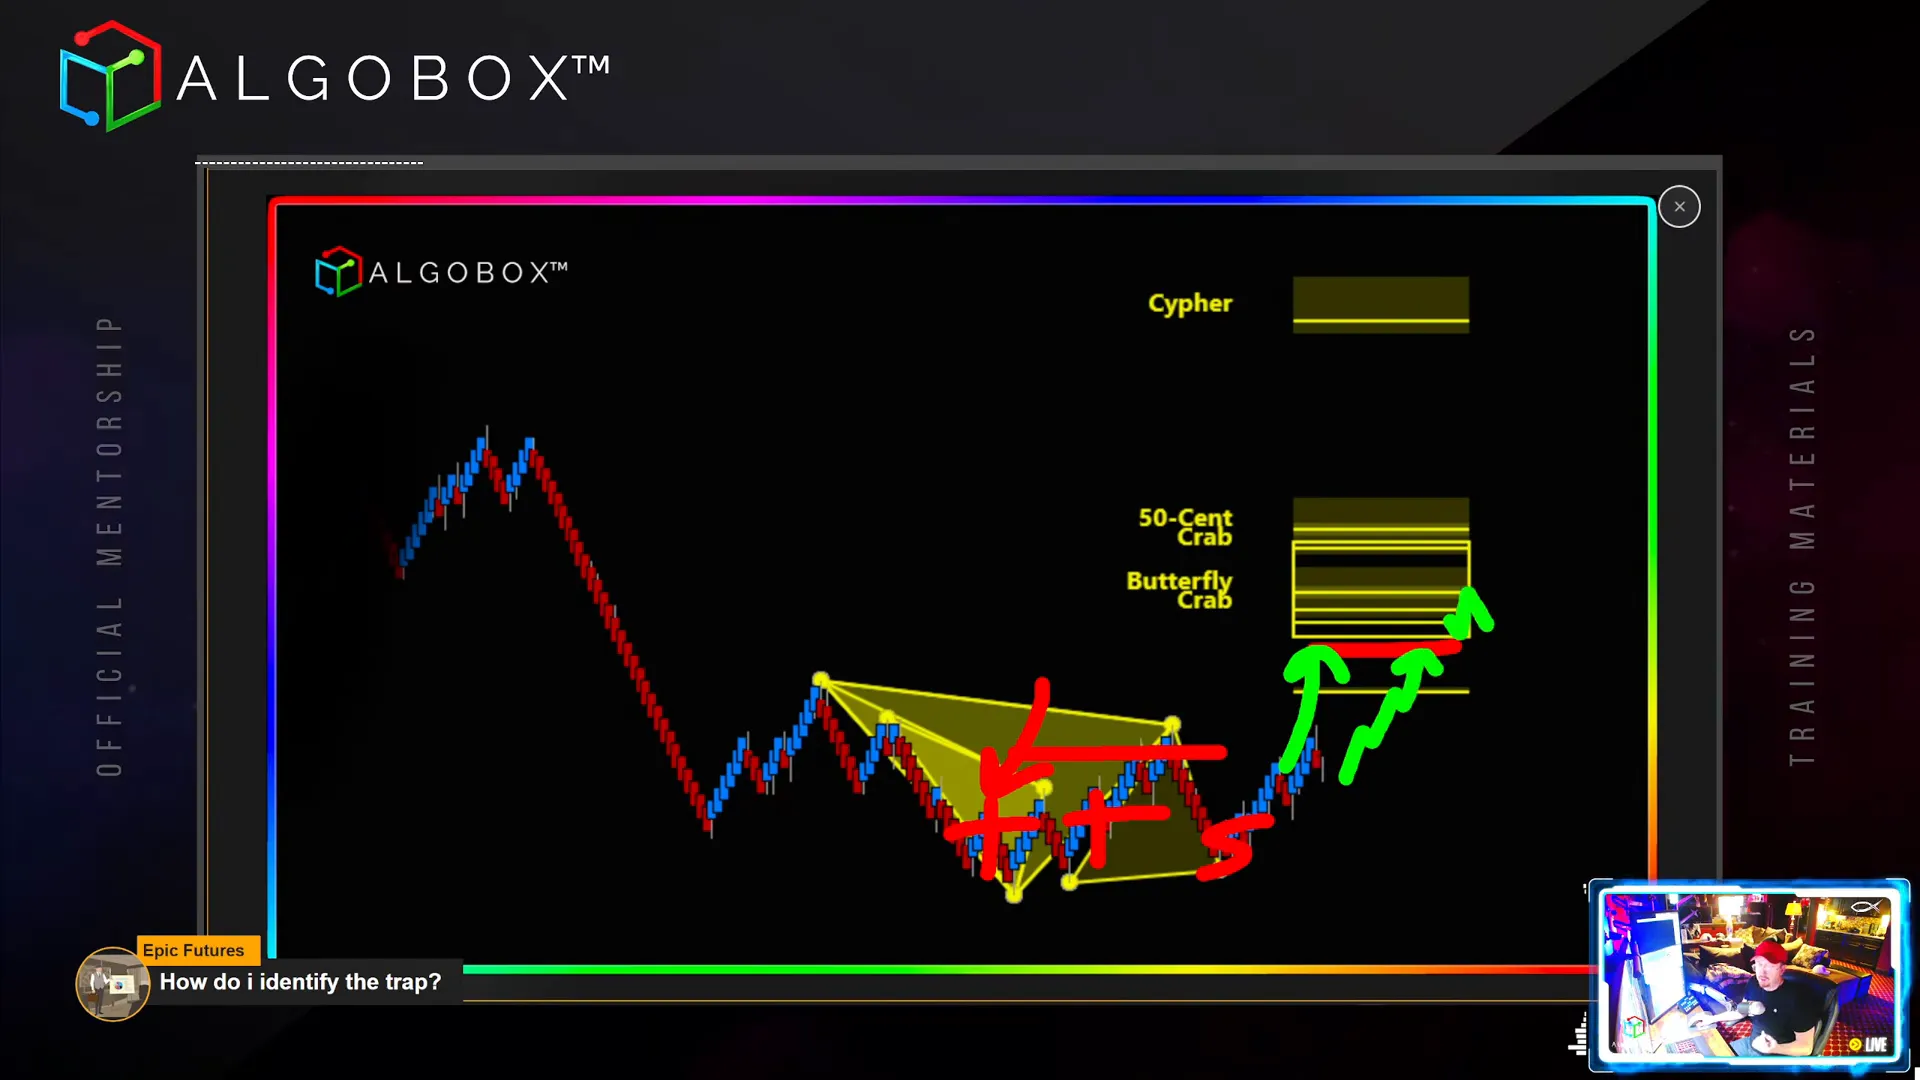
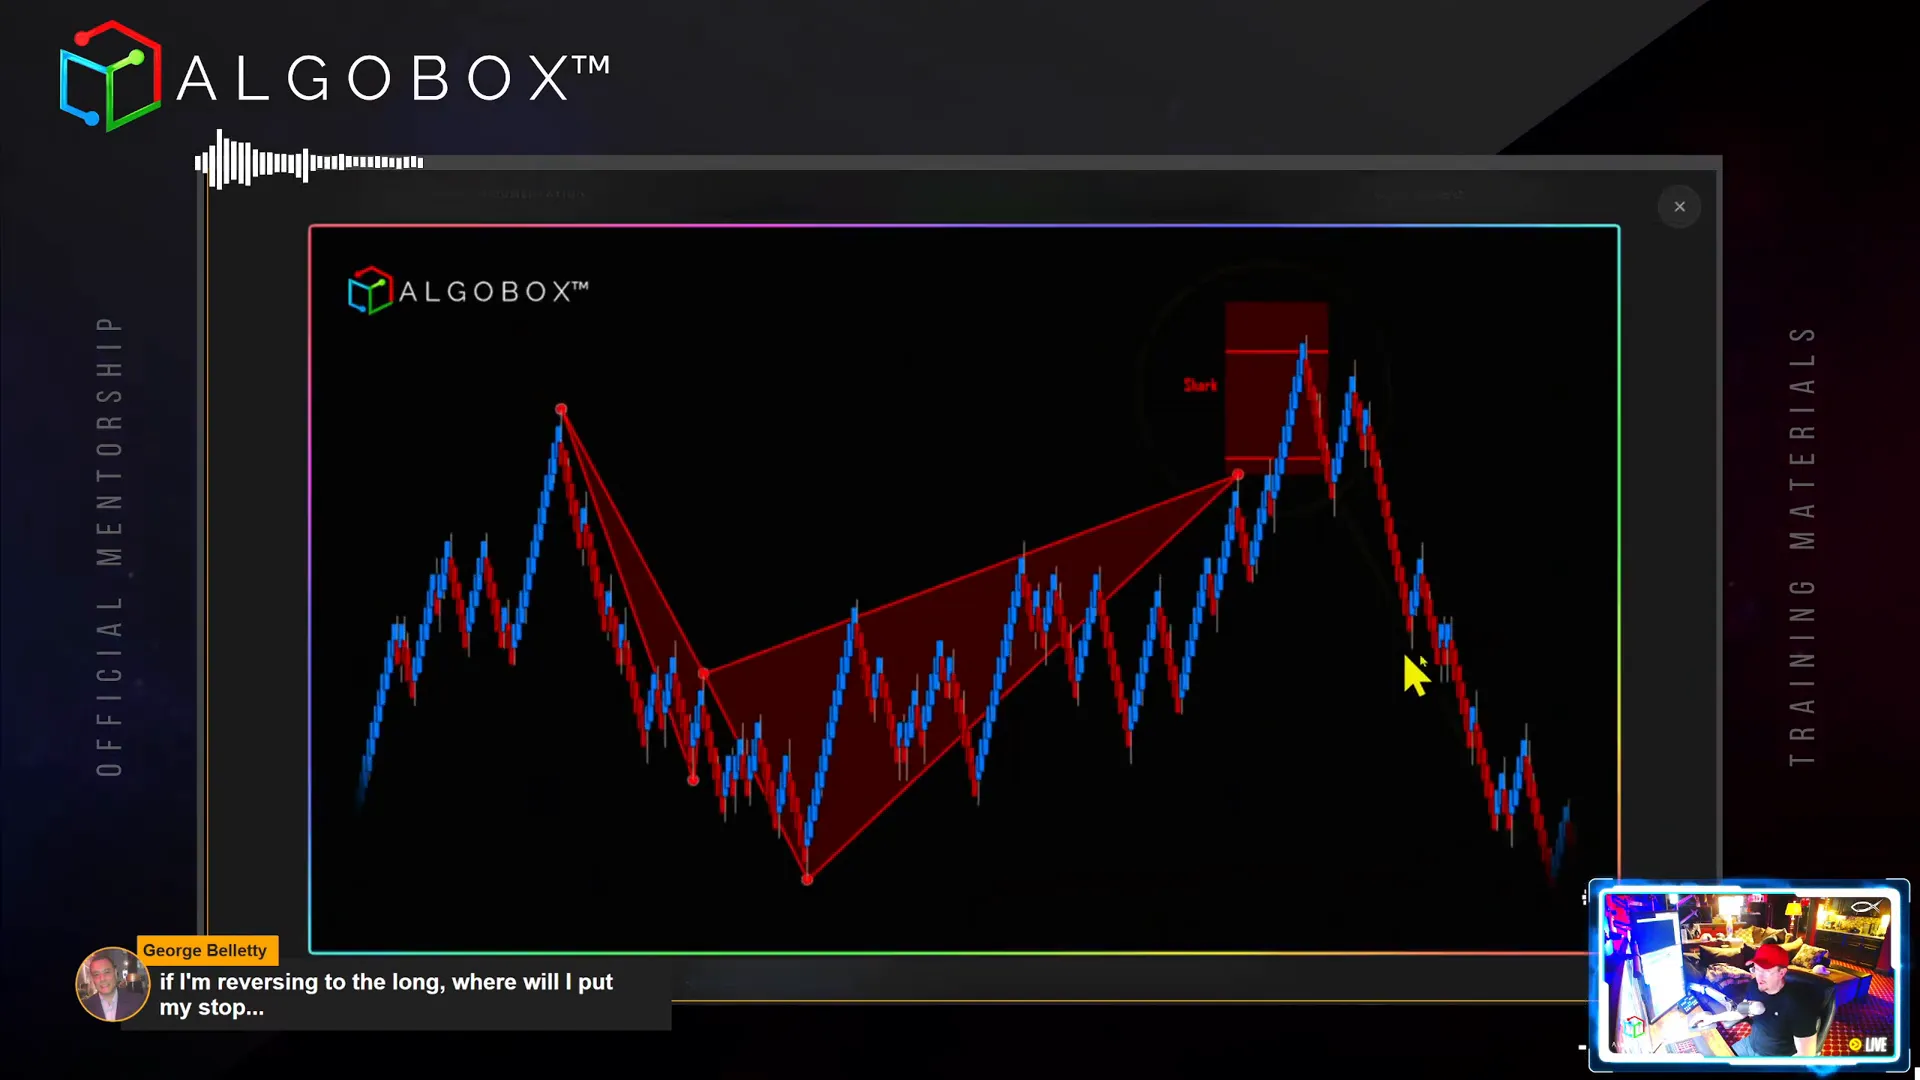
Step 8: Shark Back and Shark Tail – High-Probability Harmonic Trades
The Shark harmonic pattern is one of the most powerful setups. The Shark Back refers to entering at the back line of the shark pattern, with the first target at the front of the shark. This setup often yields quick scalp opportunities with tight stops.
The Shark Tail occurs at the tail end of the shark pattern, typically involving an RTOFA event such as a Flowmaster cross or dot. It acts as a secondary entry or re-entry point after a failed Shark Back trade.
Important tips:
- Stops should be placed behind the dots, boxes, or crosses relevant to the pattern.
- Recency is key: the most recent signal (dot or cross) dictates trade direction.
- Use the NERD and Arrow for confirming trade bias and holding runners.
Step 9: Embracing the Trade Nothing Alone Philosophy
One of the core principles is “Trade Nothing Alone.” This means combining multiple confluence points such as harmonic structures, real-time order flow events, and higher timeframe signals to increase trading edge and confidence.
Vinny demonstrates confluence examples involving:
- Order of Operations stacking.
- Headshot plus Enigma combinations.
- Masher and Delta flagging on ripple charts.
- Cluster reversals at King Timing.
- Double dot strategies following contextual signals.
- J Hook combined with Headshots for higher probability entries.
Adhering to this philosophy helps avoid chasing weak setups and improves risk-reward ratios.
Step 10: Perfect Plays – Waiting for the Sweet Spot
Patience pays off in trading. Vinny advocates waiting for “perfect plays” — setups with maximum confluence and ideal market conditions. Examples include:
- Super PRZ Crosses on higher timeframes yielding 40+ tick moves.
- Super Bat patterns at channel bottoms for clean reversals.
- Super Enigma plays combined with Shark patterns for powerful moves.
- Split Cross Reversals (SCR) with small risk and large potential moves.
- Triple crosses or Three Wise Men setups offering pinpoint entries.
Vinny also discusses managing risk with two-try rules, stop placement, and target scaling (T1, T2, runners), emphasizing the importance of discipline over frequency.
Step 11: Leveraging News Events and Market Context
News can act as a catalyst for technical moves but should be viewed as an excuse rather than a cause. Vinny uses a news indicator GUI to visualize news events on the chart, overlaying vertical text to mark impact times.
Typical patterns around news events include:
- Double Cross Double Move (DCDM) pivots coinciding with news releases.
- Quick reversals or accelerations using news as an excuse for technical continuation.
- Planning entries around news-induced volatility with low timeframe risk and high timeframe opportunity.
He highlights a substantial 123 tick move after a news event on Nasdaq, demonstrating the synergy of technical and fundamental timing.
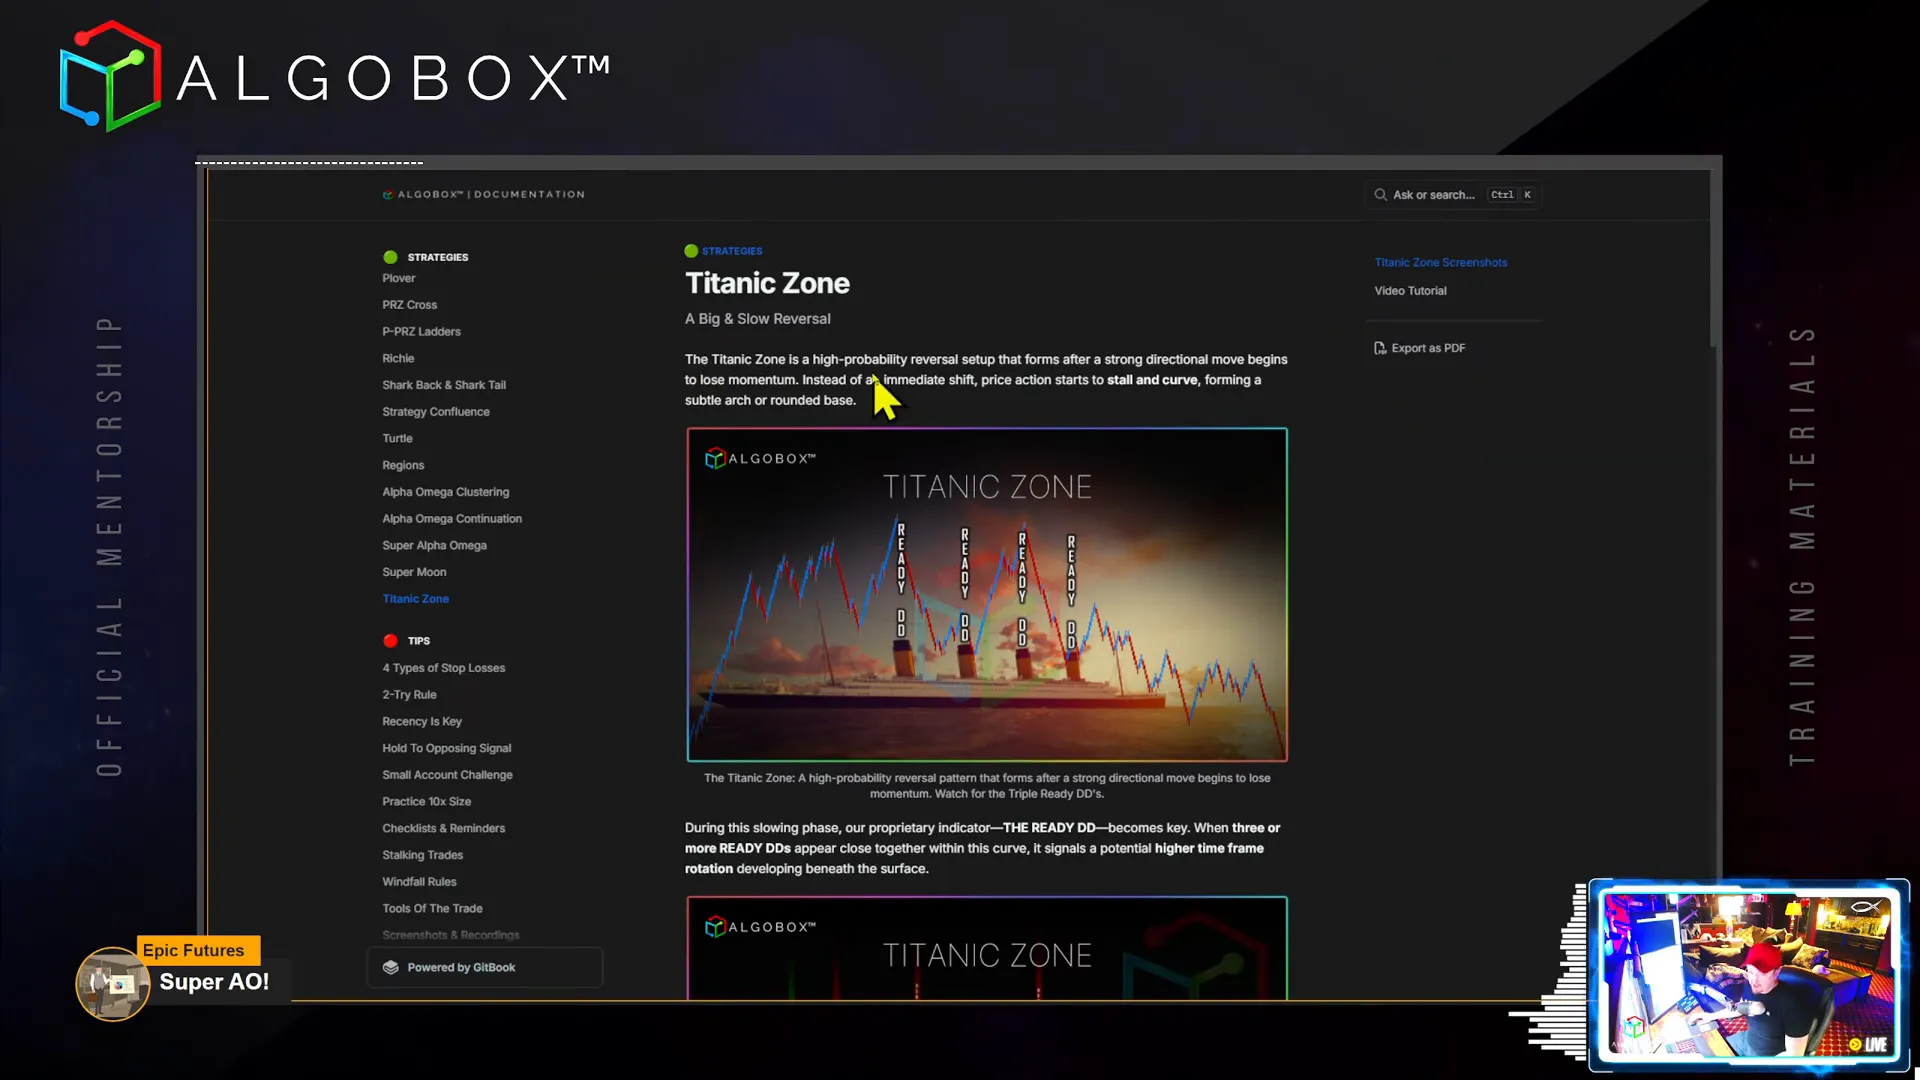
Step 12: The Titanic Zone – A High Probability Reversal Setup
The Titanic Zone is a relatively recent discovery in Vinny’s system, representing a slow, deliberate reversal after a strong directional move loses momentum. Characteristics include:
- Multiple ReadyDDs of the same color clustered closely, signaling a potential higher timeframe rotation.
- A subtle, rounded base or arc in price action rather than a sharp reversal.
- Patience to wait for confirmation, often a trap, before entering.
Vinny likens the Titanic Zone to a massive ship slowly changing course, emphasizing the importance of timing and confluence for entries.
With ReadyDD clustering and supporting harmonic patterns, traders can plan for large moves, sometimes over 100 ticks, by targeting the bottom or top of the Titanic Zone.
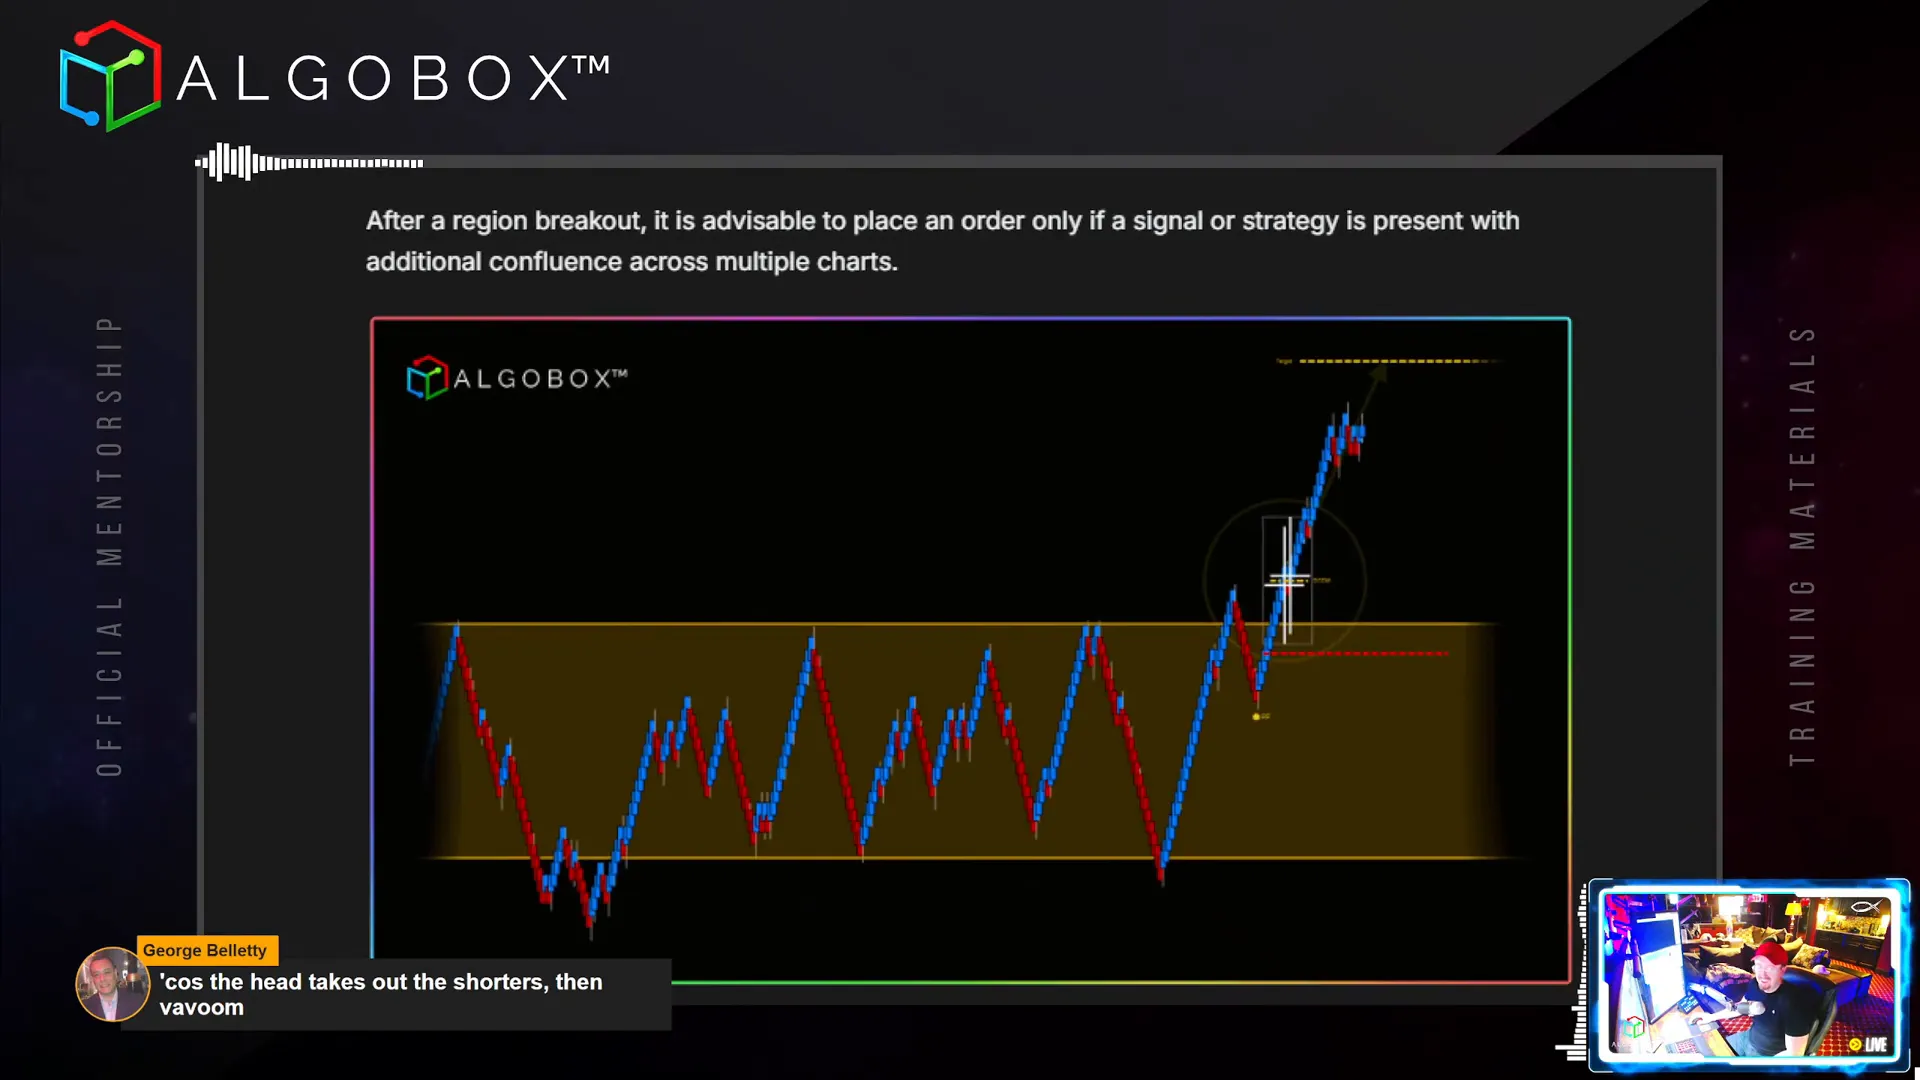
Step 13: Drawing Regions and Using Region Breakouts
Regions highlight price accumulation zones visually, helping traders identify potential breakout areas. Vinny recommends:
- Using hotkeys for quick region drawing to incorporate into daily routines.
- Waiting for region breakouts to confirm strong directional moves.
- Using DCRs (Double Cross Reversals) within regions for additional trade setups.
- Not taking entries solely on a breakout, but waiting for confluence with indicators like Enigma, DCDM, or PRZ crosses.
Region breakouts combined with traps and harmonic patterns can provide high-probability trade entries.
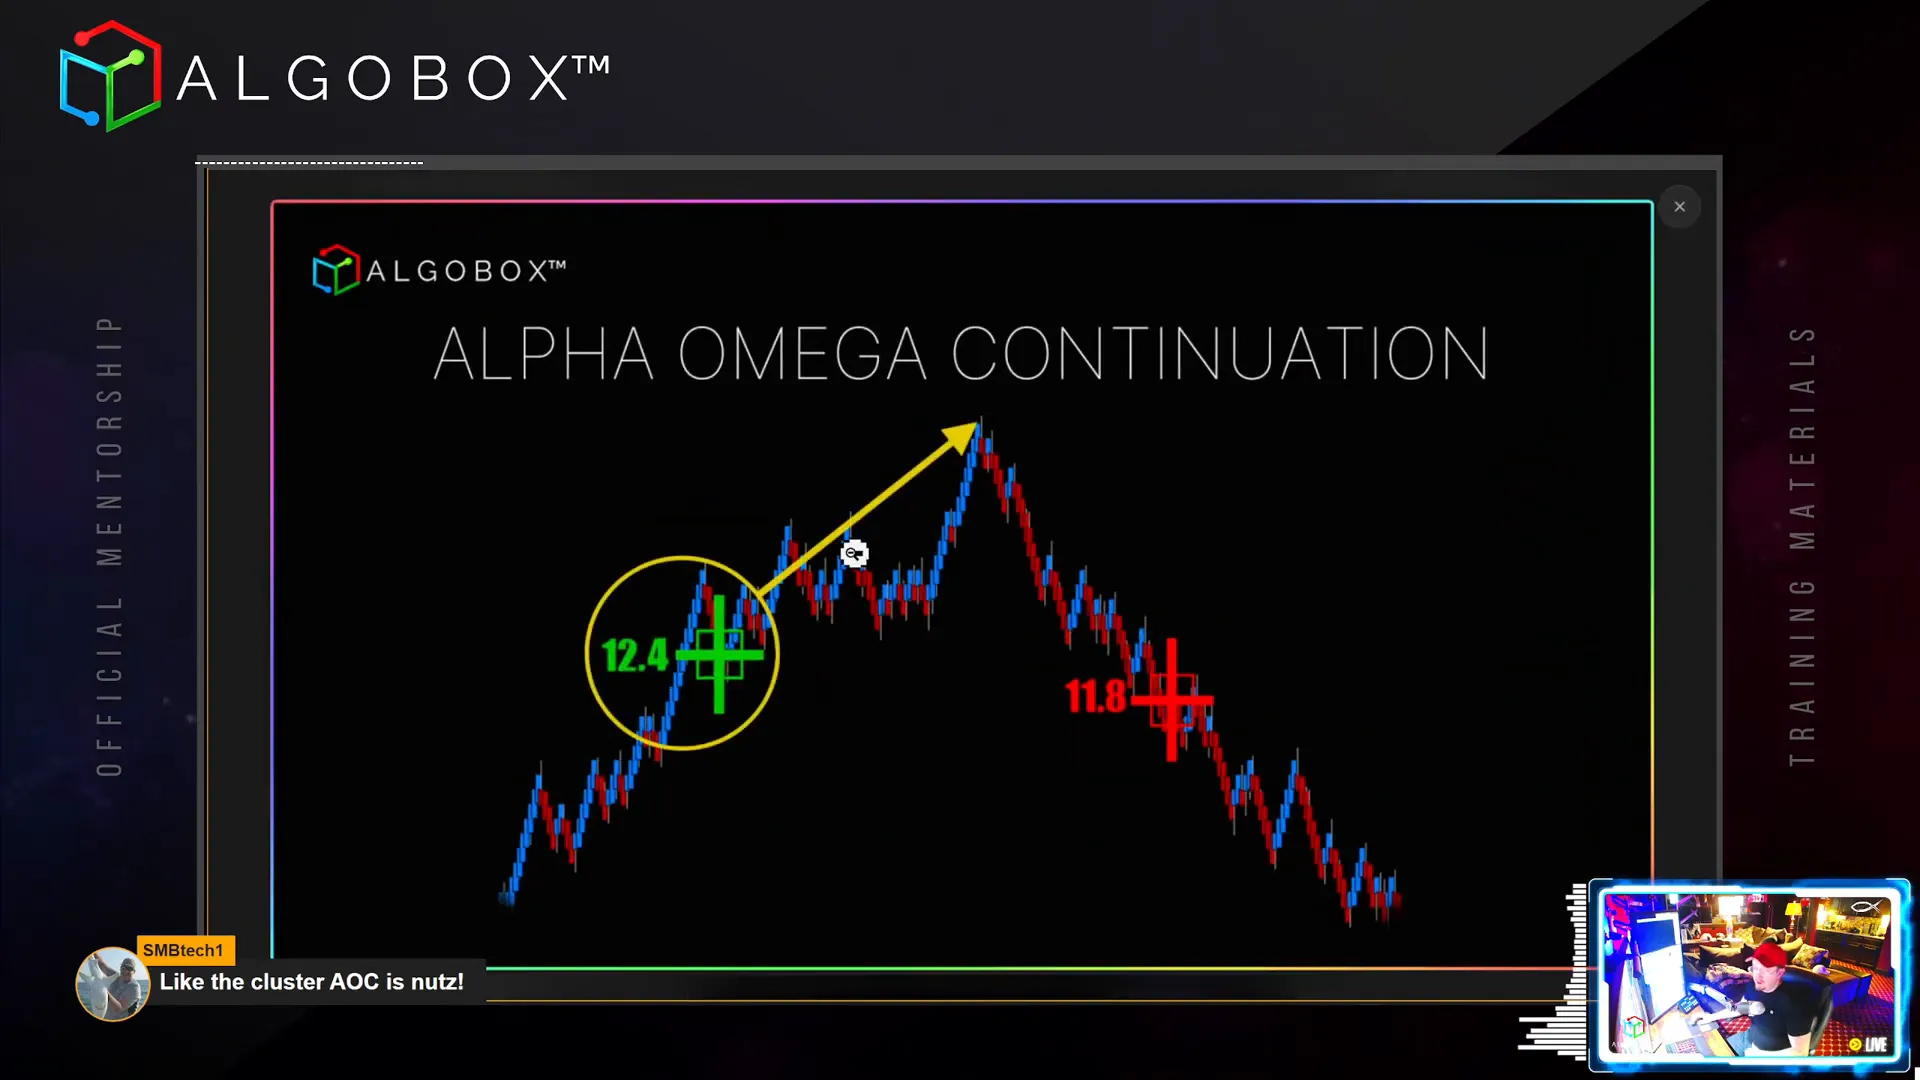
Step 14: Alpha Omega Clustering and Continuations
Alpha Omega Clustering (AOC) occurs when numerous Alpha Omega signals cluster on the chart, often indicating a strong trending day. Key insights include:
- AOC signals a potential for extended moves in one direction, requiring traders to stay onside or sit out.
- New alerts in the AlgoBox system help identify AOC events to avoid getting caught offside.
- Alpha Omega Continuations happen when a full master Alpha or Omega appears after a significant move, suggesting trend continuation.
- Lower power numbers (10 or 11) indicate higher chances of continuation, while higher numbers suggest reversals.
Vinny advises measuring double moves from pivots for targeting and emphasizes order of operations in trade entries.
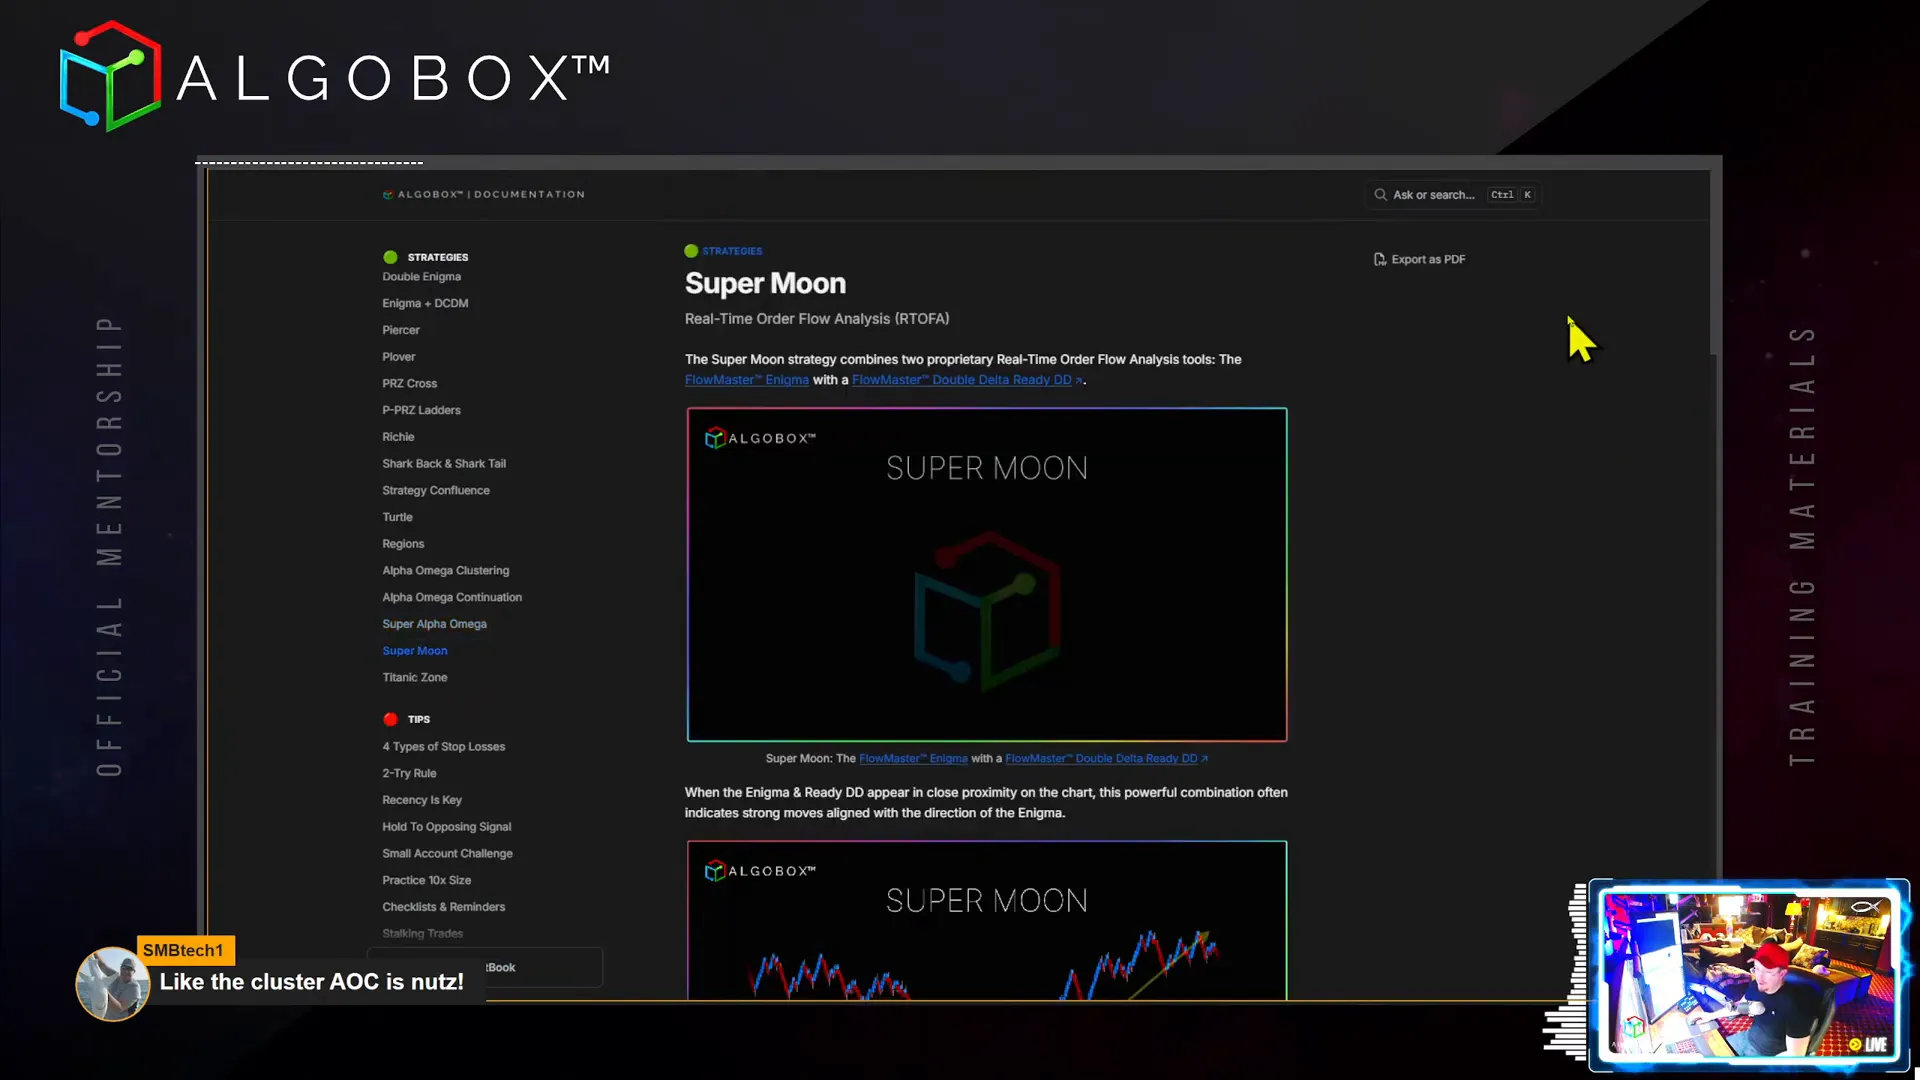
Step 15: Super Alpha Omega and Super Moon Strategies
These advanced strategies combine multiple powerful signals for maximum edge:
- Super Alpha Omega (Super AO): A Flowmaster Alpha Omega signal appearing close to a double delta ReadyDD, creating a combo breaker setup.
- Super Moon: Combines the Flowmaster Enigma with a ReadyDD, signifying strong momentum aligned with the Enigma’s direction.
Both strategies are integrated into the Dream Panel with customizable settings and filters to optimize trade selection and execution.
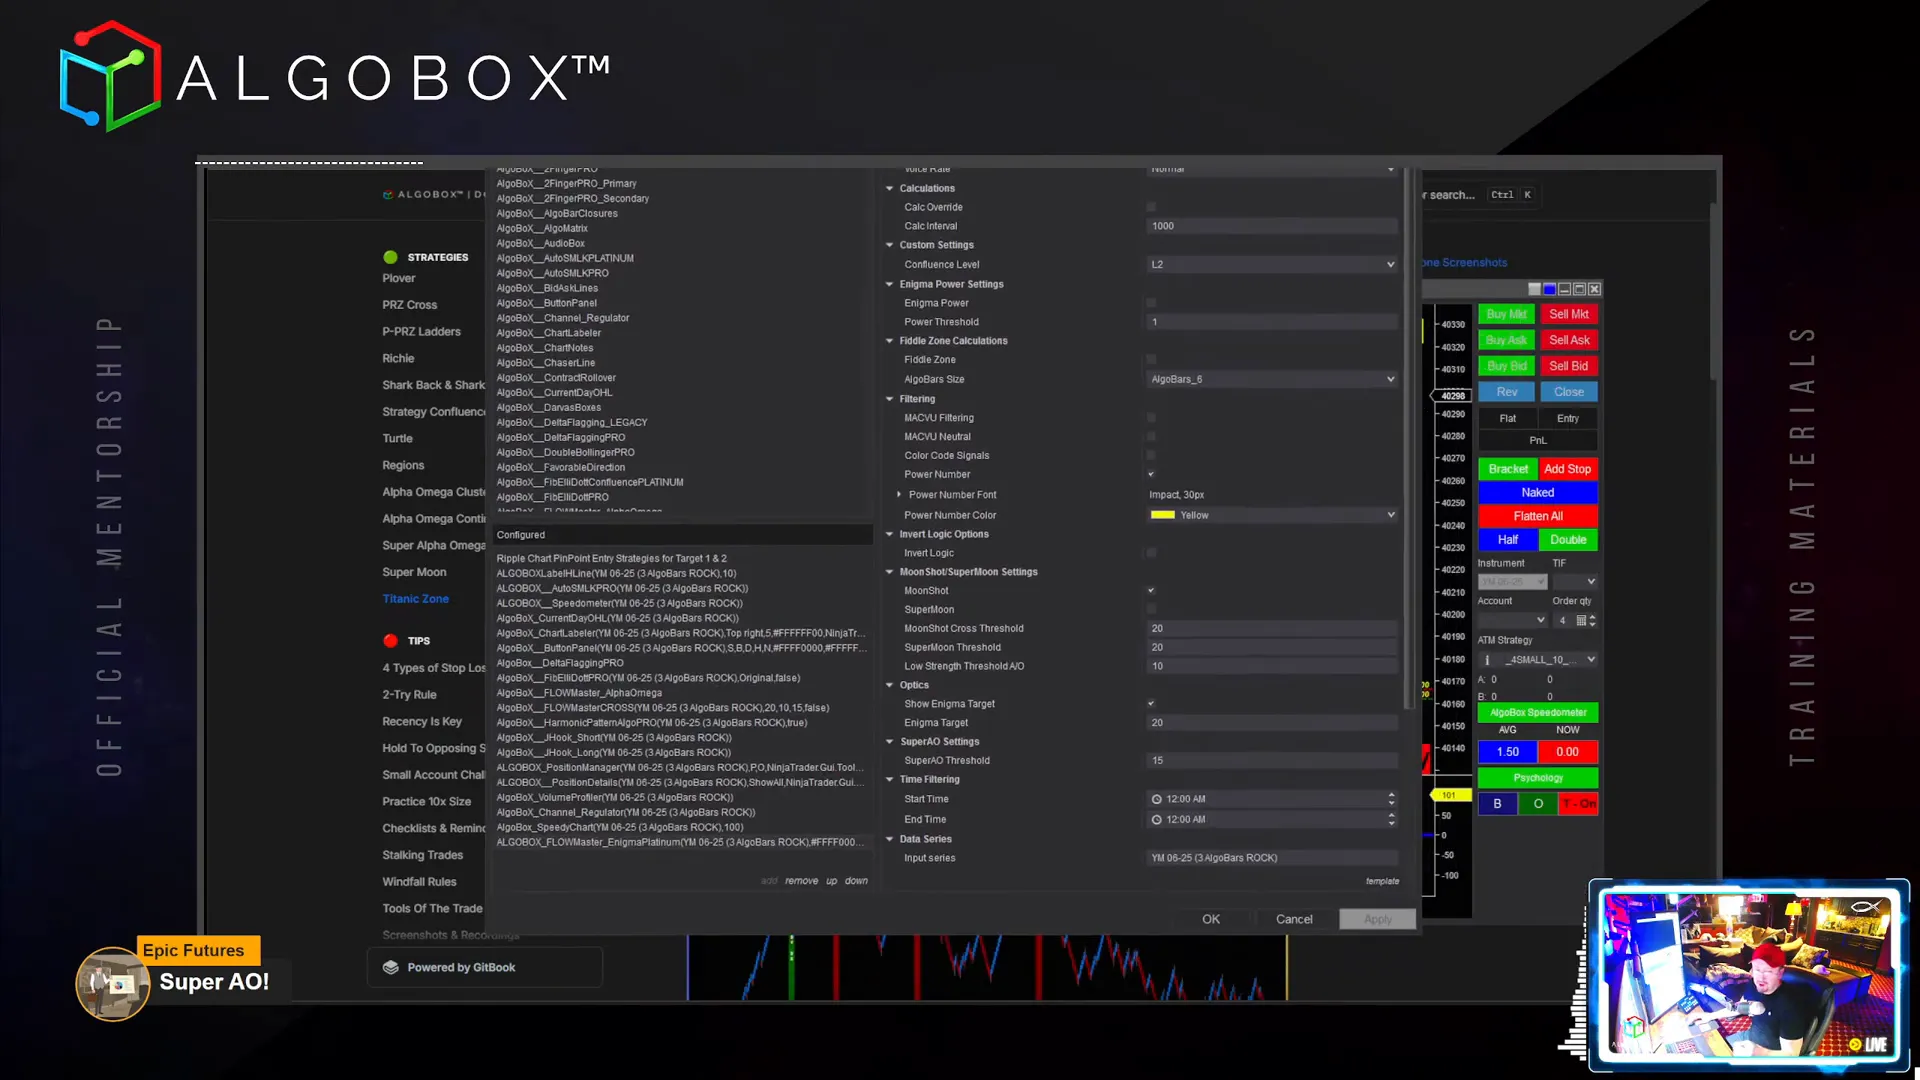
Step 16: Using the Dream Panel – Automation and Time Filters
The Dream Panel (also known as the Flowmaster Enigma Platinum) is a comprehensive tool that automates trade identification and execution. Key features include:
- Time filtering to restrict trades to optimal market hours, typically between 9:15 AM and 10:45 AM, covering the bell curve of activity.
- Options for full auto or semi-auto trading modes, allowing flexibility in trade management.
- Customizable parameters for Super AO thresholds, Enigma power levels, and fiddle zone filters to control risk and signal quality.
- Stop and target management, with flatten all buttons to close all positions in an account efficiently.
Vinny cautions traders to monitor bots actively, comparing them to employees handling cash registers, emphasizing responsible oversight despite automation.
Conclusion: Mastering Algorithmic Futures Trading with Confluence and Discipline
Day 7 of the Algo Futures Trading Course underscores the power of combining harmonic patterns, real-time order flow analysis, and higher timeframe bias to create a robust trading edge. From the Piercer and Plover strategies to advanced setups like the Titanic Zone and Super Moon, each technique builds on the foundational principle of “Trade Nothing Alone.”
Success in algorithmic trading hinges on patience, discipline, and continuous learning. Waiting for perfect plays, respecting risk management rules, and embracing confluence will help you trade smarter and more confidently.
Remember, the journey is ongoing, and mastering these tactics can significantly shorten your learning curve. Stay curious, practice with market replay, and leverage tools like the Dream Panel to automate and refine your strategy.
Happy trading!