
Welcome to an in-depth guide on algorithmic futures trading using NinjaTrader, brought to you by Vinny Emini. This comprehensive tutorial covers advanced trading strategies and proprietary patterns designed to help traders identify high-probability setups, manage risk effectively, and optimise their entries and exits. Whether you’re a beginner or looking to refine your skills, this step-by-step tutorial will equip you with actionable insights and techniques used by professional traders.
Table of Contents
- Step 1: Master the One Tick Wonder Pattern
- Step 2: Understand and Trade the Two Finger Salute (Two FS) Strategy
- Step 3: Recognise the Three Wise Men Setup
- Step 4: Master the Four Legged Dog Trap
- Step 5: Utilize the Power of SuperBands
- Step 6: Identify Cluster Reversals Using Flowmaster Crosses
- Step 7: Execute the Double Cross Double Move (DCDM) Strategy
- Step 8: Apply the Double Cross Reversal (DCR) with Accumulation Zones
- Step 9: Harness the Delta King Strategy with King Timing Lines
- Step 10: Explore the Diamond Dot and Harmonodot Patterns
- Step 11: Master the Headshot Setup for Precision Entries
- Step 12: Use Double Deltas and Titanic Zones for Institutional Insight
- Step 13: Revisit the Classic Double Dot Strategy
- Conclusion: Integrating Strategies and Embracing Discipline
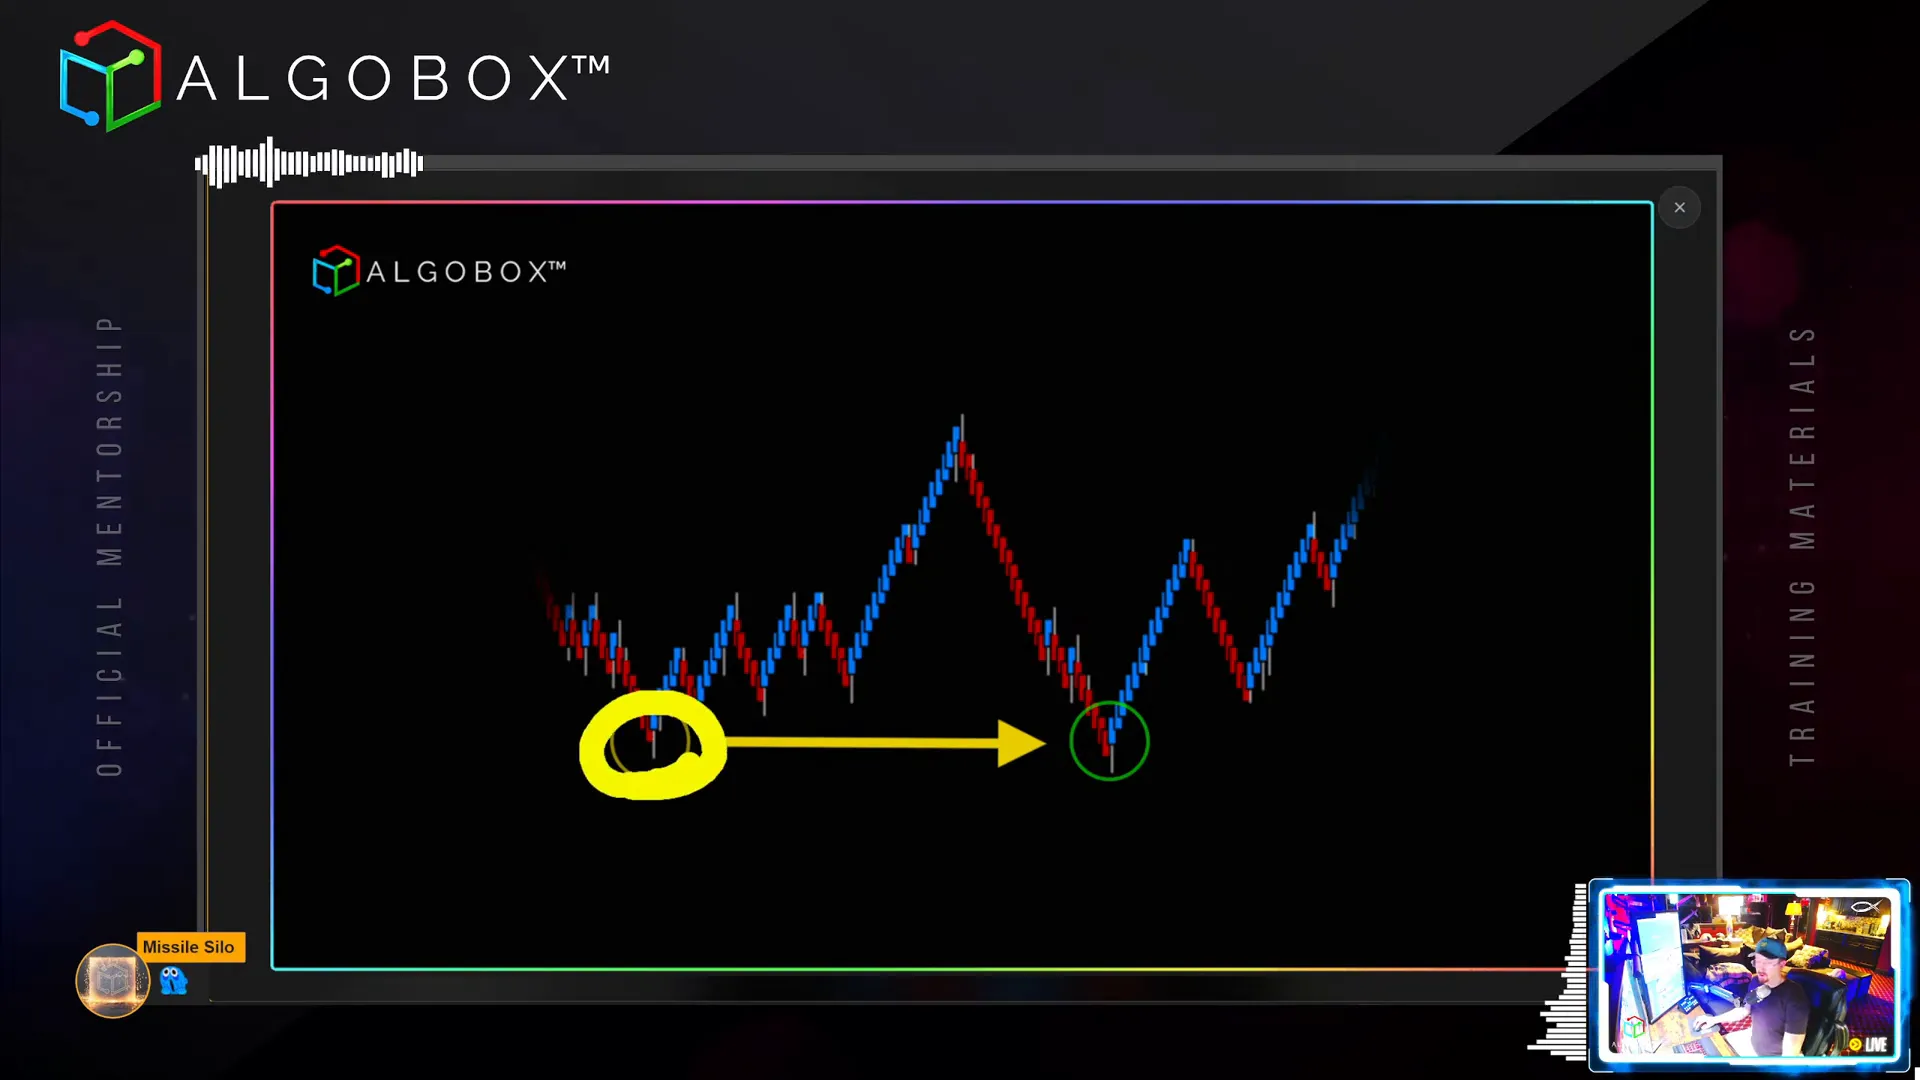
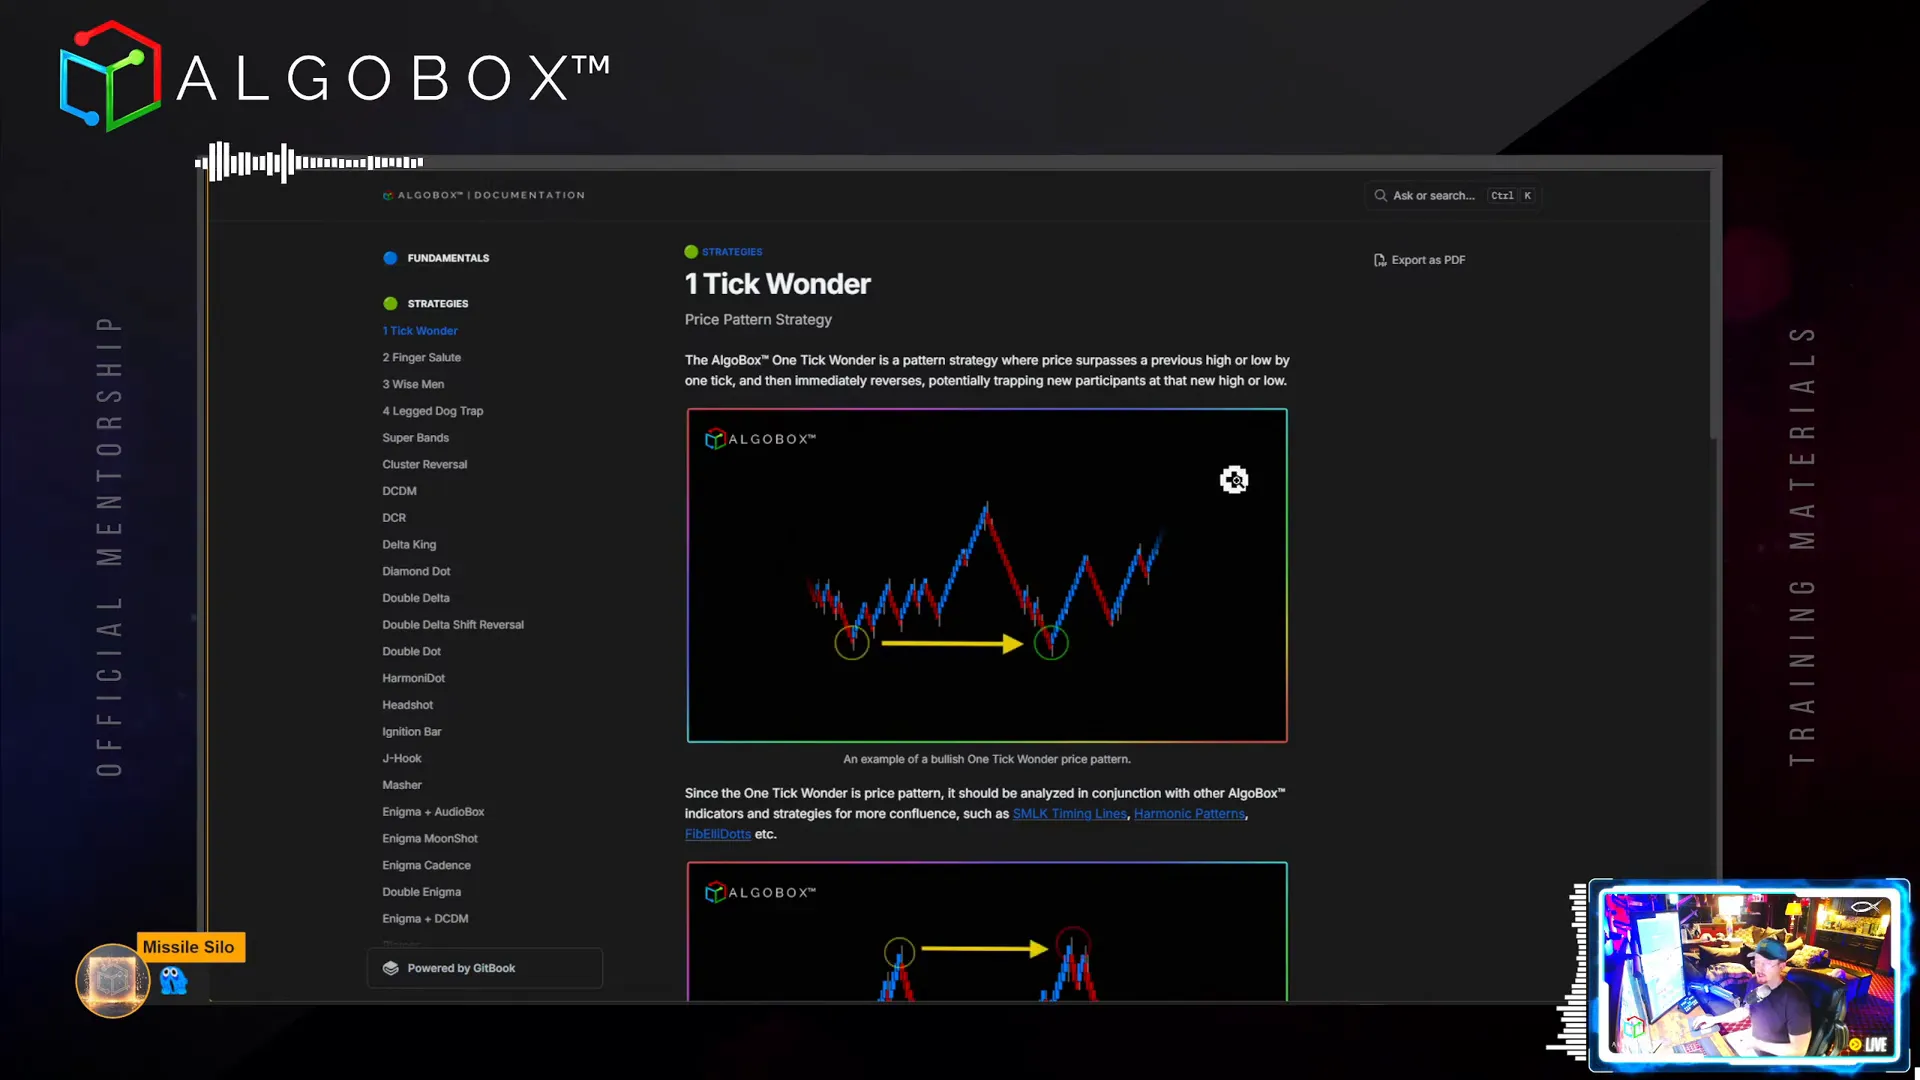
Step 1: Master the One Tick Wonder Pattern
The One Tick Wonder is a deceptively simple yet powerful pattern strategy that can be identified even without AlgoBox, though the tool makes it easier to spot. This pattern occurs when the price surpasses a previous higher low or lower high by just one or a few ticks and then quickly reverses. This move often traps new participants who enter at what they believe to be a breakout point.
Here’s how to recognise and trade the One Tick Wonder:
- Look for a pivot point on the chart where price moved up or down.
- Observe when the price breaks a previous higher low or lower high by just one tick, sometimes two or three.
- Watch for an immediate reversal after this break, which traps traders who jumped in expecting a continuation.
- Pay attention to the speed of the move: “If it’s fast, it’s not going to last.” Fast moves often indicate fake-outs, while slow, stair-step-like moves suggest a genuine trend.
- Look for a Flowmaster cross (often a white cross) near the break, signalling where retail traders step in.
- Use the “Doctor Seuss” entry technique: this is when a red bar is immediately followed by a blue bar, signalling a potential reversal entry point.
- Place a very tight stop loss just below the reversal bar to keep risk minimal.
This pattern often marks the beginning of a slow, steady upward or downward grind, especially if it resembles a staircase. Slower moves tend to favour bulls, while fast moves favour bears, as traders exit quickly.
Remember, the One Tick Wonder is best analysed alongside other AlgoBox indicators for confirmation. The key is to spot the trap and enter with precision while keeping risk tight.
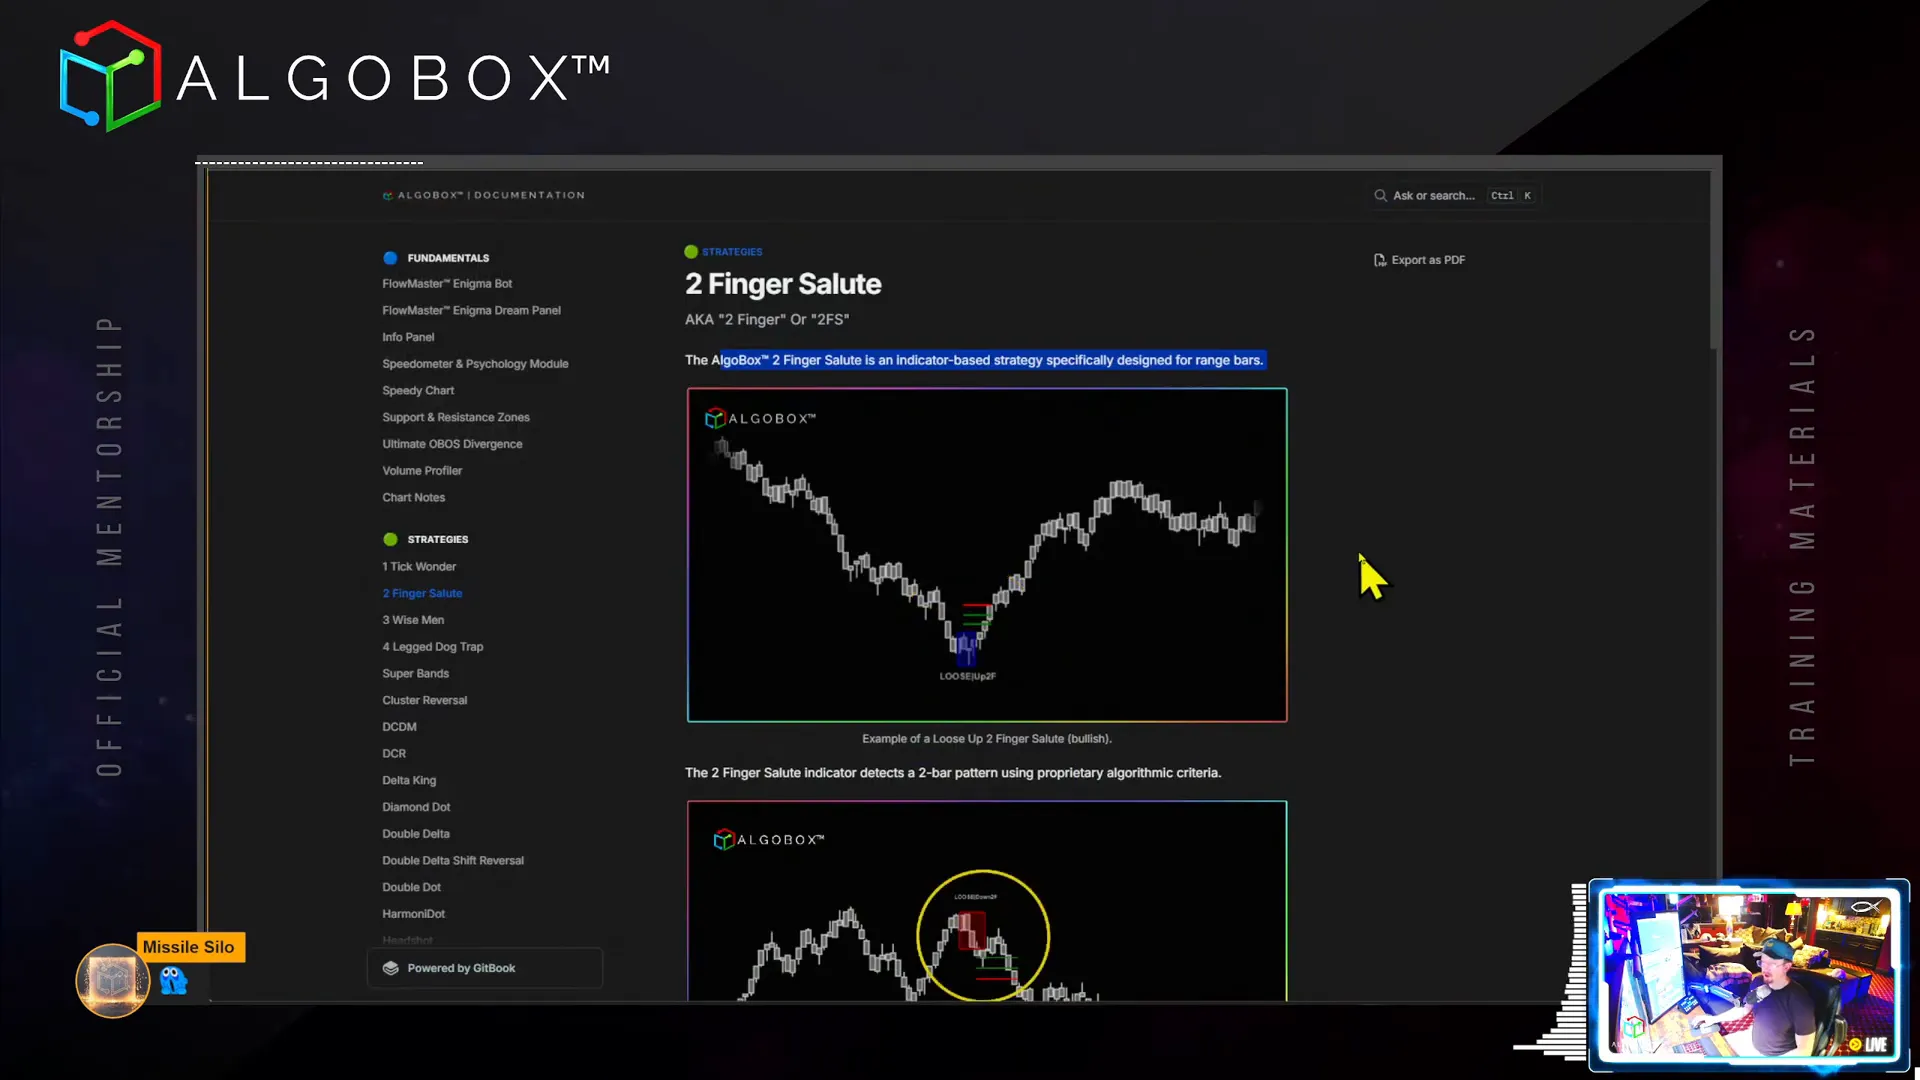
Step 2: Understand and Trade the Two Finger Salute (Two FS) Strategy
The Two Finger Salute, or Two FS, is an indicator-based strategy specifically designed for range bars, typically applied on the Wave or Tide charts within the AlgoBox suite. This strategy is not applicable to the standard Algo bars or the three-chart layout; it requires the full five-chart layout for optimal use.
Key characteristics of the Two Finger Salute:
- It involves spotting two hammer bars following what is called an “arm” — a preceding price move that sets up the pattern.
- The pattern should not occur inside a “flag” formation — a sideways consolidation resembling a flag on a pole — because the flag can distort the signal.
- The Two FS is colour-coded to indicate the expected direction and strength: blue represents a more powerful bullish signal, green is moderate, and red or pink indicates bearish or moderate strength bearish signals.
- Stops are placed behind the “box” that AlgoBox draws around the two hammer bars, usually behind the tails of those bars.
- Targets are preset with multiple levels: a scalping target, midpoint target, target one, target two, and a runner target for extended gains.
Typically, the initial target is to capture 10 to 15 ticks, with the possibility of holding runners if the higher time frame signals remain favourable.
There are three power levels—loose, moderate, and super—each colour-coded for easy visual scanning. Always back-test these levels on your preferred instrument and time frame, as market dynamics can vary over time, especially around contract rollovers, options expirations, and quarterly cycles.
For advanced traders, opacity and colour customisation can be managed via NinjaTrader’s hex colour codes, allowing for better visual clarity on different chart backgrounds.
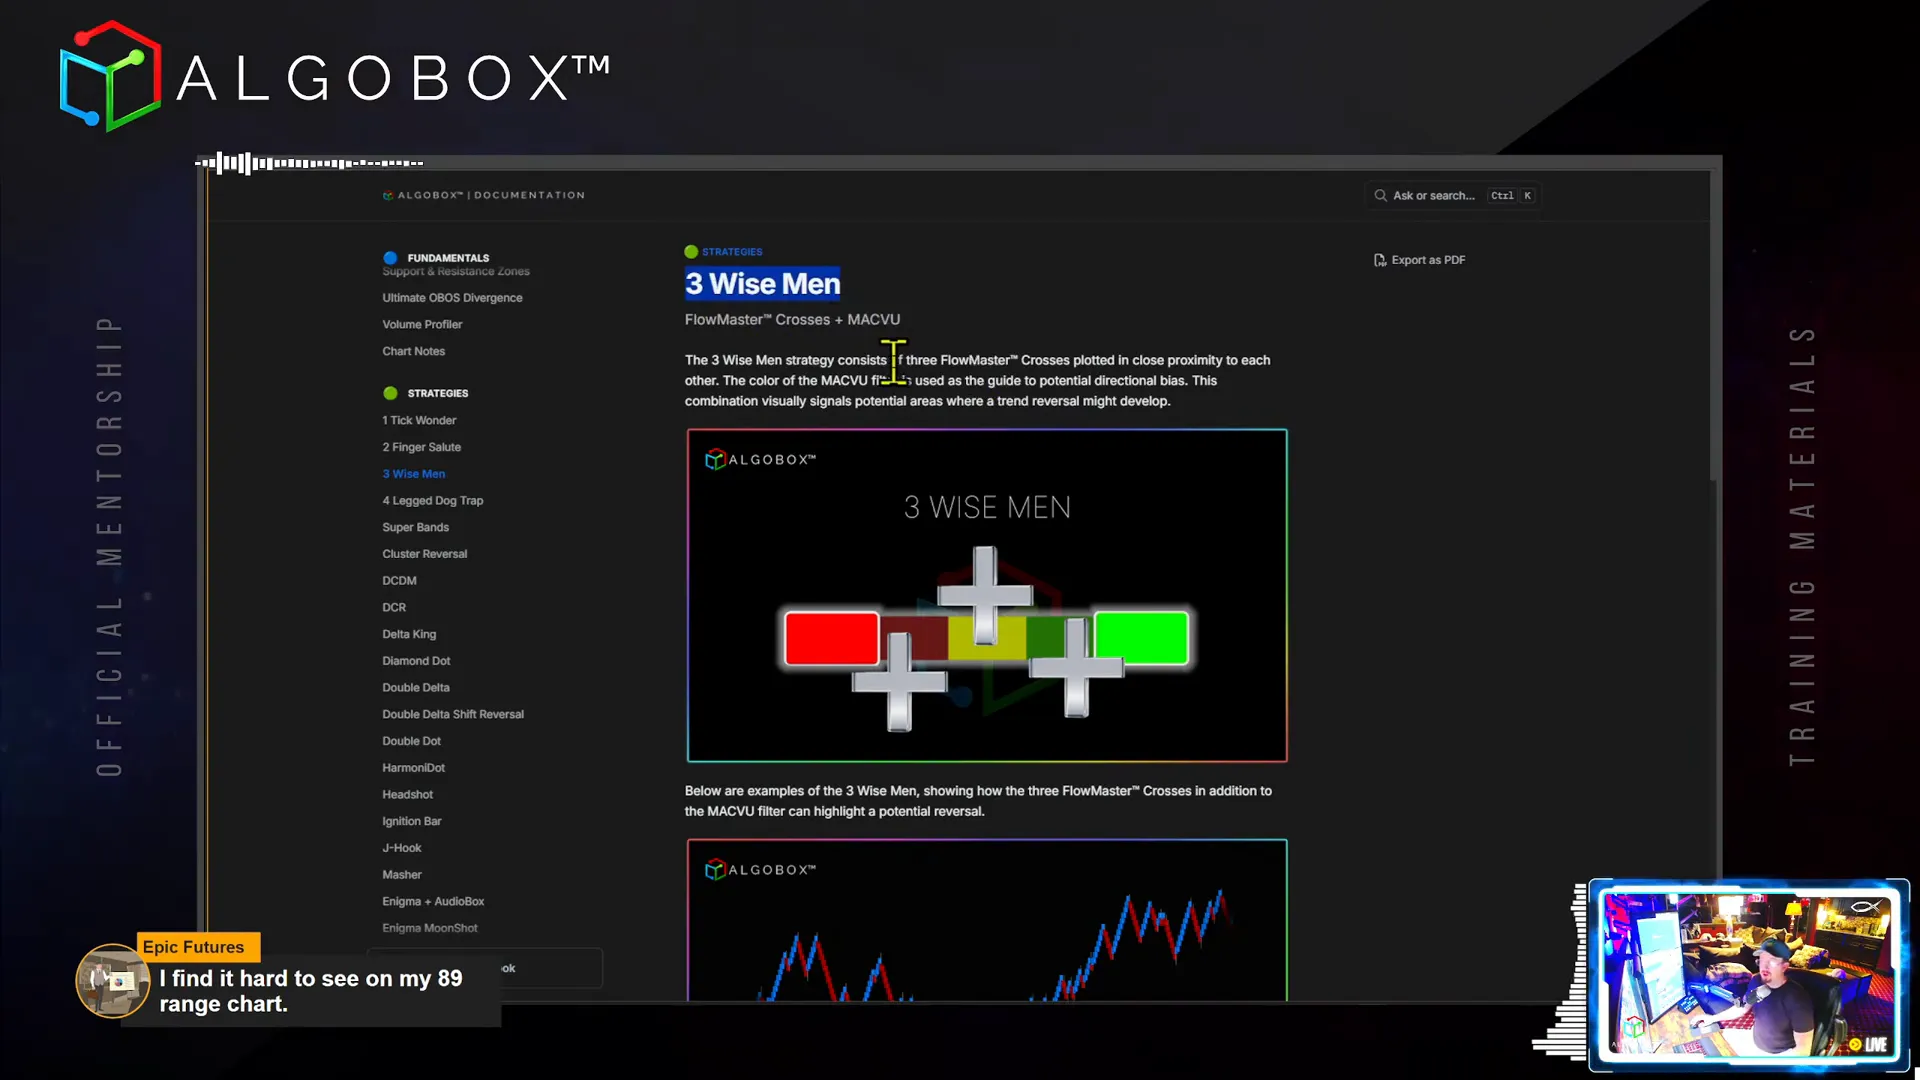
Step 3: Recognise the Three Wise Men Setup
The Three Wise Men strategy is a pattern involving three Flowmaster crosses appearing in close proximity, signalling potential trend reversals or continuations. The MACV Ultimate filter colour guides the directional bias.
Vinny’s perspective is that every move is essentially a reversal—from one pivot to the next—so even what looks like a continuation is a reversal in his view.
How to trade the Three Wise Men pattern:
- Identify three Flowmaster crosses clustered together on the chart.
- Confirm the colour of the MACV Ultimate filter to determine trade direction.
- Watch for speed: fast moves are usually short-lived traps.
- Beware of “Late Nate” entries—these are traders who enter late into a move, often near the third cross, and tend to get trapped.
- Place stops just above or below the last cross to minimise risk.
- Use Doctor Seuss entries on pullbacks for scaling in or adding to positions.
This setup often traps retail traders chasing momentum, leading to sharp reversals. Being patient and disciplined, especially using the “Doctor Seuss” approach, is key to success with this pattern.
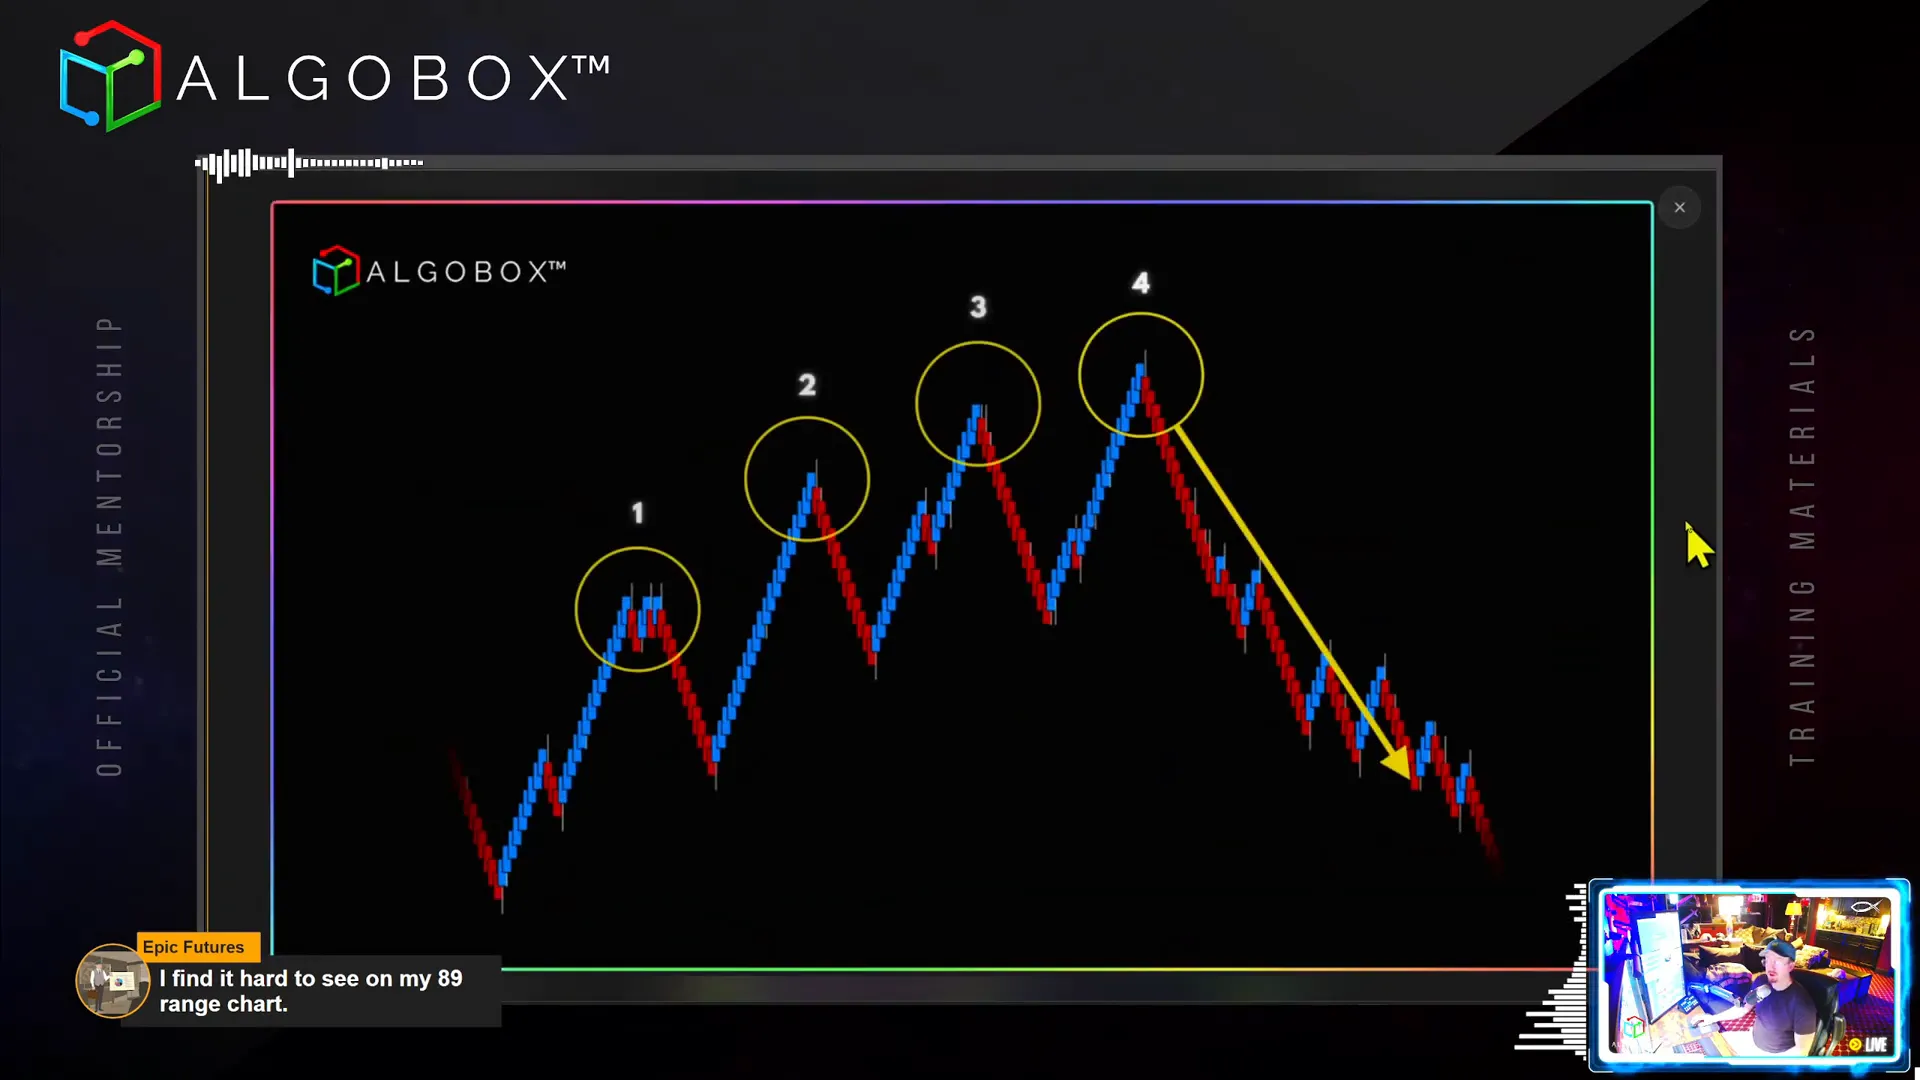
Step 4: Master the Four Legged Dog Trap
The Four Legged Dog Trap is a price pattern characterised by four distinct legs moving in one direction, followed by a reversal that traps traders who entered late.
Key points for trading the Four Legged Dog Trap:
- Count the four legs—these represent strong directional moves.
- Look for a “doggy head” formation on the pullback, which is the entry signal, typically a Doctor Seuss entry (red bar followed by blue bar).
- Place your stop loss just below the fourth leg.
- Target the price level where the four legs started as your first profit target.
- Hold the runner until you receive an opposing signal (e.g., a red cross if long, or a green cross if short).
The key mantra here is “Hold to the opposing signal.” This discipline enables you to capture larger moves without prematurely exiting.
Vinny emphasises that many traders get shaken out early due to panic, but patience and adherence to the opposing signal can lead to significant profits.
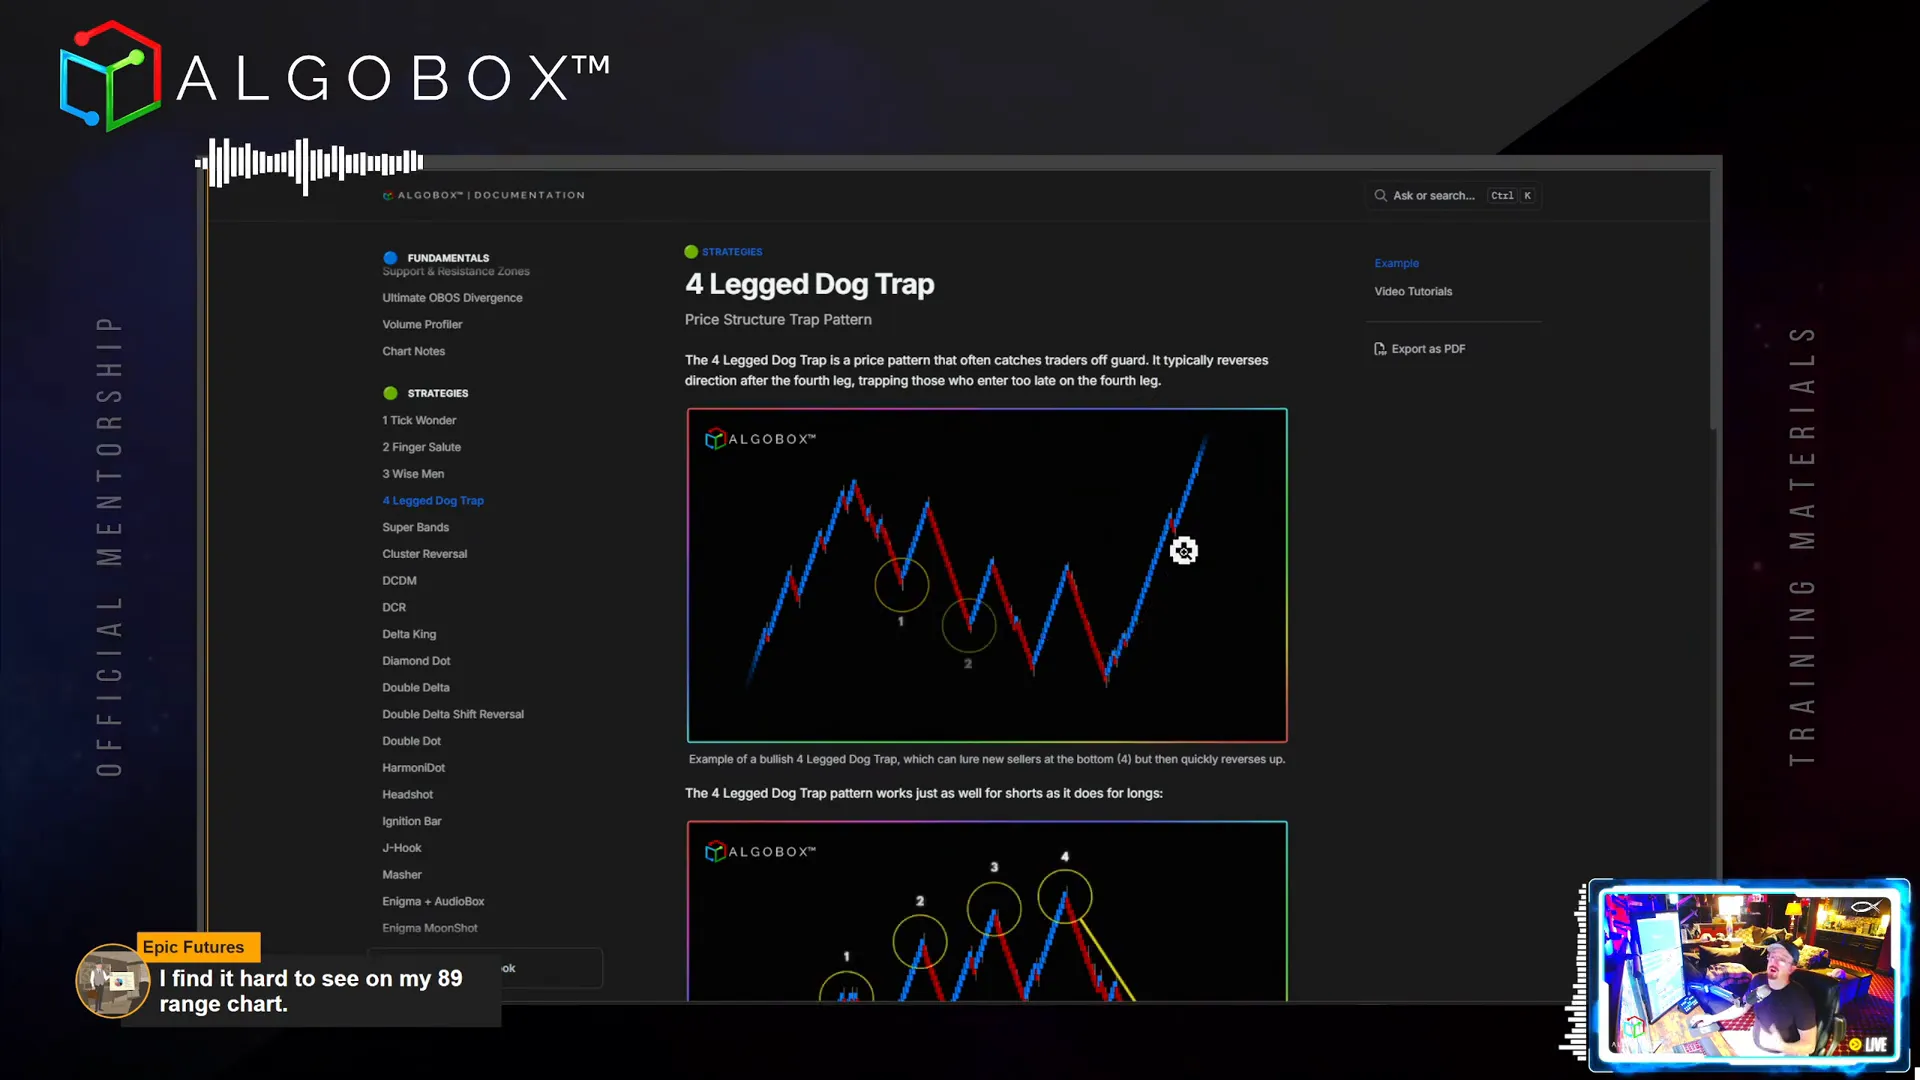
In the opposite direction, the pattern is the same — four legs up followed by a retracement forming the doggy head, signalling a short entry.
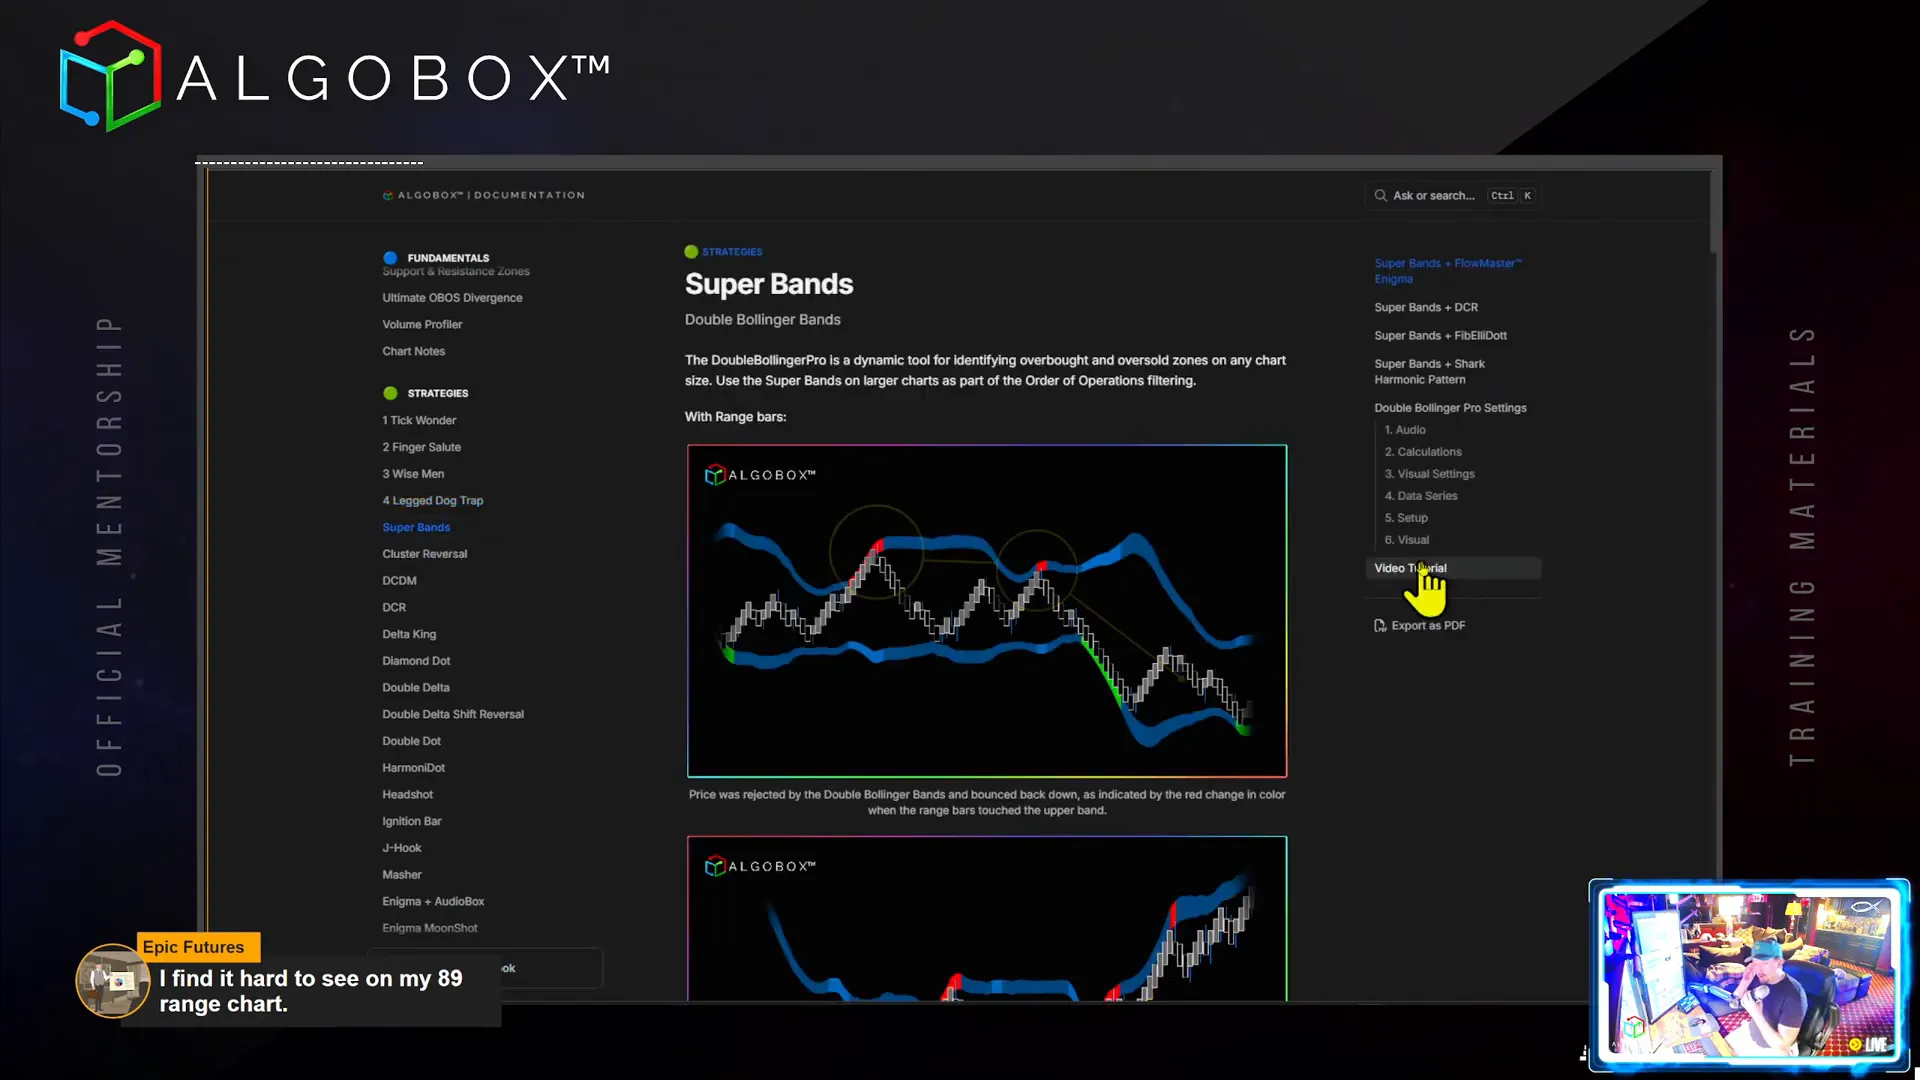
Step 5: Utilize the Power of SuperBands
SuperBands are an enhanced version of Bollinger Bands, designed to identify overbought and oversold zones dynamically across any chart size. They come with colour designations and audio alerts to notify traders of key setups.
Best practices when trading with SuperBands:
- Use them primarily on higher timeframes for spotting major opportunity zones.
- Wait for price to touch the SuperBand before considering entries.
- Combine with lower timeframe entries such as double cross reversals or enigma setups for precise timing.
- Set targets conservatively, often aiming for the midpoint of the bands to lock in profits.
- Be cautious of greed—taking profits early at the middle band can prevent giving back gains.
Vinny shares an example where he took profits at the middle band after a Bollinger Touch, only for the price to reverse and rally further. This highlights the importance of risk management and not getting greedy.
SuperBands work best in combination with other indicators, adding confluence and improving the quality of trade setups.
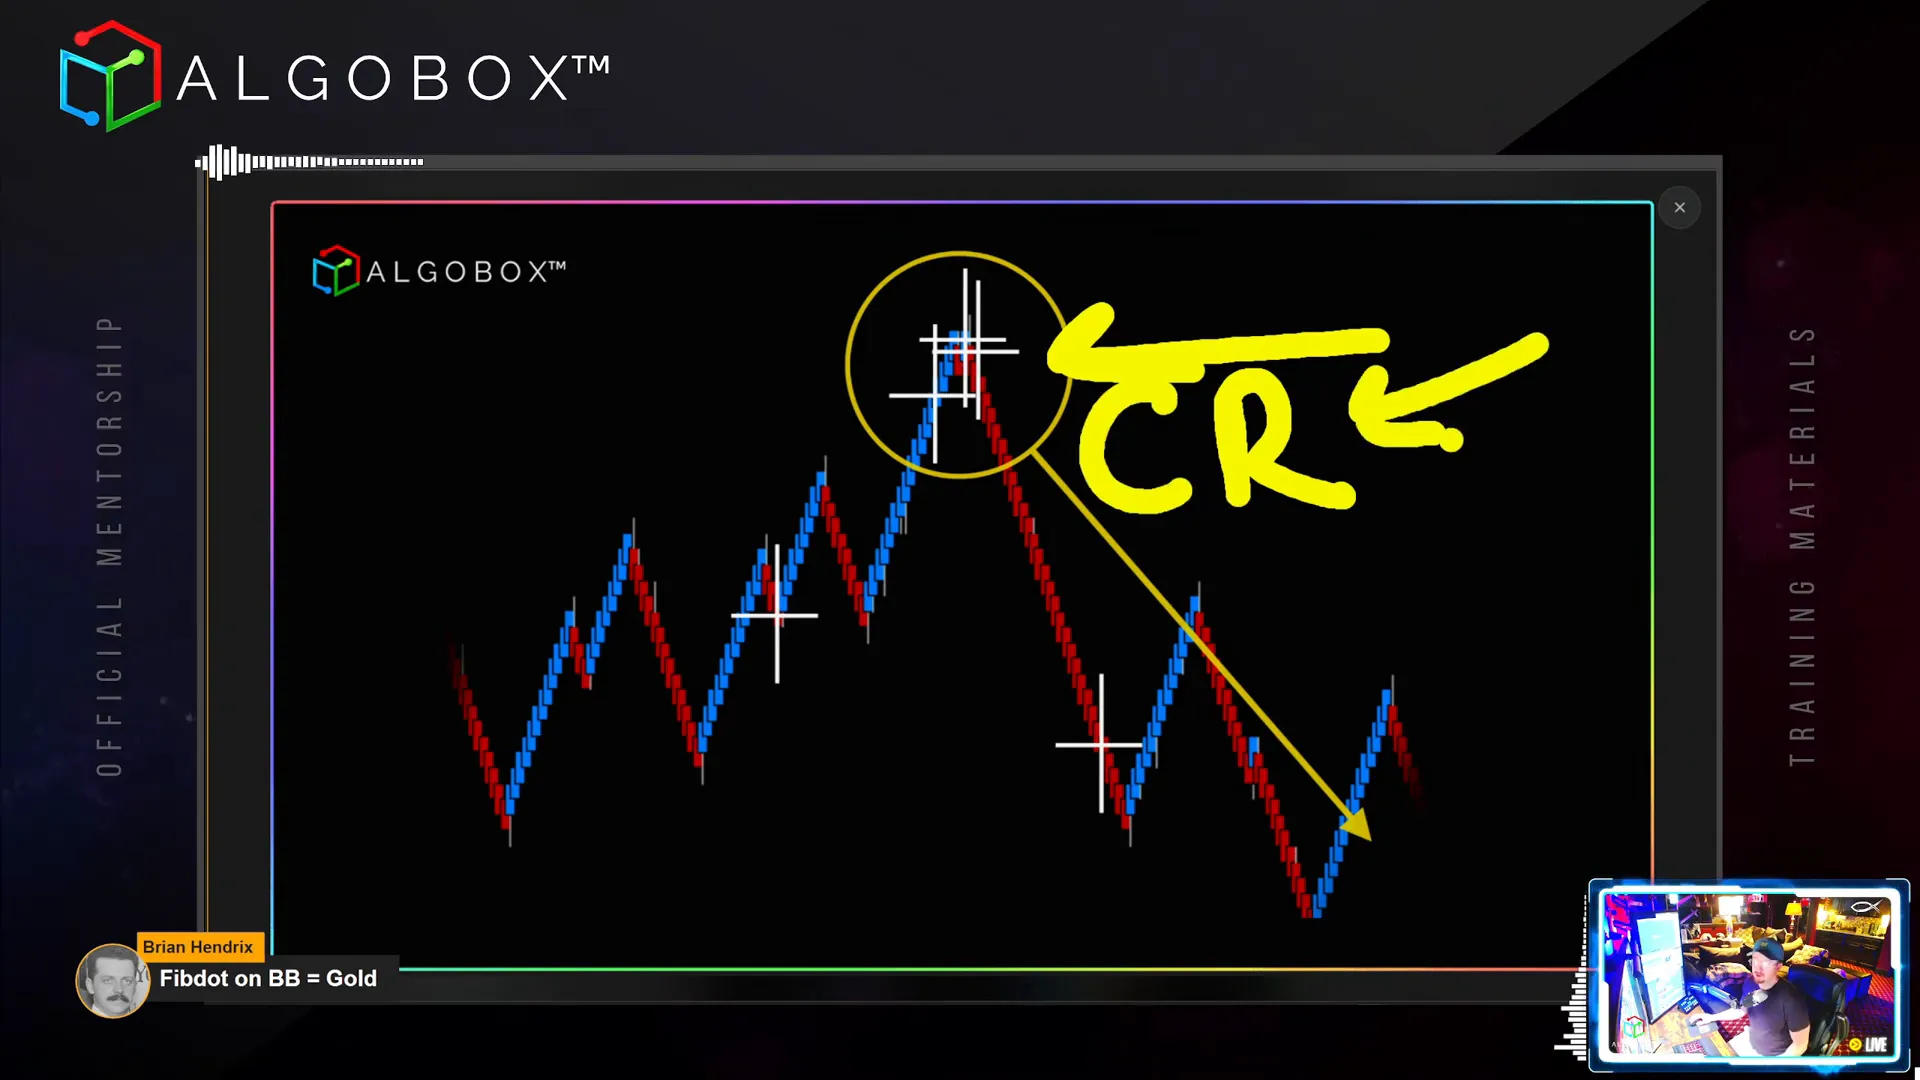
Step 6: Identify Cluster Reversals Using Flowmaster Crosses
Cluster Reversals occur when multiple Flowmaster crosses bunch together in an area, signalling a potential reversal. This setup often indicates that retail traders are all acting in unison, creating a crowded trade that can be exploited.
Trading cluster reversals involves:
- Spotting clusters of crosses, regardless of colour, as the key signal.
- Understanding that these clusters often occur after strong moves, where many traders try to enter the same position.
- Placing stops above or below the cluster, depending on trade direction, using the dot, box, or cross stop types.
- Expecting a strong move in the opposite direction as trapped traders exit their positions.
This pattern is sometimes called the “racket ball” play—like a ball hitting the front wall and bouncing back quickly. The speed of the initial move (fast or slow) influences whether the reversal will be strong or weak.
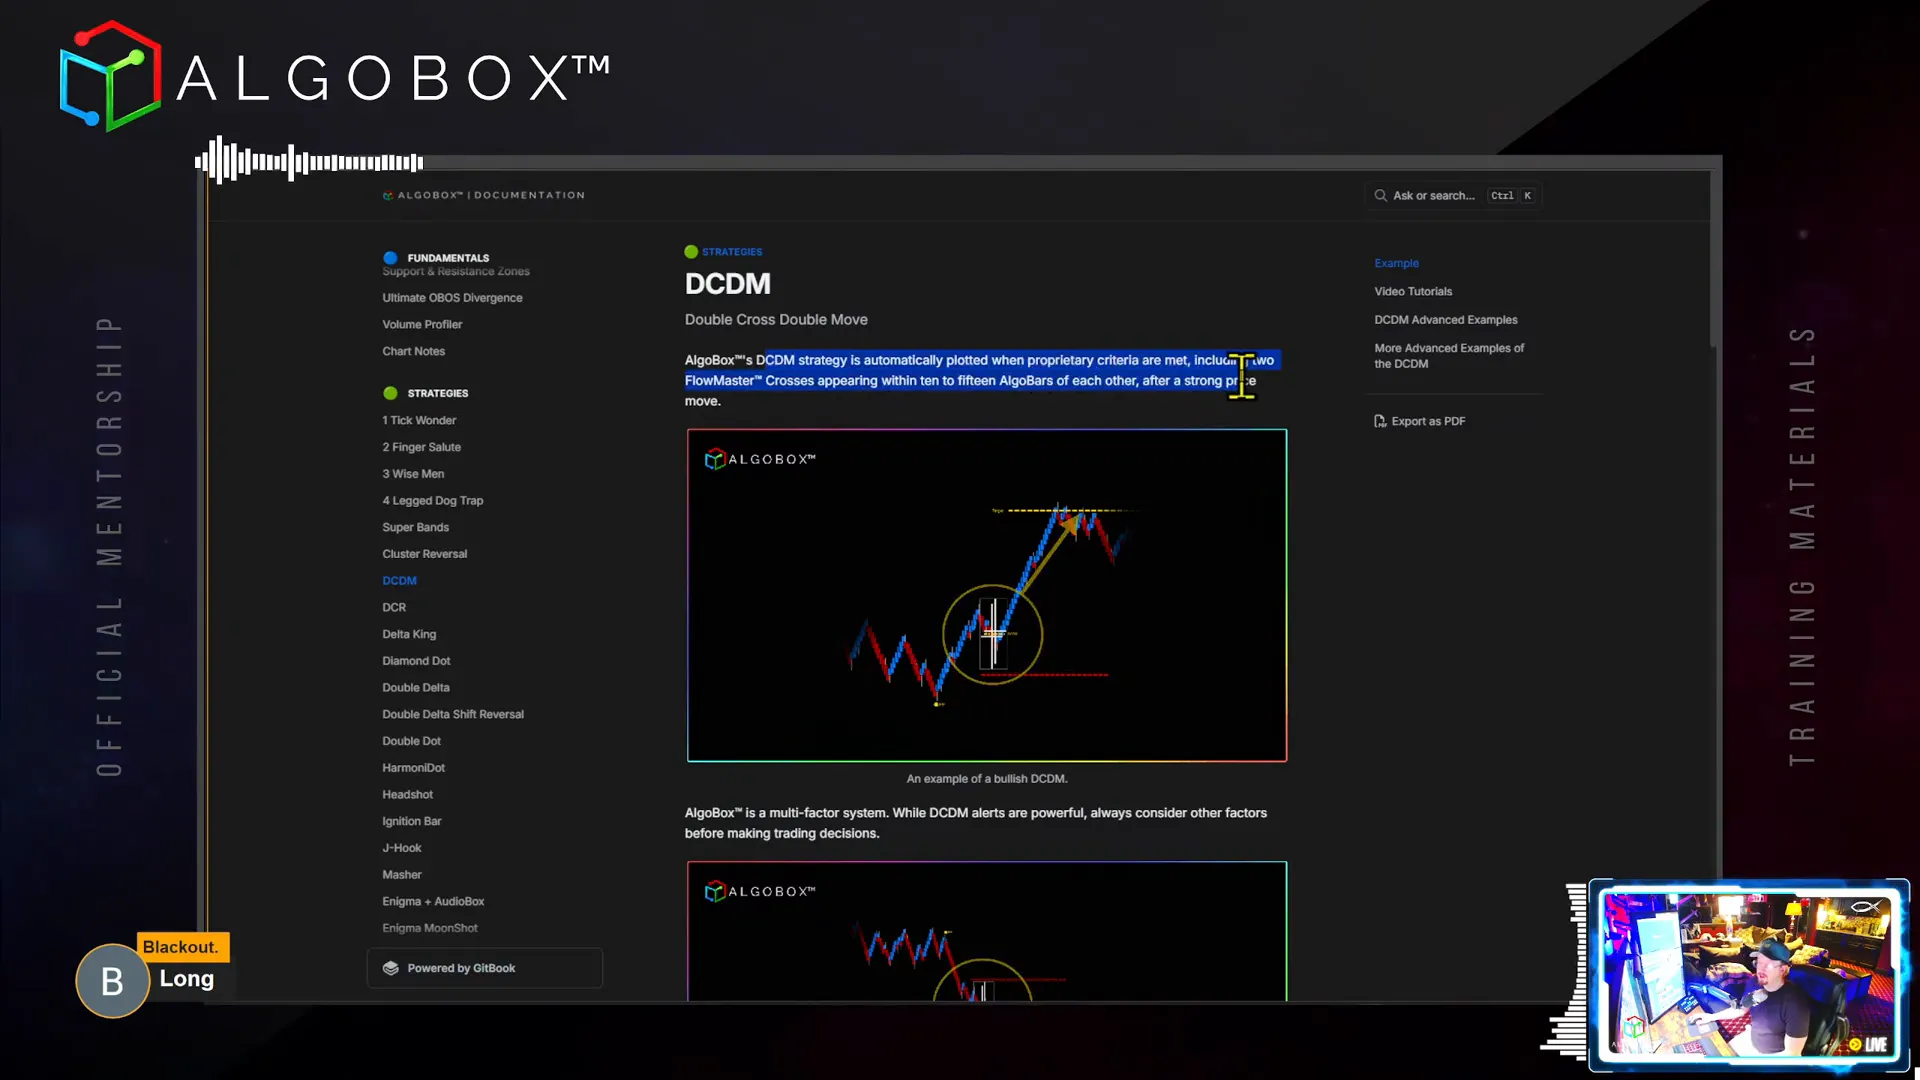
Step 7: Execute the Double Cross Double Move (DCDM) Strategy
The Double Cross Double Move (DCDM) strategy is a powerful setup triggered when two Flowmaster crosses appear within 10 to 15 Algo bars after a strong price move, often following an accumulation zone breakout.
How to trade DCDM:
- Identify the two crosses appearing close together after a strong directional move.
- Recognise the pivot point (PEP) from which to measure the expected move.
- Use AlgoBox’s automatic target lines that measure the distance from the pivot to the crosses and project it forward.
- Place stops just below the crosses to minimise risk.
- Look for traps to the left of the setup, indicating retail participation and potential for a reversal.
- Use the “two try rule” to confirm the setup before committing fully.
Vinny highlights that these setups are often followed by a Gold Line Reversal (GLR), which can be traded for quick 10-tick profits, even if you missed the initial entry.
Be cautious when entering late and always manage your stop tightly. The DCDM strategy is highly effective when combined with other AlgoBox signals and market context.
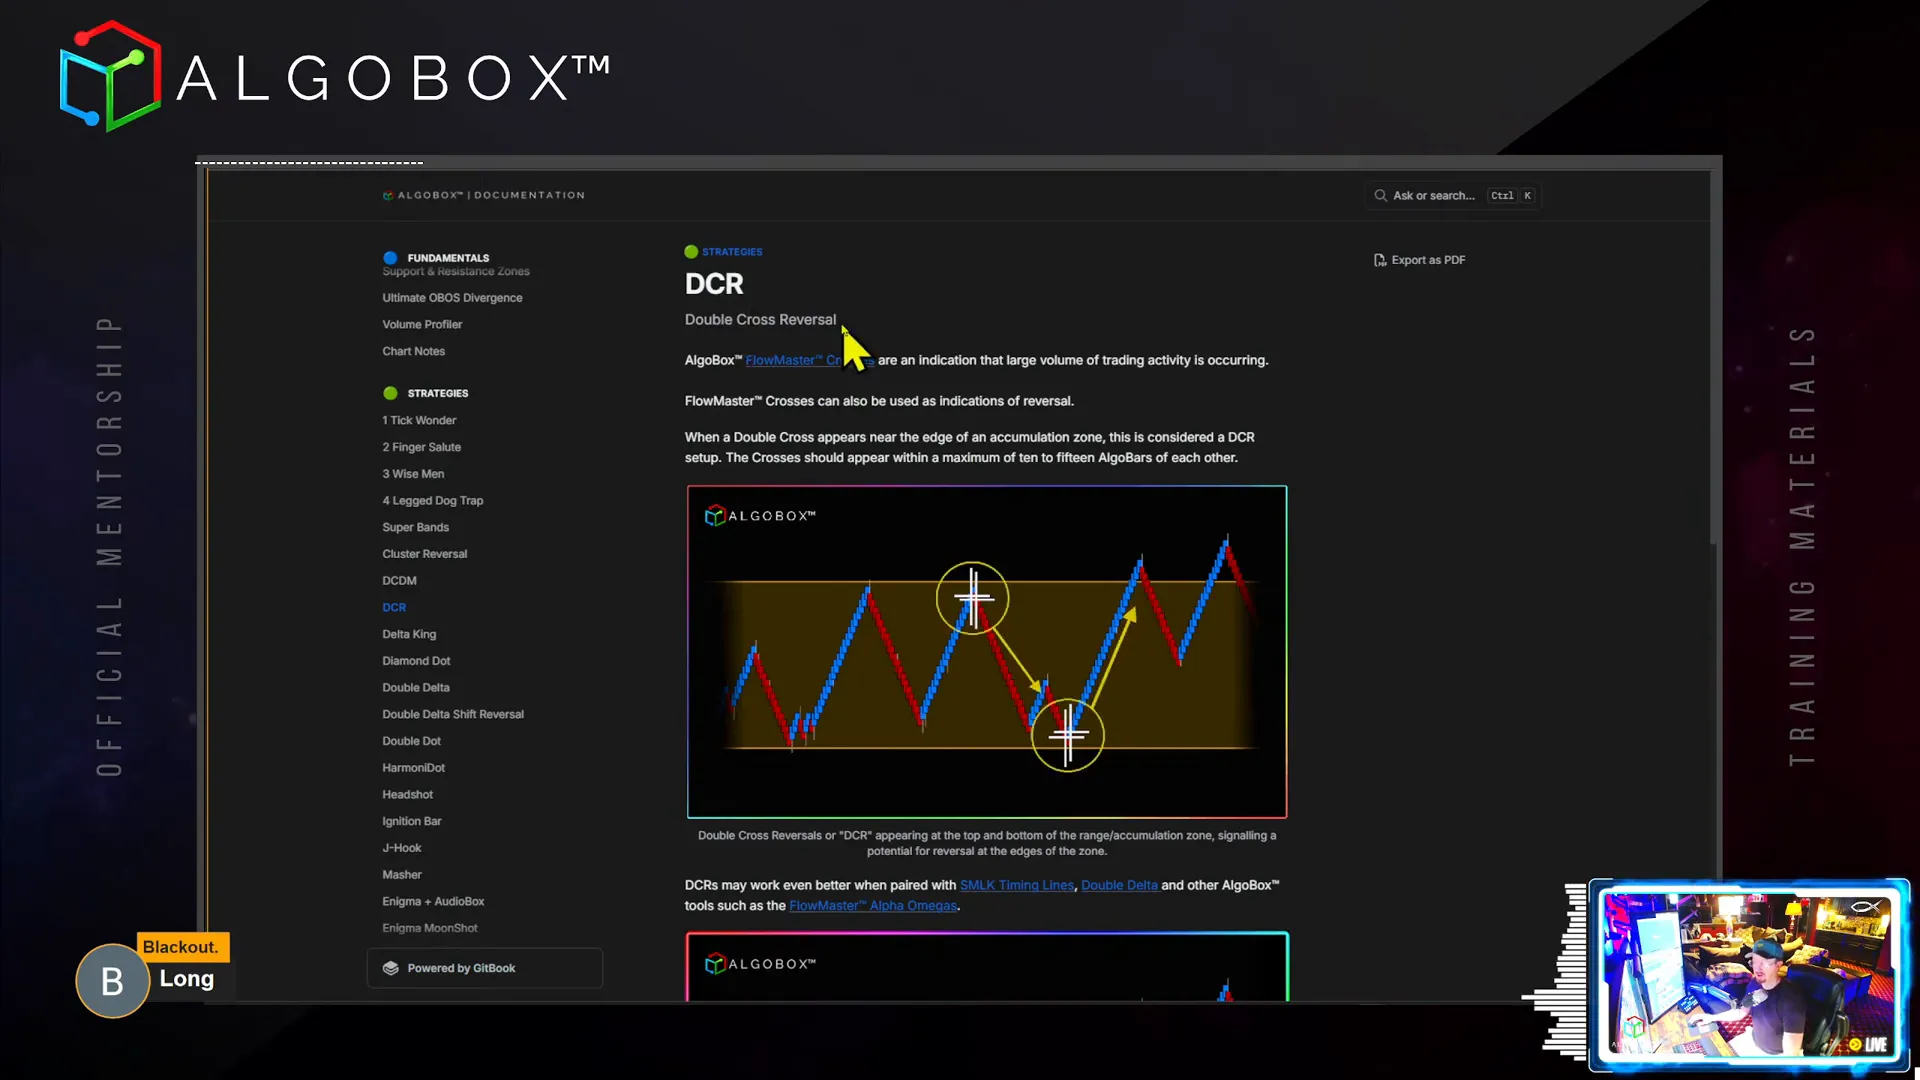
Step 8: Apply the Double Cross Reversal (DCR) with Accumulation Zones
The Double Cross Reversal (DCR) strategy focuses on reversals after two crosses appear within an accumulation zone—a range where price consolidates before a significant move.
Key elements of DCR trading:
- Draw accumulation zones on your chart using pivot highs and lows to define the range.
- Look for two crosses near the top or bottom of the zone.
- If the MACV Ultimate indicator (NERD) is in your favour, target the opposite side of the zone; if not, target the middle.
- Place stops just above or below the crosses.
- Exit quickly if price breaks out of the zone to avoid large losses.
DCR setups often coincide with big long legs (BLL), where a sudden strong move exhausts retail traders, leading to a reversal opportunity.
Vinny emphasizes the importance of discipline and risk management, advising traders to accept small losses and not to chase the market.
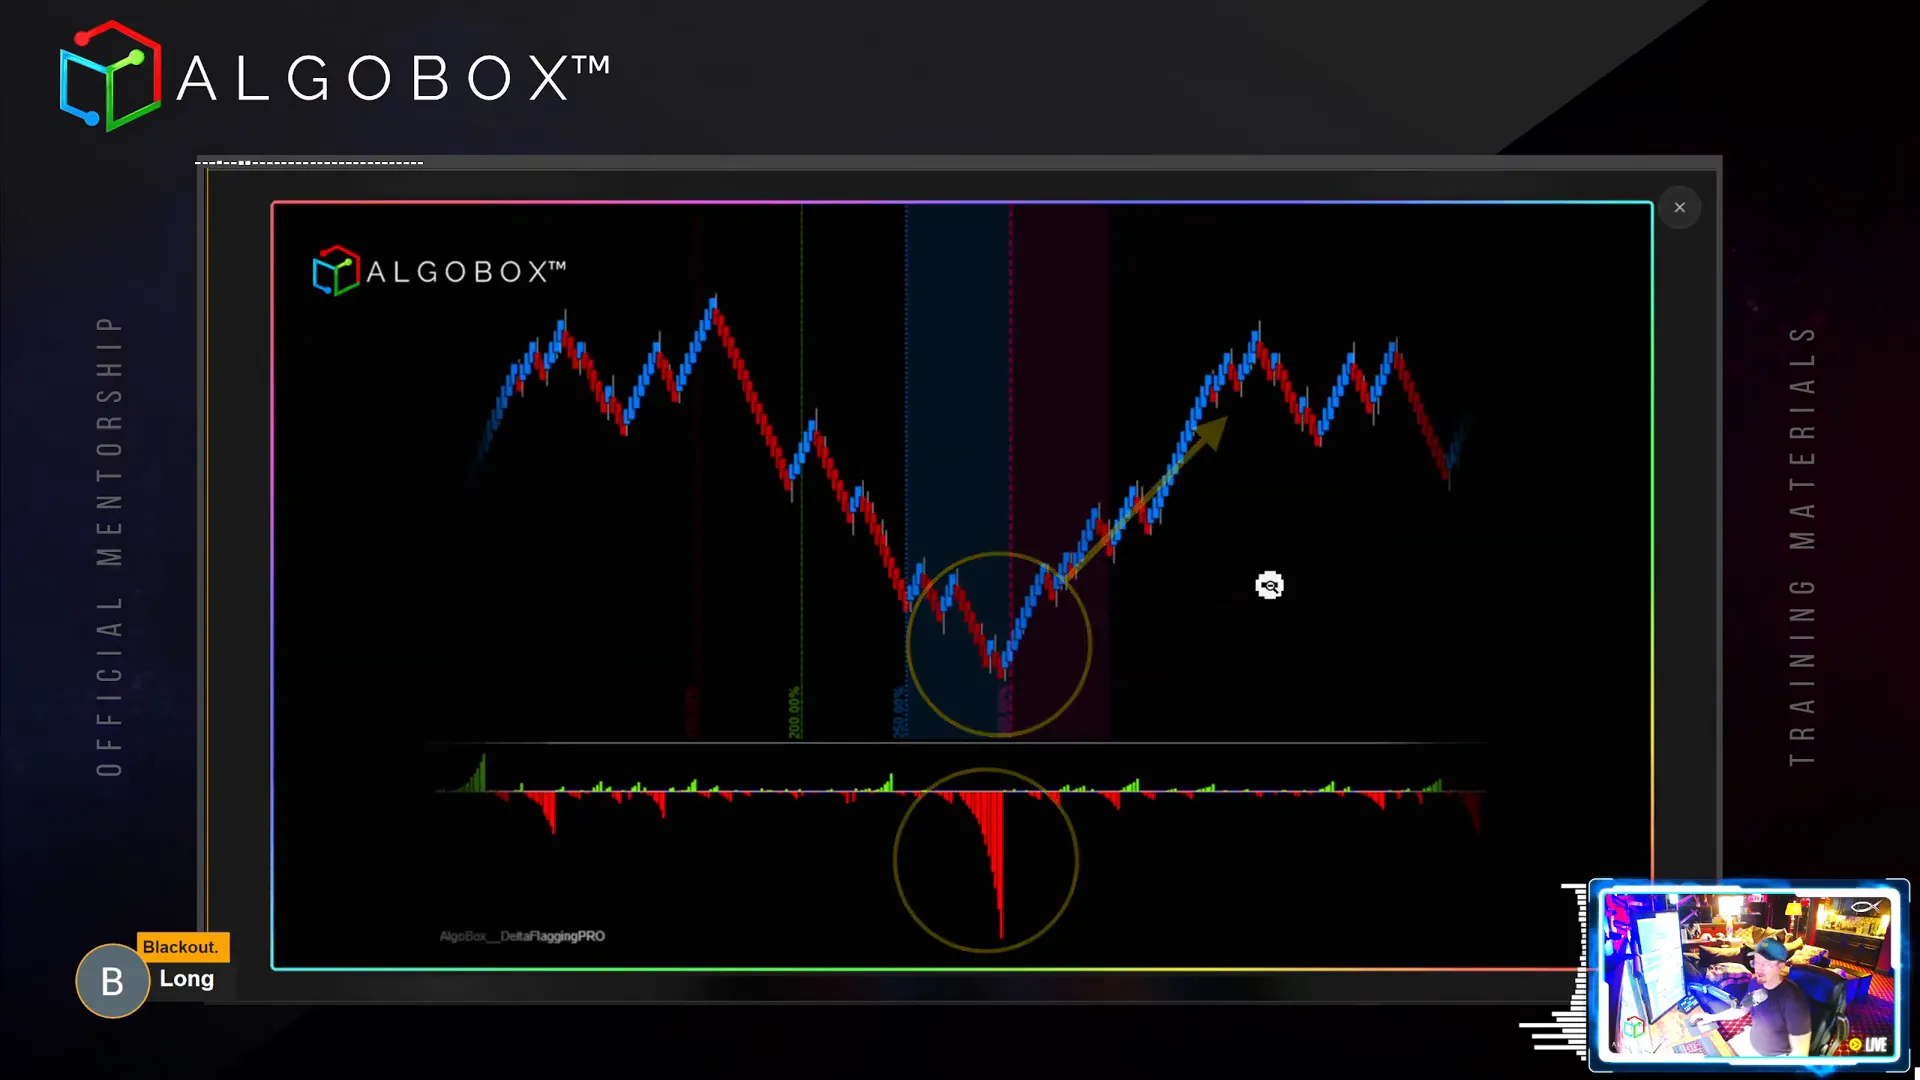
Step 9: Harness the Delta King Strategy with King Timing Lines
The Delta King strategy uses SMLK timing lines combined with large Delta flags to identify institutional trading activity and high-probability trade setups.
How to trade the Delta King:
- Watch for large Delta flags near King timing lines, signalling potential shakeouts or major moves.
- Look for confirmation from Alpha Omega or enigma indicators for added confluence.
- Enter on Doctor Seuss entries at pivot turns near the King timing line.
- Place tight stops behind the pivot candle.
- Targets vary by timeframe, with smaller targets on lower timeframes and larger ones on higher timeframes.
This strategy is particularly useful for catching runners and big moves off institutional activity.
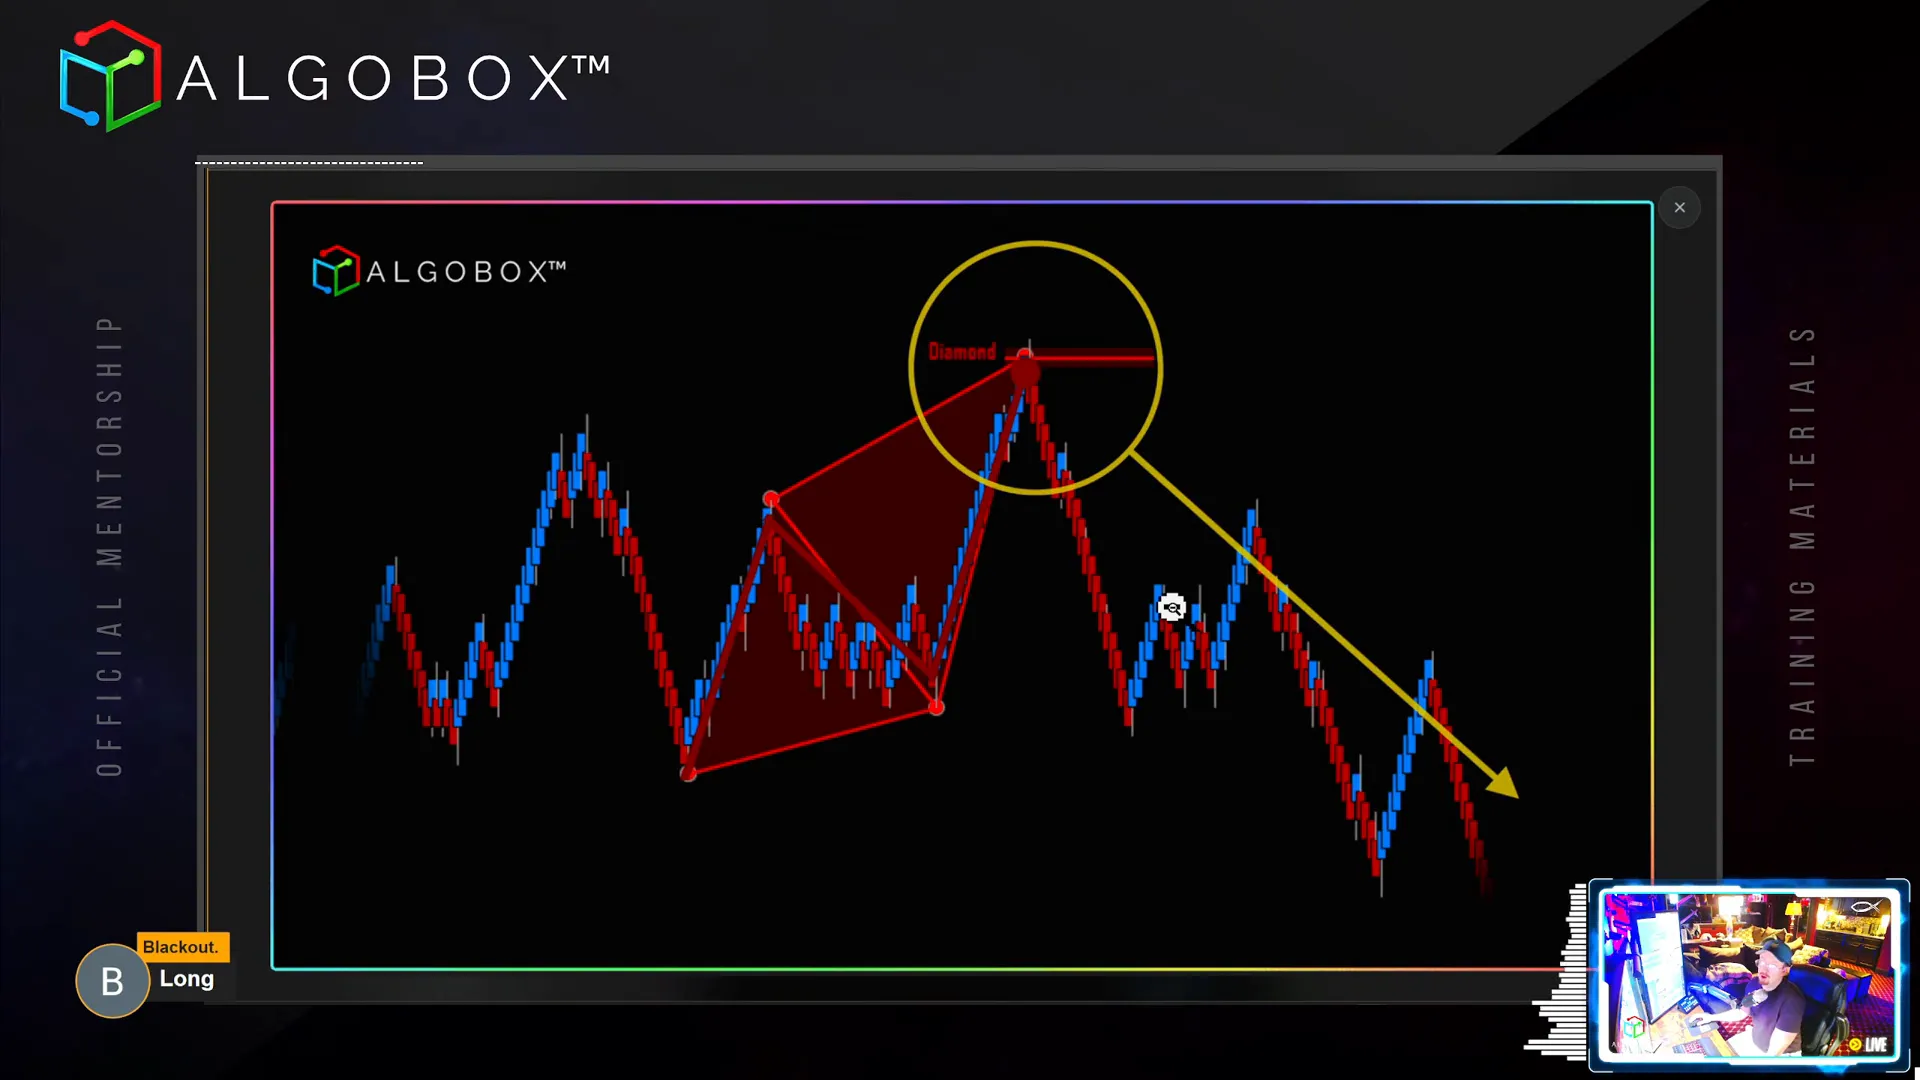
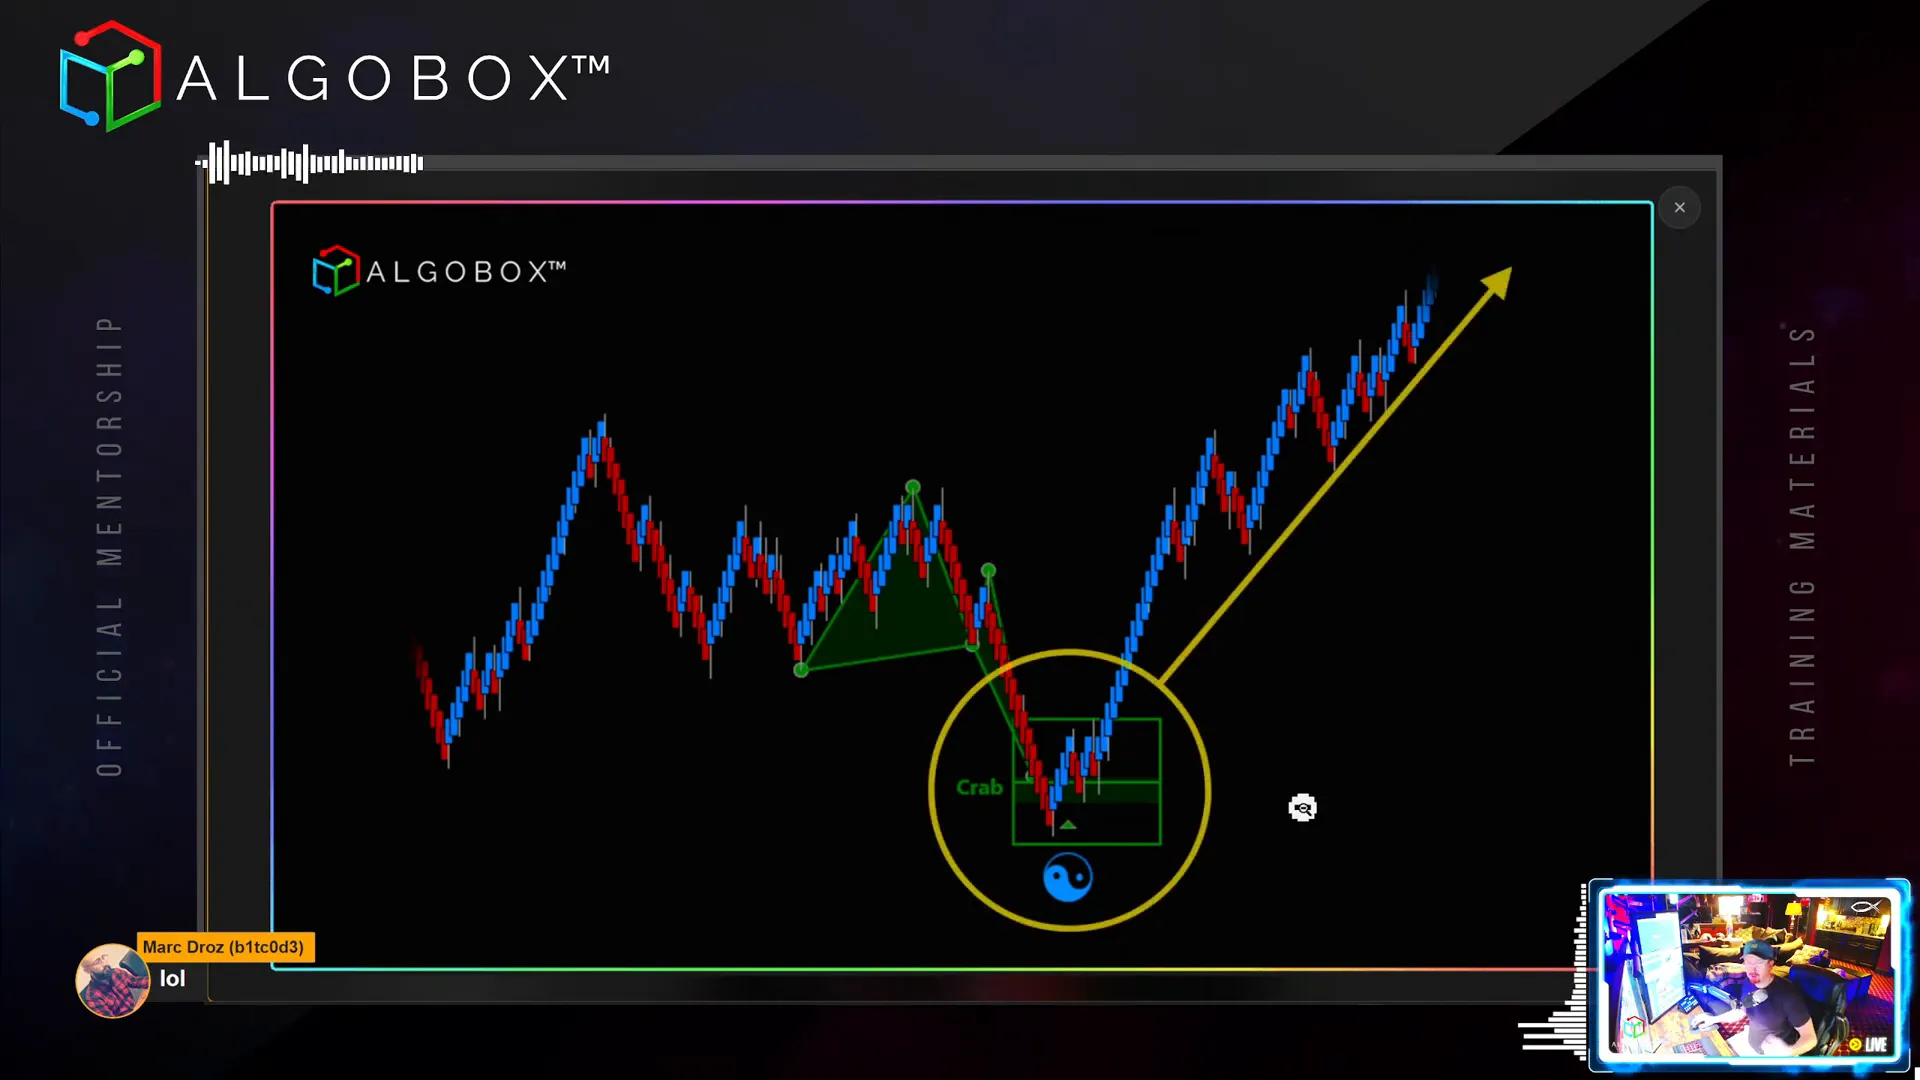
Step 10: Explore the Diamond Dot and Harmonodot Patterns
The Diamond Dot and Harmonodot (HMD) are confluence setups combining harmonic patterns with Favella dots, offering precise reversal signals.
- Diamond Dot: Combines a harmonic diamond pattern with a Favella dot for strong entry signals.
- Harmonodot: A broader category combining harmonic patterns (like sharks, bats, crabs) with Favella dots within Potential Reversal Zones (PRZ).
- Always trade in the direction of the dot’s colour, even if the harmonic box colour differs.
- Stops are placed behind the dot for minimal risk.
- Targets adjust based on timeframe and additional confluence indicators like NERD and local arrows.
Shark patterns are considered the most powerful harmonics, while diamonds are weaker. You may customise your charts to only show sharks for focused trading.
Adding an enigma indicator to the HMD setup increases power and potential for larger moves.
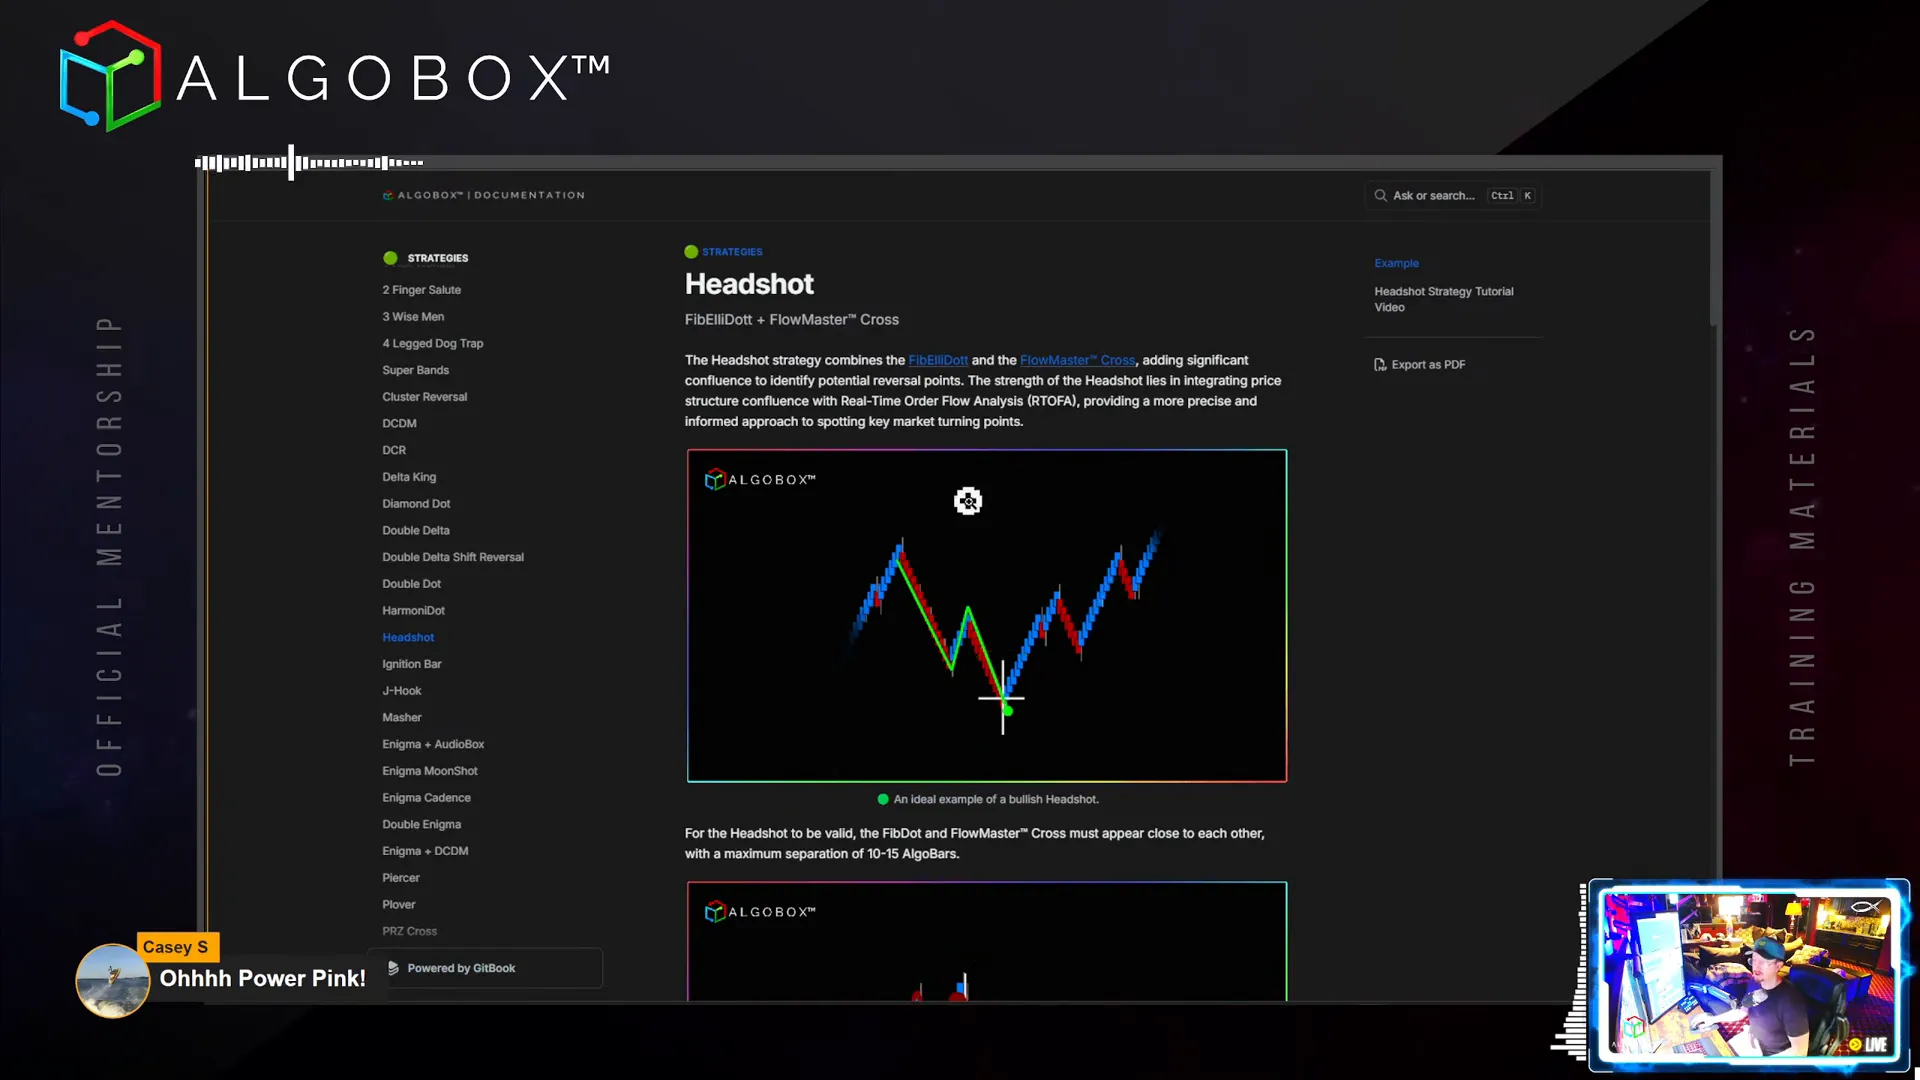
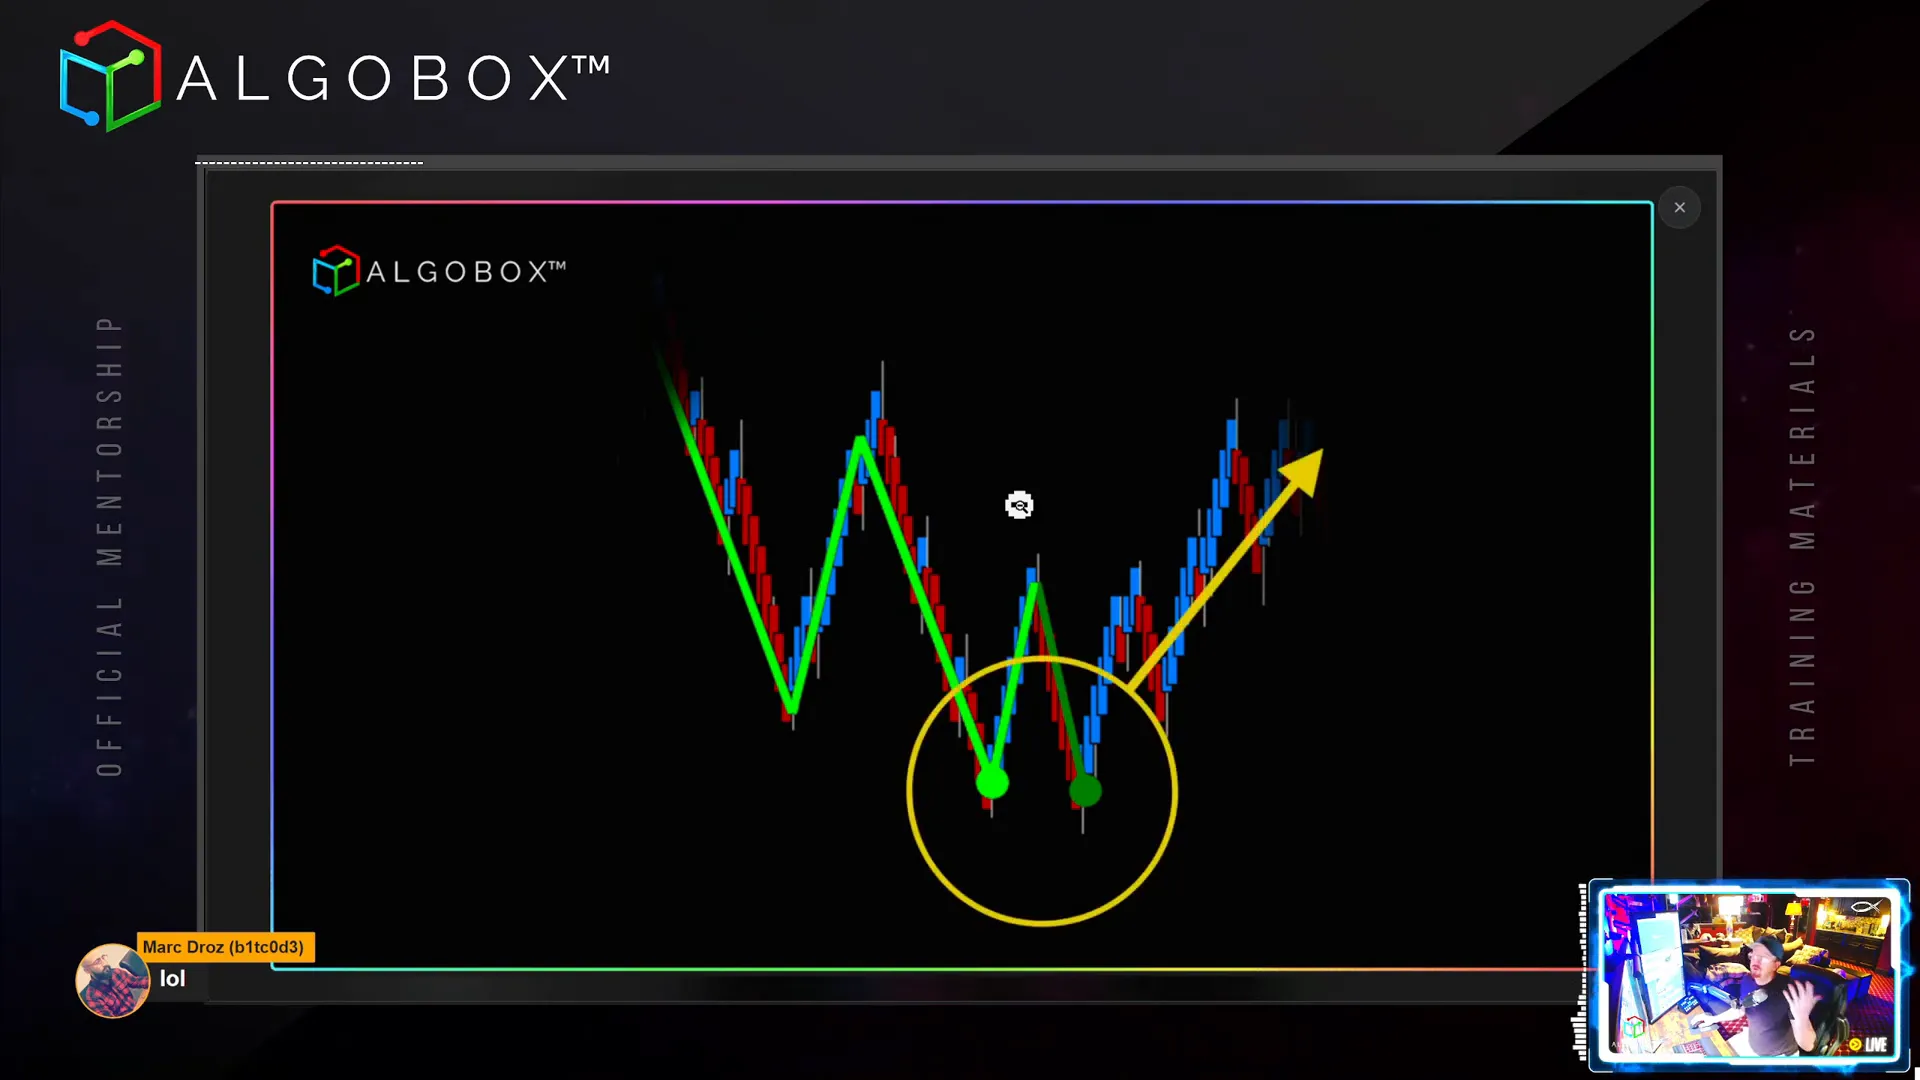
Step 11: Master the Headshot Setup for Precision Entries
The Headshot is a high-precision entry setup combining multi-Fibonacci, Elliott wave structure, and RTOFA events, typically signalling a retailer getting caught offsides.
Key trading points include:
- Combination of a Favella dot and a Flowmaster cross, often appearing as a “reticle” on the chart.
- Stops are placed behind the cross, often a bit wider to accommodate repeated retests.
- Targets are set for 10-15 ticks on low timeframes, with doubled targets if an Alpha Omega cross confirms the setup.
- Runners can be held if higher timeframe confluence exists.
This setup is popular among gamers and traders who appreciate precision and “max damage” style entries.
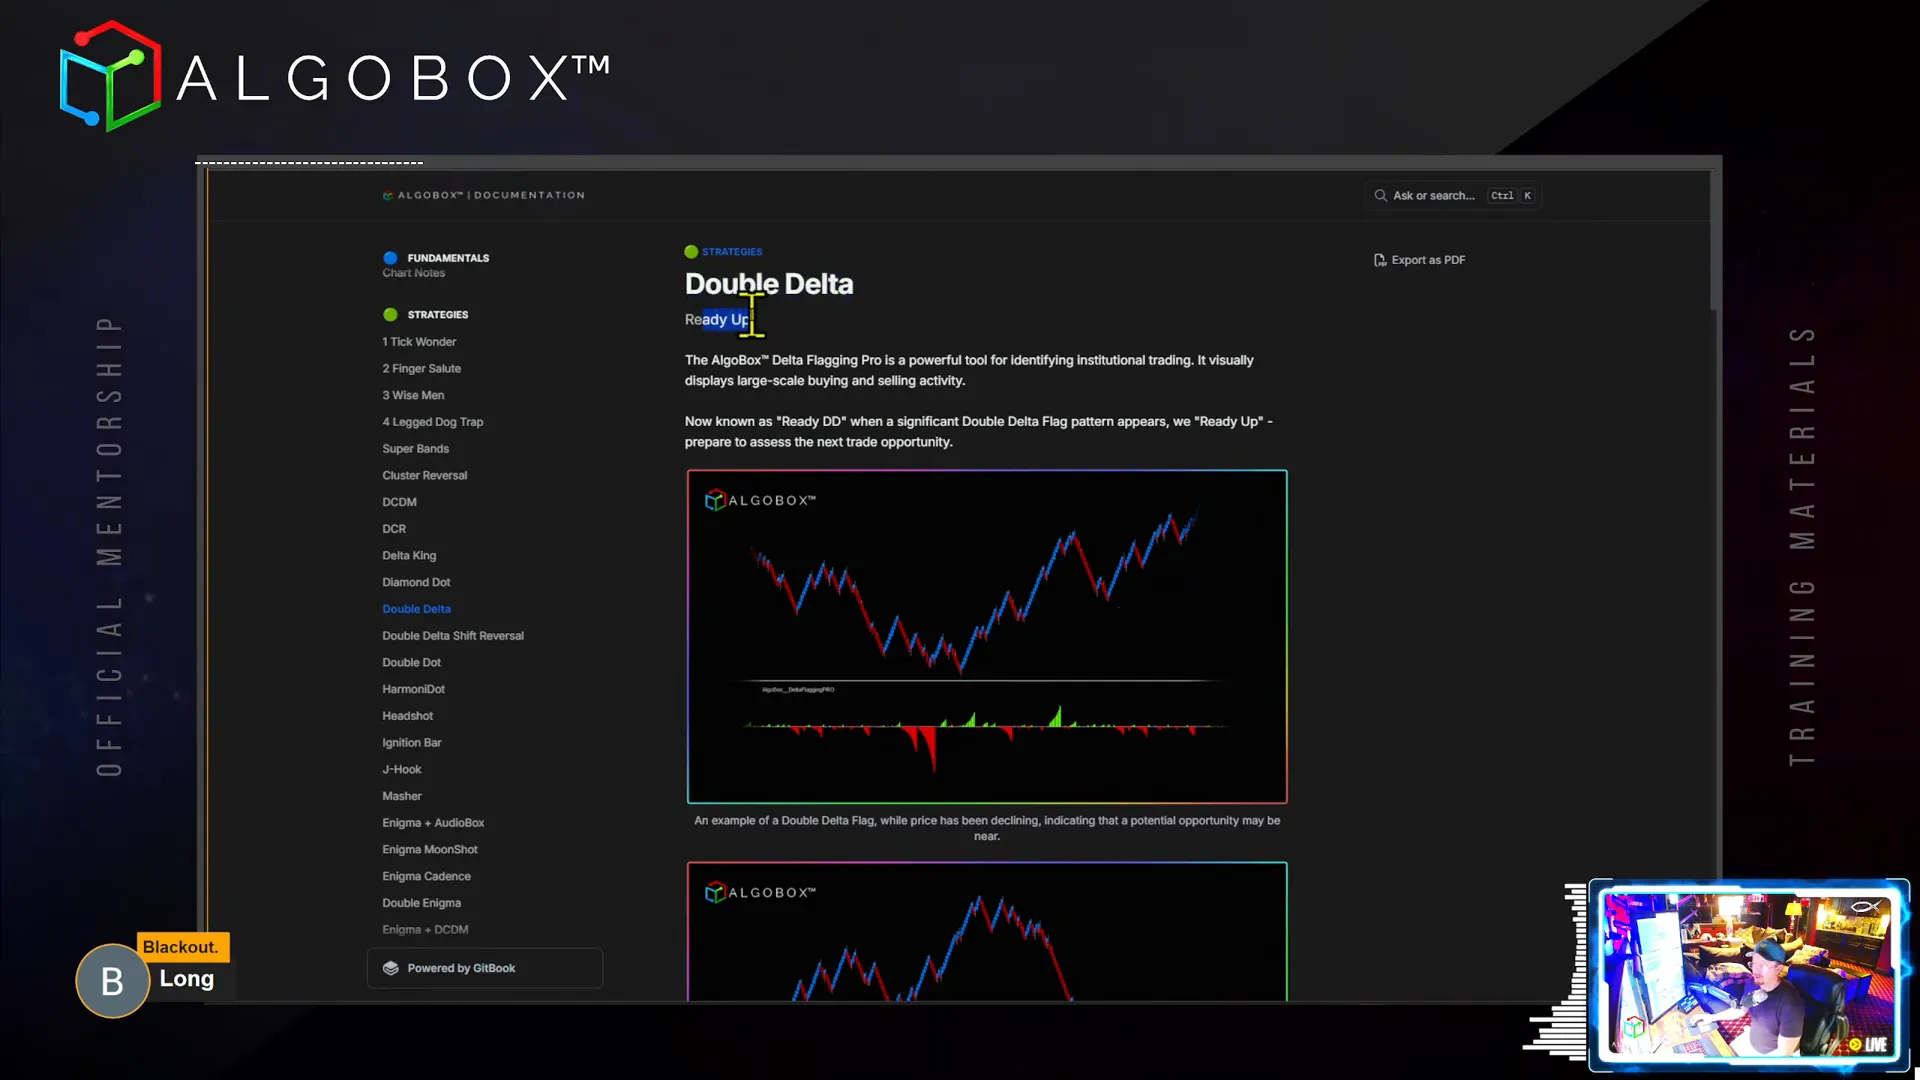
Step 12: Use Double Deltas and Titanic Zones for Institutional Insight
Double Delta and Titanic Zones are institutional trading signals showing large-scale buying and selling activity.
How to use these tools:
- Double Delta flags indicate major money entering or exiting the market; look for “ReadyDD” signals to prepare for the next high-probability play.
- Titanic Zones occur when three or more ReadyDDs appear consecutively, signalling a potential major reversal zone.
- Combine ReadyDD signals with your order of operations (OOP) and cheat sheets to confirm entries.
- Double Delta Shift Reversals (DDSR) occur when large opposite Delta flags appear back-to-back, indicating absorption and potential for a big reversal.
- Stops for DDSR are placed over the text box, usually requiring careful risk management due to wider stops.
These tools give traders a unique edge by visualising institutional footprints, which are invisible on traditional charts.
Step 13: Revisit the Classic Double Dot Strategy
The Double Dot strategy, once the go-to setup, remains a valuable confluence tool. It involves two Favella dots appearing within 10-15 Algo bars, signalling strong potential reversals.
Important considerations:
- Trade in the direction of the most recent dot colour, as recency is key.
- Combine with other indicators like Bollinger Touches, NERD shifts, or MASher zones for better accuracy.
- Stops are placed just behind the latest dot.
- Practice this strategy multiple times in market replay to build confidence.
While more complex strategies have emerged, the Double Dot remains a foundational pattern within AlgoBox’s ecosystem.
Conclusion: Integrating Strategies and Embracing Discipline
Mastering algorithmic futures trading involves not only learning individual strategies but also understanding how to integrate them for confluence and risk management. Vinny Emini’s approach emphasises:
- Using multiple indicators and patterns together rather than trading any signal alone.
- Applying strict stop-loss placement using dot, box, or cross stop types to protect capital.
- Employing the “Doctor Seuss” entry technique for precise timing.
- Following the “two try rule” and understanding accumulation zones to filter high-probability setups.
- Holding runners patiently until an opposing signal confirms it’s time to exit.
- Backtesting strategies regularly and adjusting to current market conditions.
- Maintaining discipline by knowing when to say “nope” and exit losing trades quickly.
By following these steps, traders can navigate the complex markets with confidence, leveraging technology and strategy to gain an edge.
Embrace the journey, practice relentlessly, and remember: the edge belongs to the nimble and disciplined trader.
For deeper dives into these strategies, detailed documentation, and live examples, consider joining AlgoBox’s premium education resources and community forums.