Table of Contents
- Introduction: Why I Teach Cluster Reversals and What You’ll Learn
- Step 1: Understand FlowMaster Crosses — the foundational signal
- Step 2: Recognize Cluster Reversals — three or more in close proximity
- Step 3: Combine Alpha-Omega Signals and Crosses for confirmation
- Step 4: Entry Rules and Timing — aligning with the last cross
- Step 5: Targets and Scaling — ATM rules and runner management
- Step 6: Risk Management and Stops — protect the thesis
- Step 7: Practice in a Simulated Environment — market replay and bootcamp
- Step 8: Putting It All Together — pre-session routine and live-trade checklist
- Conclusion: Why cluster reversals work for me and how to adopt them
- FAQ — Frequently Asked Questions About the Cluster Reversal Strategy
- Appendix: My personal checklist before taking a cluster reversal trade
- Final thoughts
Introduction: Why I Teach Cluster Reversals and What You’ll Learn
I created this guide to walk you through the cluster reversal strategy I use inside the AlgoBox system on NinjaTrader. In the original training video produced by ALGOBOX Trading, I explain how FlowMaster crosses and FlowMaster alpha-omega signals reveal areas of intensified order flow that often lead to short-term price exhaustion and reversal. In this article I expand on that lesson, give practical step-by-step instructions, and provide a repeatable practice plan so you can internalize the setup in a simulated environment before trading live.
This strategy is about reading order flow clusters — concentrated visual cues that appear on algo bars and range bars — and using those clusters as a trigger for potential reversals. When three or more FlowMaster crosses or alpha-omega signals appear tightly grouped, the probability of a short-term reversal increases. I’ll cover signal identification, entry timing, target selection, risk management, and a practice routine using NinjaTrader Market Replay. Along the way I’ll share specific examples, mental checklists, and trade management rules I use.
Below I’ll present the method as a step-by-step tutorial. Each section includes a screenshot timestamped to the corresponding moment in the training so you can cross-reference the visual cue in the original video. Read this as if I’m coaching you through the setup on a live chart.
Step 1: Understand FlowMaster Crosses — the foundational signal
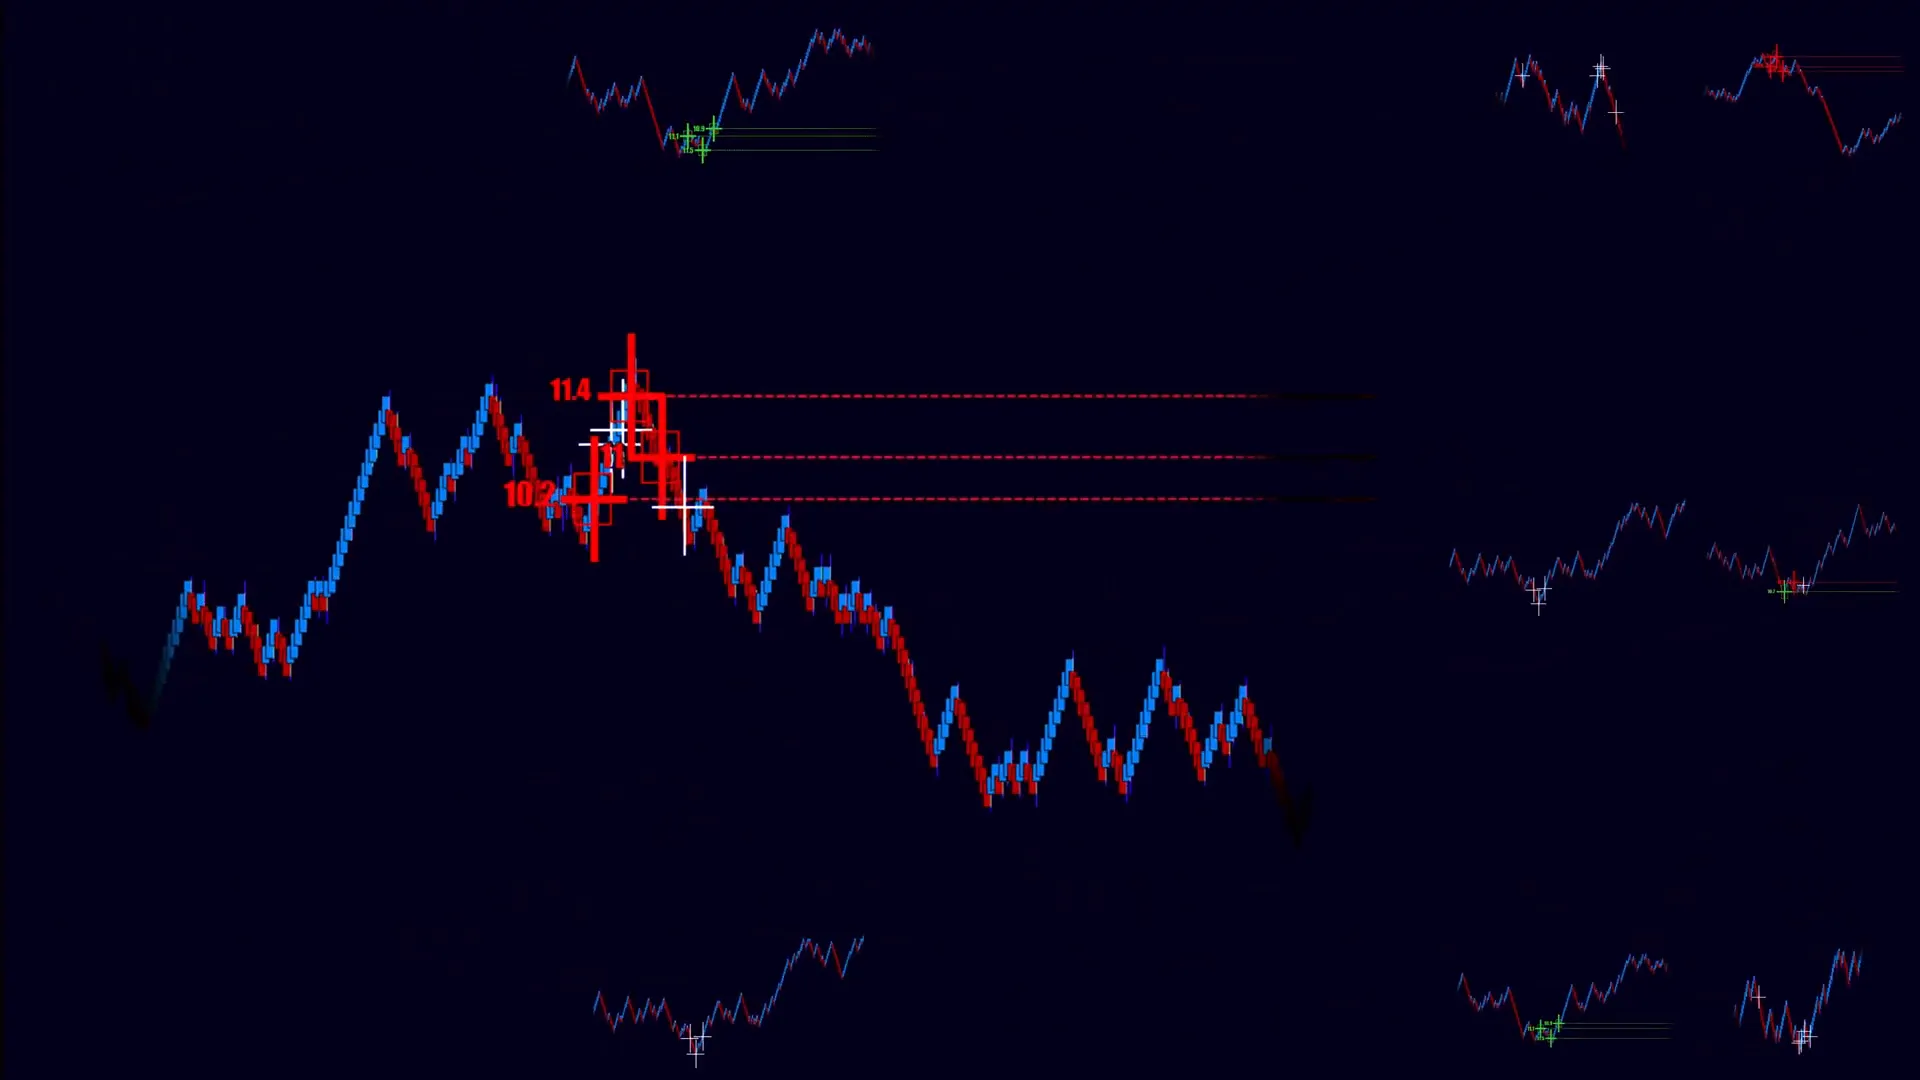
The first thing to understand is what a FlowMaster cross represents. In the AlgoBox system, FlowMaster crosses are visual indicators that flag concentrated, high-volume activity at a specific price area on your algo bar or range bar chart. They are not magic—they are a distilled representation of strong order flow interactions between aggressive buyers and sellers. When the FlowMaster produces a cross, it’s telling you that the market produced a cluster of traded volume and directional interaction around that price.
Conceptually, imagine price running into an area where aggressive buyers or sellers have been heavily executing. As those orders match up with passive counterparties, you get high volume and tension. If that volume is one-sided and intense, price can accelerate. If it’s balanced or occurs at the end of a move, it can indicate exhaustion and a higher chance of a reversal. The FlowMaster cross draws your attention to those events.
Key points about FlowMaster crosses:
- They mark concentrated order flow: Not every bar with volume gets a cross—these are specific, higher-probability clusters.
- They’re visual cues for traders: Use them as a prompt to look deeper at context, not as a standalone signal.
- They appear on algo bars and range bars: Different bar types change the timing and sensitivity of the signal.
When you learn this strategy, practice recognizing the crosses visually and forcing yourself to pause and read context. Don’t reflexively enter; treat the cross as an invitation to investigate.
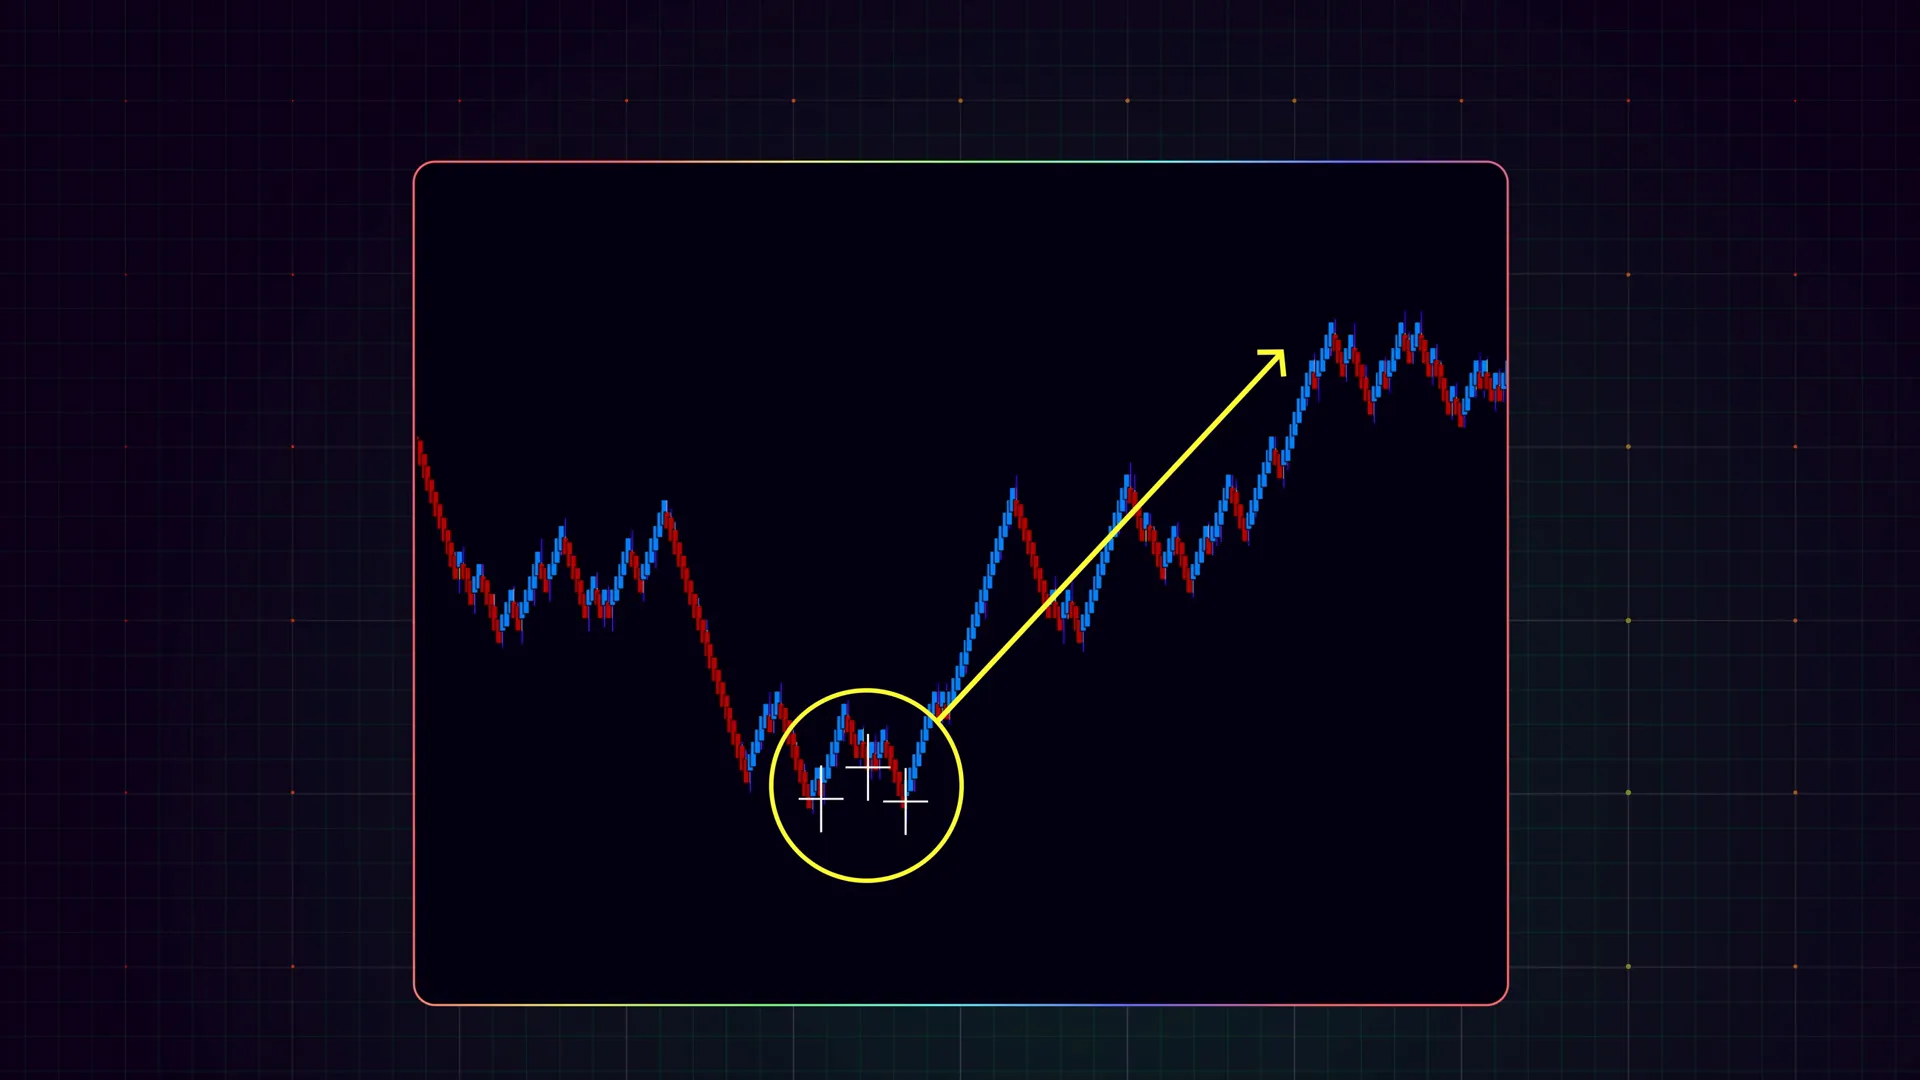
Step 2: Recognize Cluster Reversals — three or more in close proximity
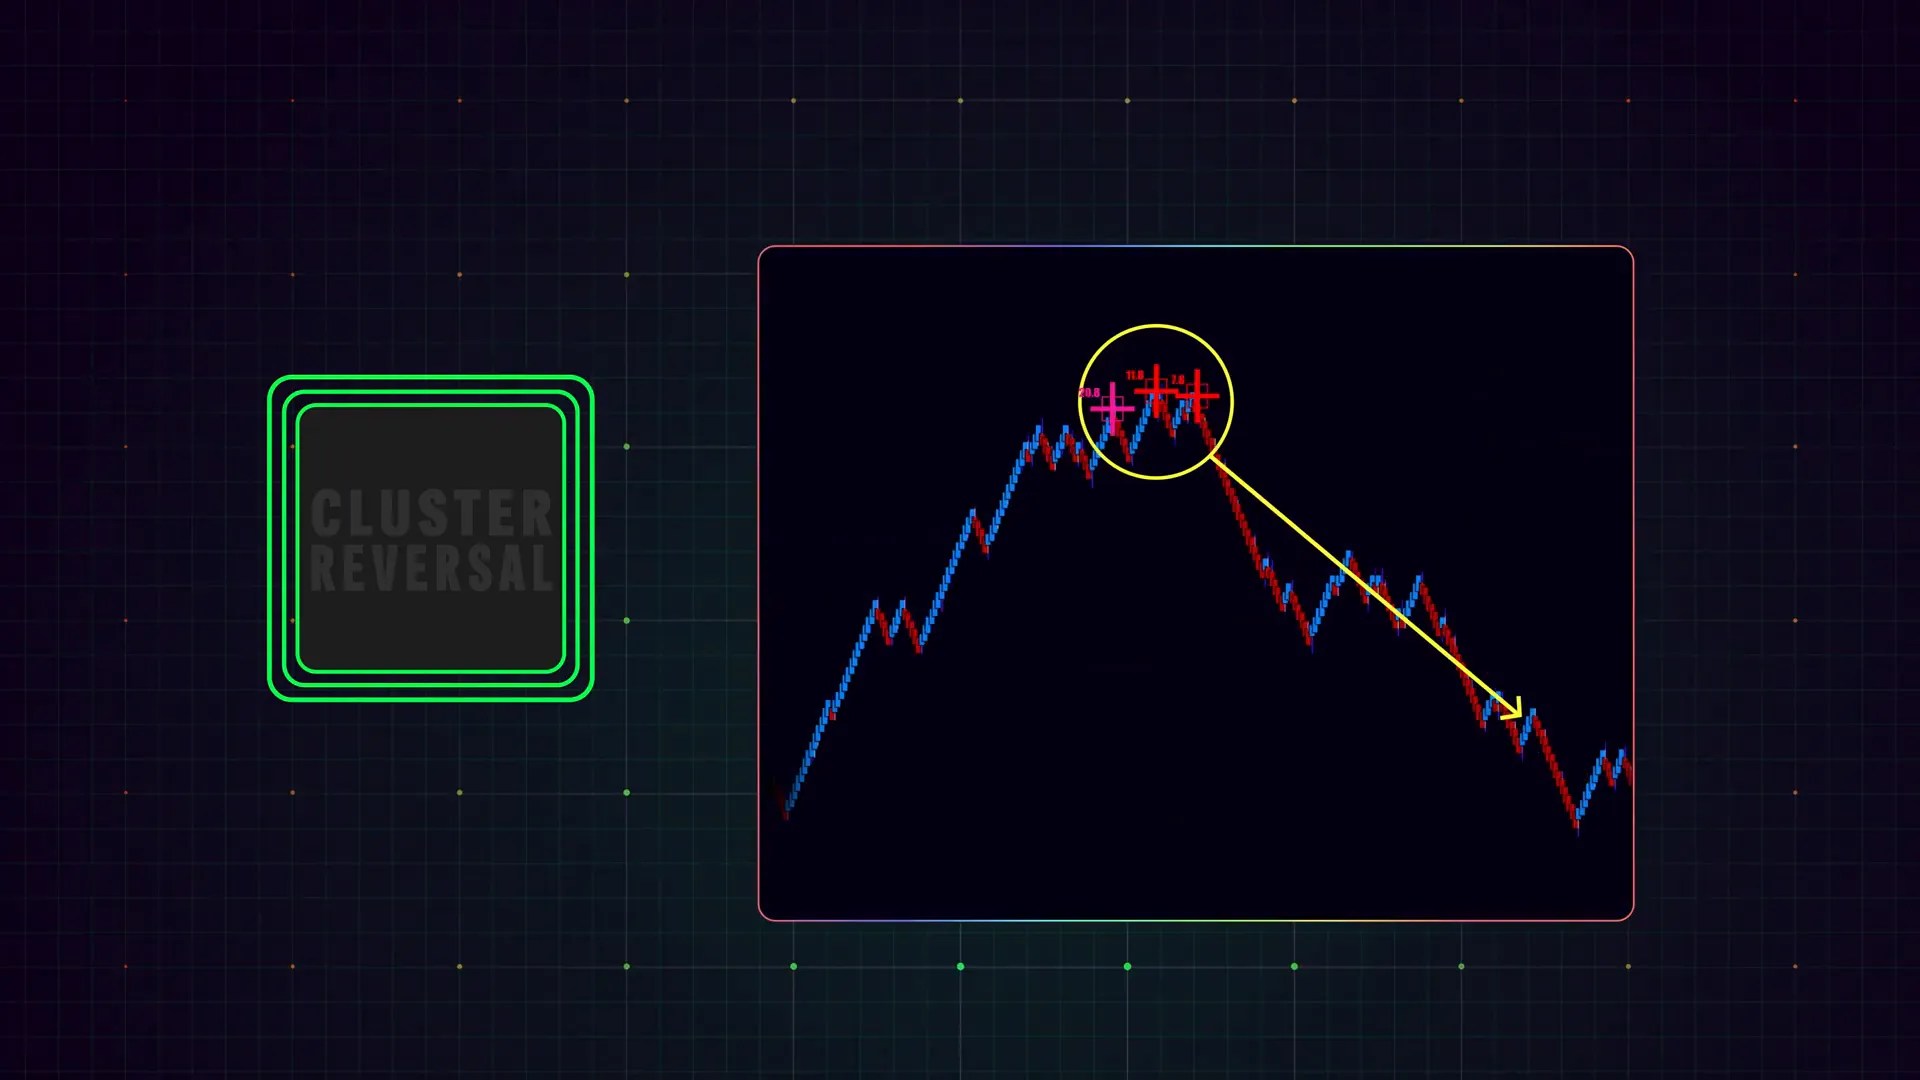
A single FlowMaster cross may simply reflect a spike in volume. What gives the cluster reversal strategy its edge is the clustering: three or more crosses (or alpha-omegas) appearing tightly grouped. In practical terms I watch for clusters that occur within a 10–15 algo-bar window. The tighter and more numerous the signals, the stronger the case for a potential reversal.
Why three? Because human and algorithmic participants often test a price several times before deciding to push. The first cross can be exploratory, the second can be a larger reaction, and the third can reveal the exhaustion point where the market fails to sustain continuation. When these signals happen in the same price area, you’re watching a localized battle where most of the liquidity has just been consumed.
How I evaluate a cluster:
- Count the signals: Three or more within a 10–15 algo-bar window is my basic threshold.
- Check price compression: Are the crosses occurring in the same small price range? Clustering in the same range is stronger than the same number spread across a wide range.
- Watch volume context: Is the cluster occurring on increasing volume bars? Is it during a session spike or event?
- Session context: Clusters near session highs/lows, after news, or at the close/open are higher-impact.
Remember: a cluster reversal is a probability play. It improves your odds, but it does not guarantee a reversal every time. I teach traders to treat clustering as an actionable edge when combined with sensible risk management.
Step 3: Combine Alpha-Omega Signals and Crosses for confirmation
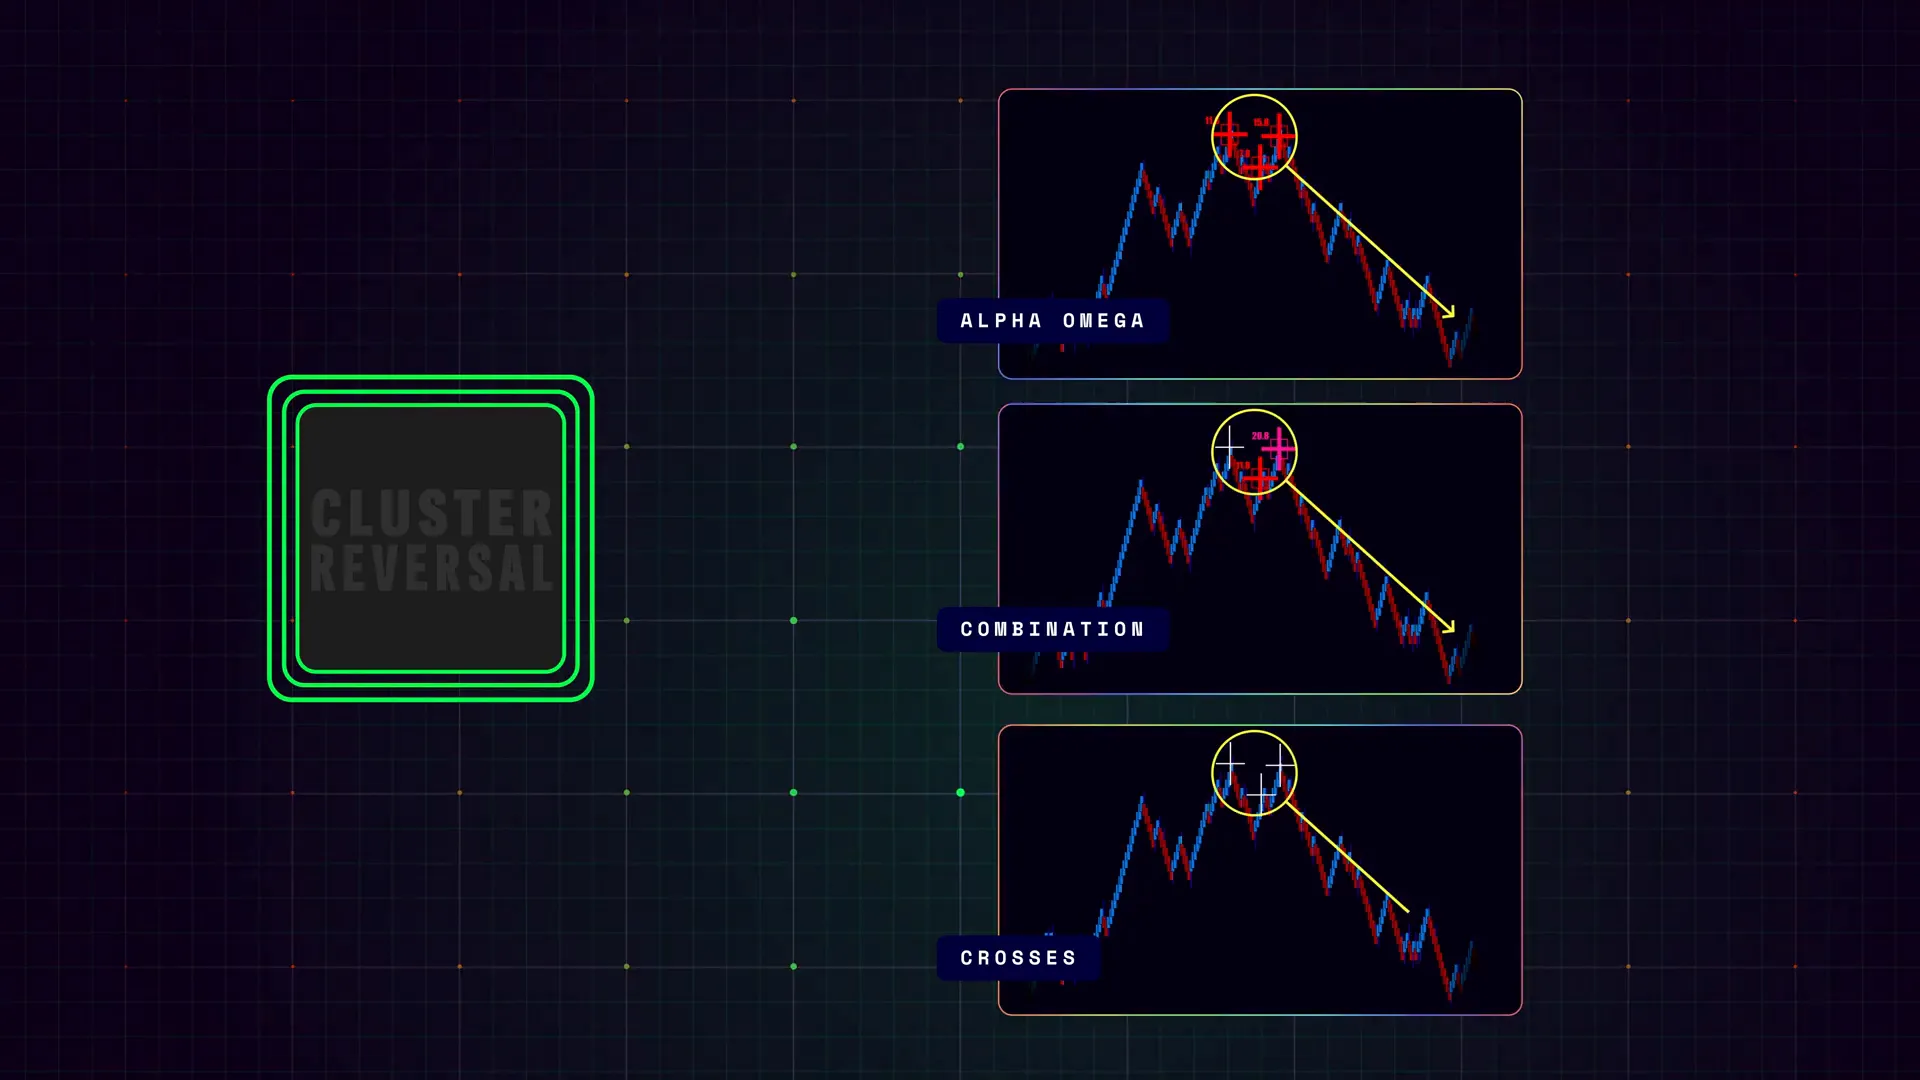
The FlowMaster alpha-omega (alpha-ω) signals are proprietary indicators inside the AlgoBox ecosystem. While crosses focus on volume clusters, alpha-omega signals highlight directional shifts in order flow — who is winning the tape at an execution level. When you see alpha-omega signals aligning with crosses, the setup gains potency.
Mixing signals looks like this in practice:
- Three alpha-omegas alone clustered together — suggests directional flips within order flow.
- Three crosses alone clustered together — suggests volume exhaustion at a price.
- A combination of alpha-omegas and crosses tightly grouped — this is my preferred confirmation because it couples directional intent with volume exhaustion.
One important nuance: I don’t require every trade to have both signal types. If I see a strong cluster of either signal type in a high-probability context, I’ll consider taking the trade. But if both appear together, I increase my position sizing slightly (within my risk limits) and consider a higher confidence plan for scaling and runners.
Finally, avoid overfitting: don’t demand perfect alignment of every indicator. The market is noisy; the goal is to stack small, independent edges into a coherent approach.
Step 4: Entry Rules and Timing — aligning with the last cross
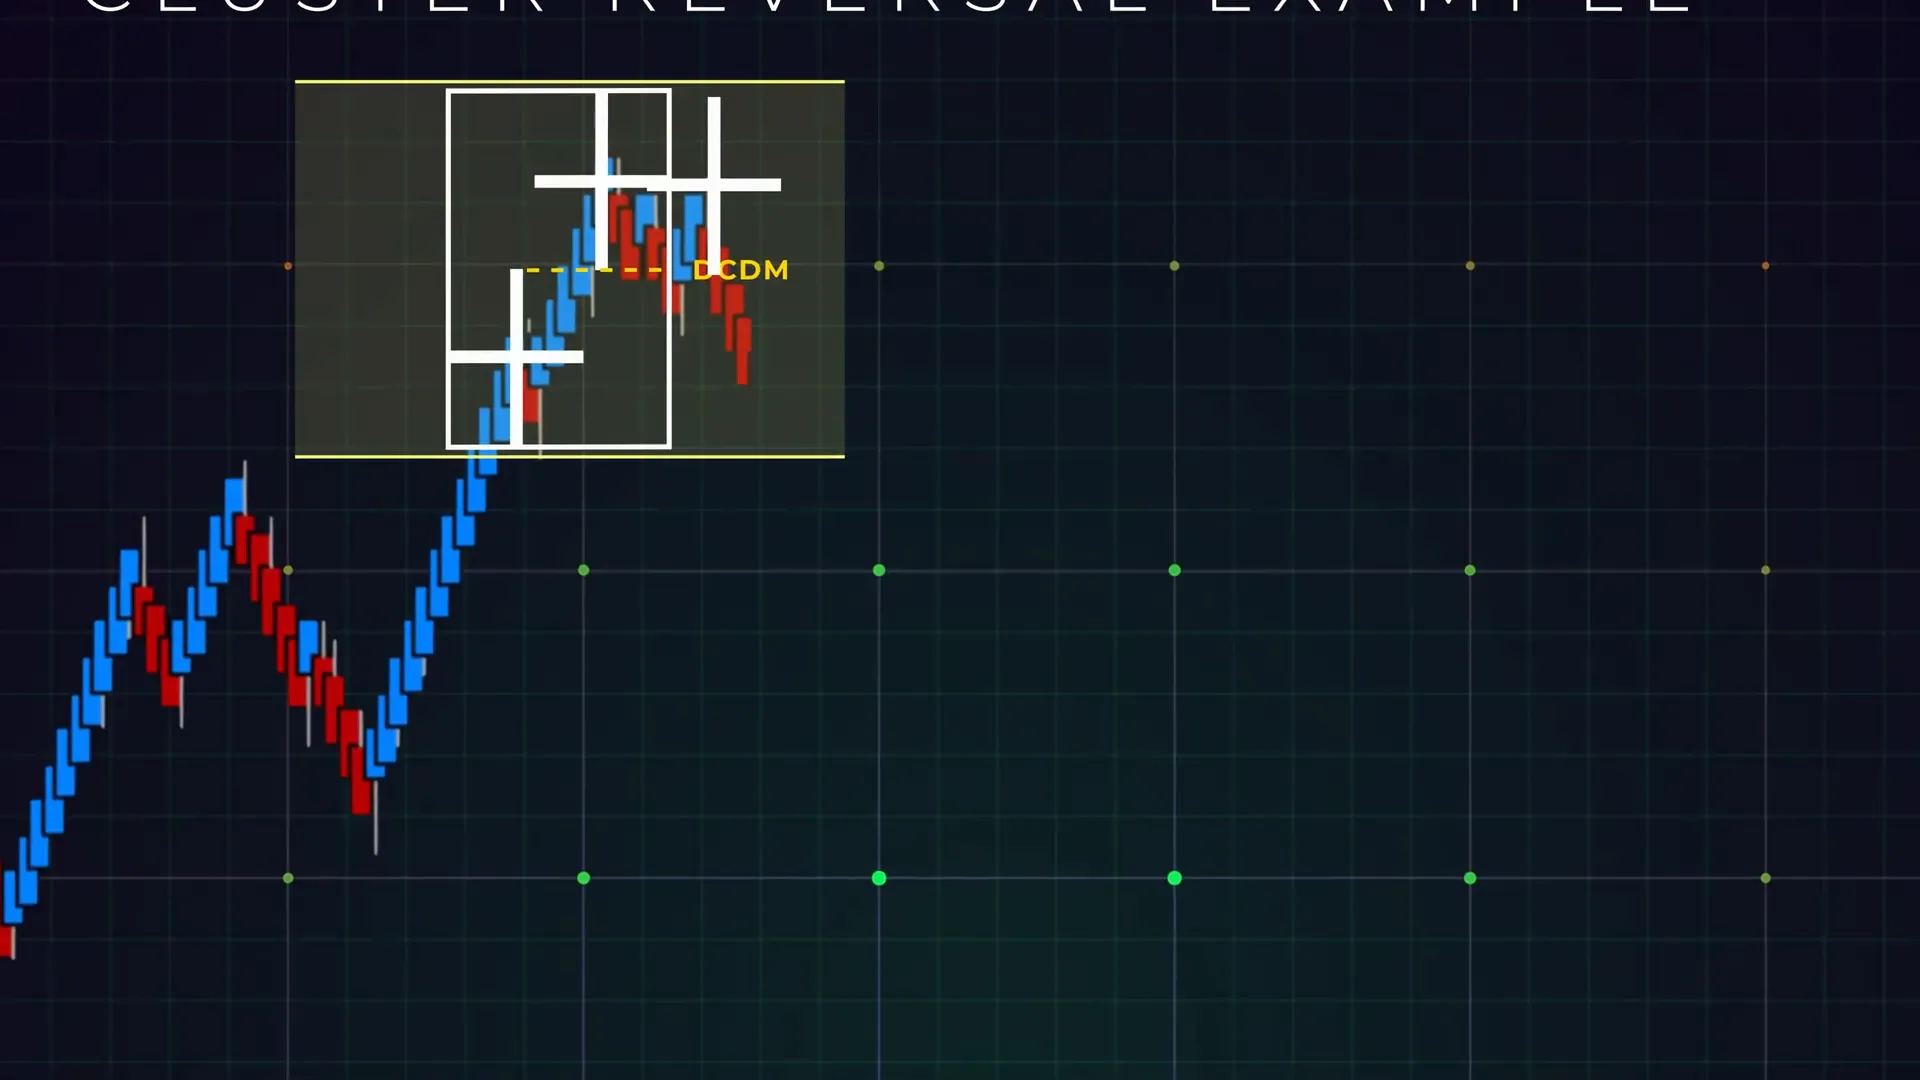
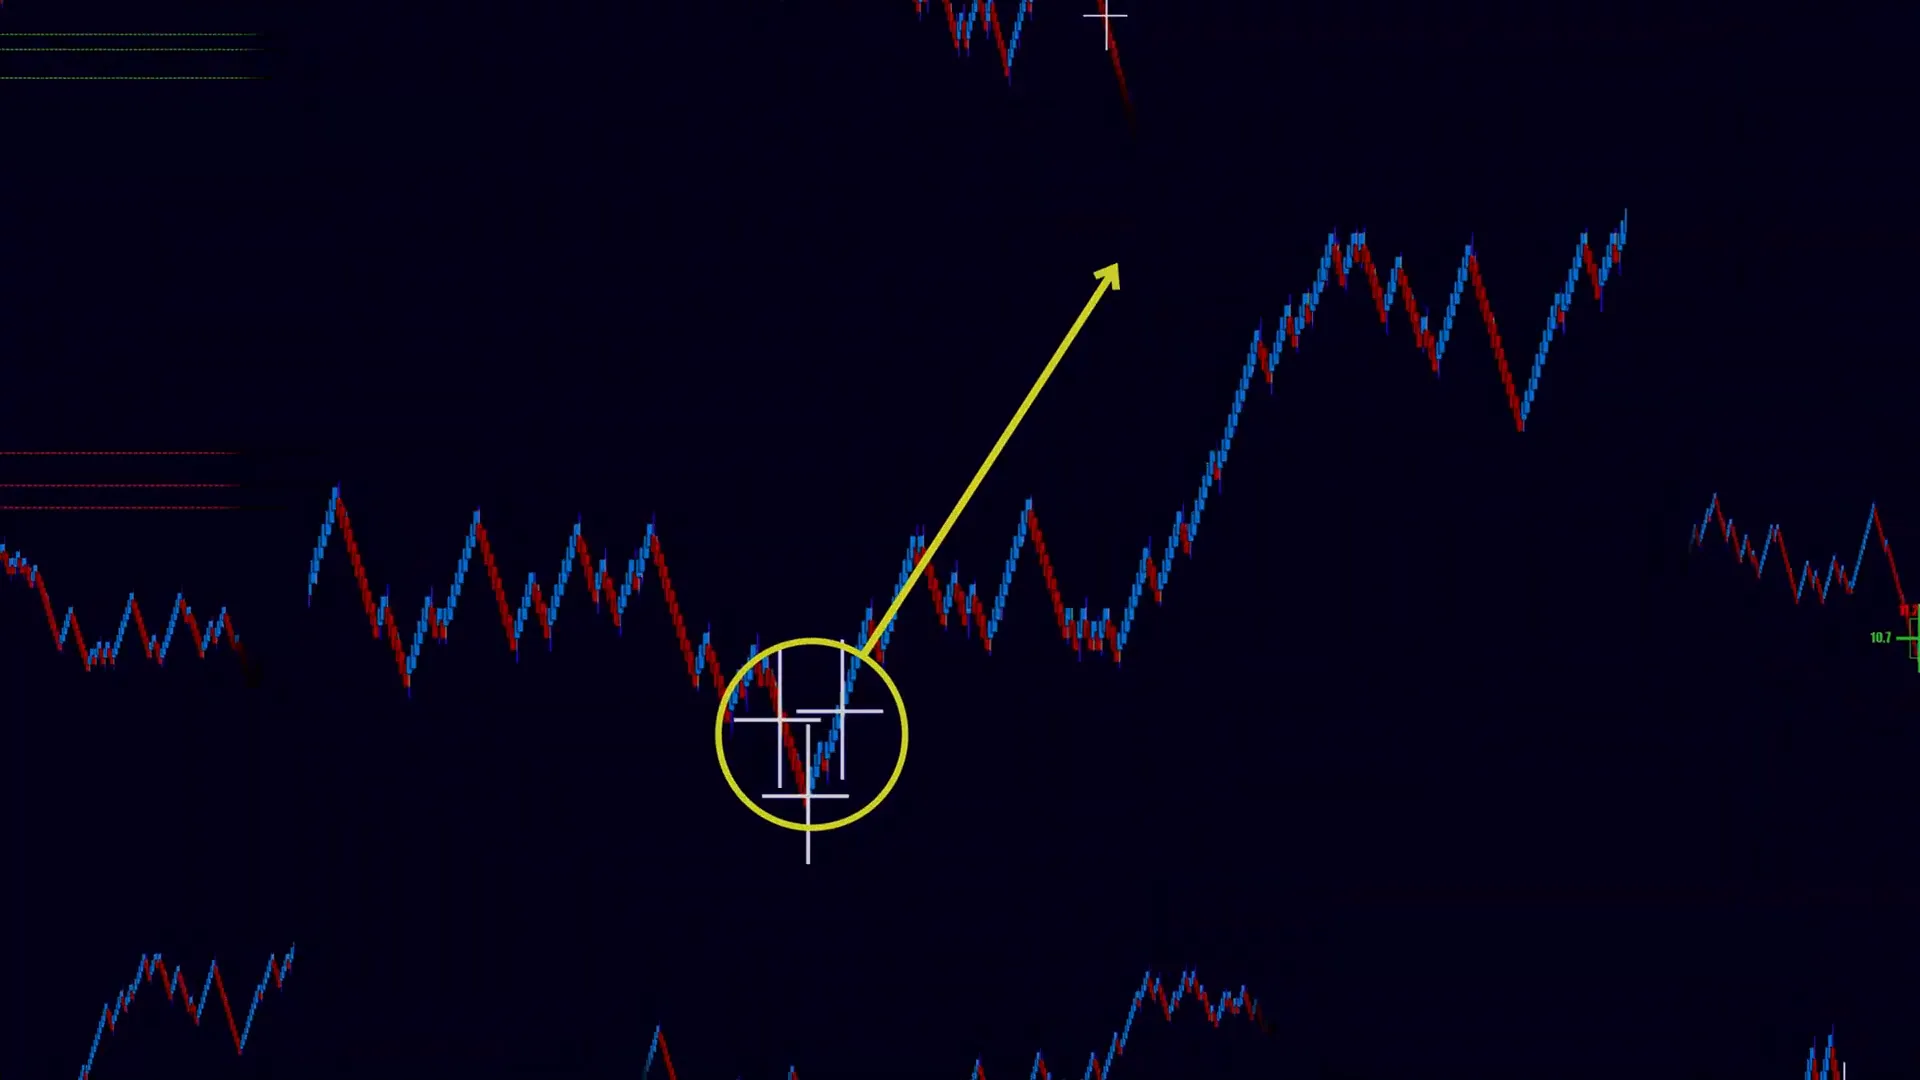
Once you find a cluster, how do you actually enter? My rule is straightforward and repeatable: align with the signal’s direction and ideally enter close to the last cross’s appearance. The logic is that the last cross often marks the point of maximum inflection — the final test where the move either continues or fails. By entering near that cross you attempt to place your stop relatively tight behind the cluster while gaining exposure to the reversal leg.
Entry checklist I follow:
- Confirm cluster: three or more crosses/alpha-omegas within 10–15 algo bars.
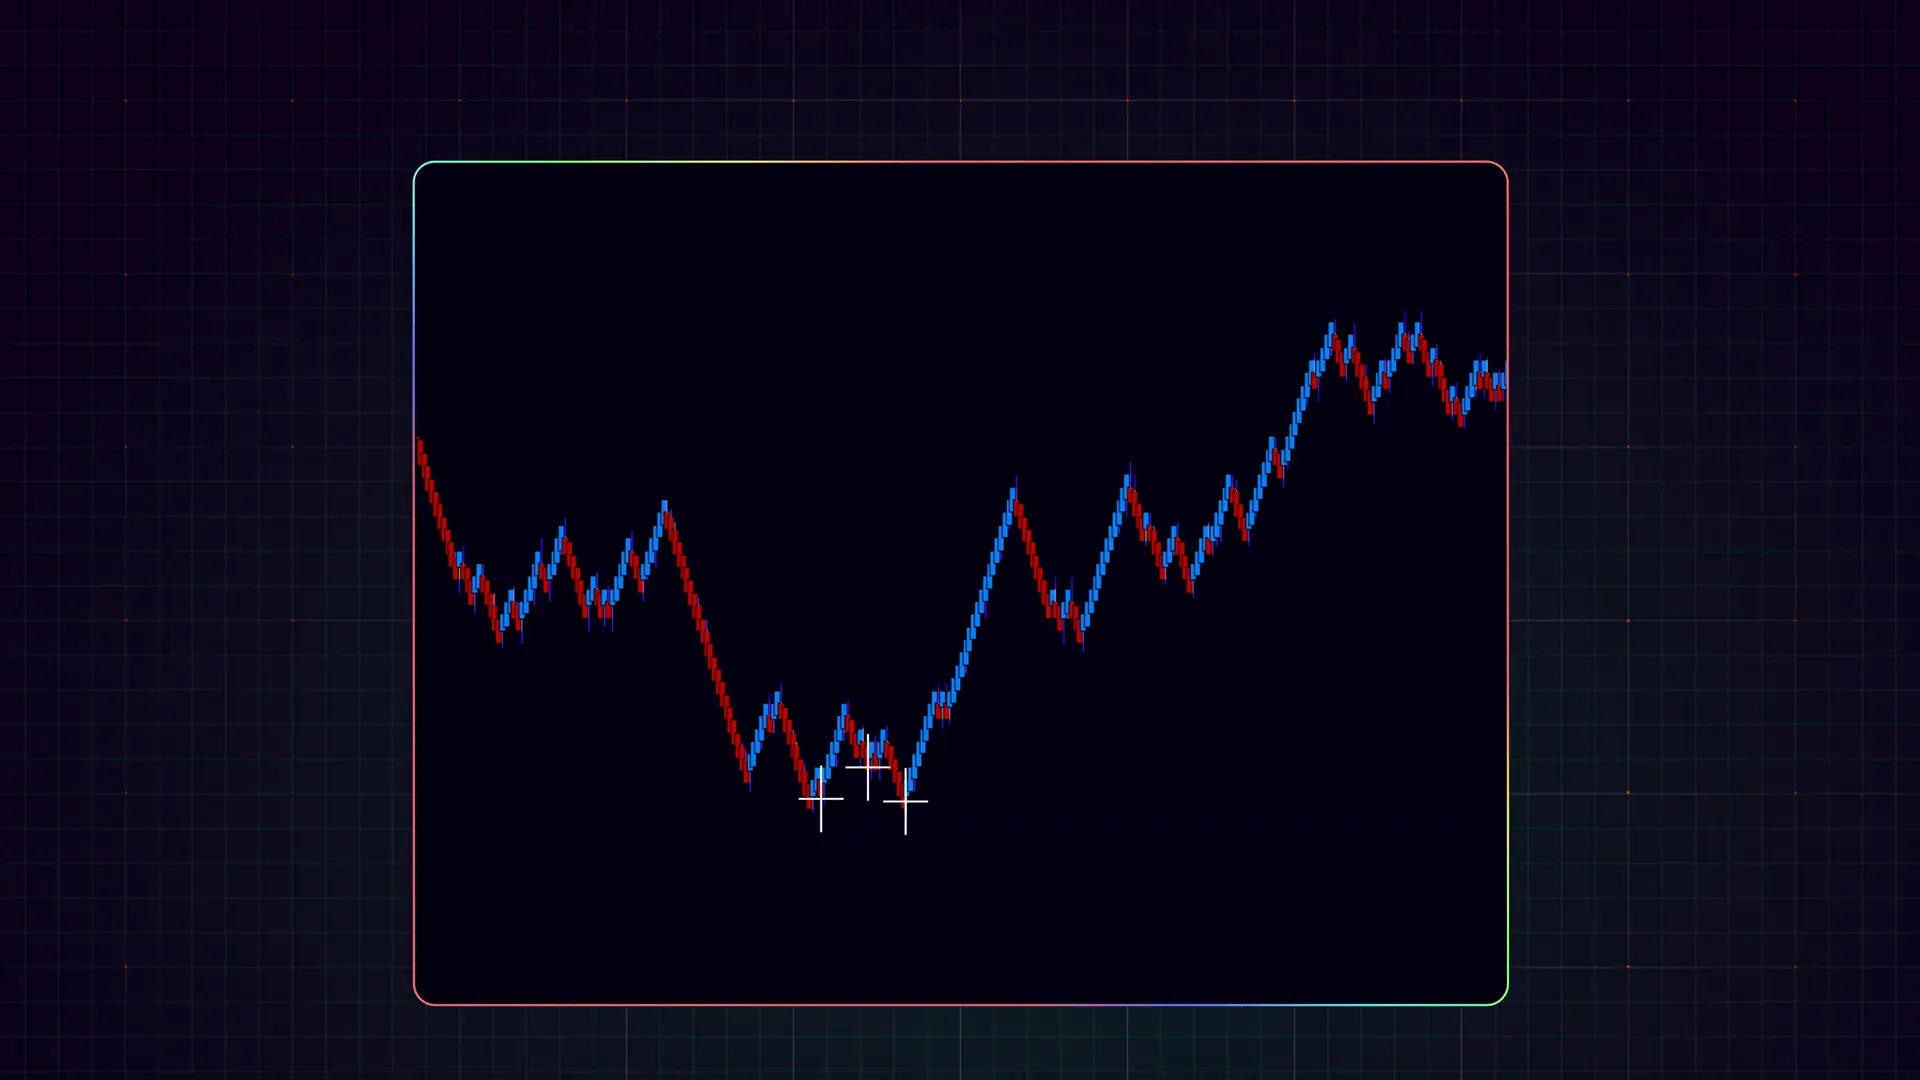
- Confirm price is reacting from the cluster price range and not just drifting: look for a decisive micro-structure flip (e.g., failed extension, wick rejection).
- Confirm session context: avoid taking cluster reversals immediately into scheduled high-impact news unless your plan accounts for it.
- Align with the last cross: place an entry order near that bar’s close (for market orders) or slightly better for limit entries if the move allows.
Examples of entries:
- If three crosses appear at the top of an intraday up move and the price starts to show lower highs and a rejection wick, I may enter a short on a break below the low of the last cross bar.
- Conversely, if three crosses cluster at the bottom of a pullback and the last cross bar prints a solid wick rejection to the downside, I may enter long on the next bar’s break above the last cross high.
Getting the timing right takes practice. In algo bar 1–3 contexts (very tight bars), you often see rapid movement, so entries must be quick or automated. In algo bar 5 or higher and in range bars, entries are more deliberate and allow for limit orders that improve your average entry price.
Step 5: Targets and Scaling — ATM rules and runner management
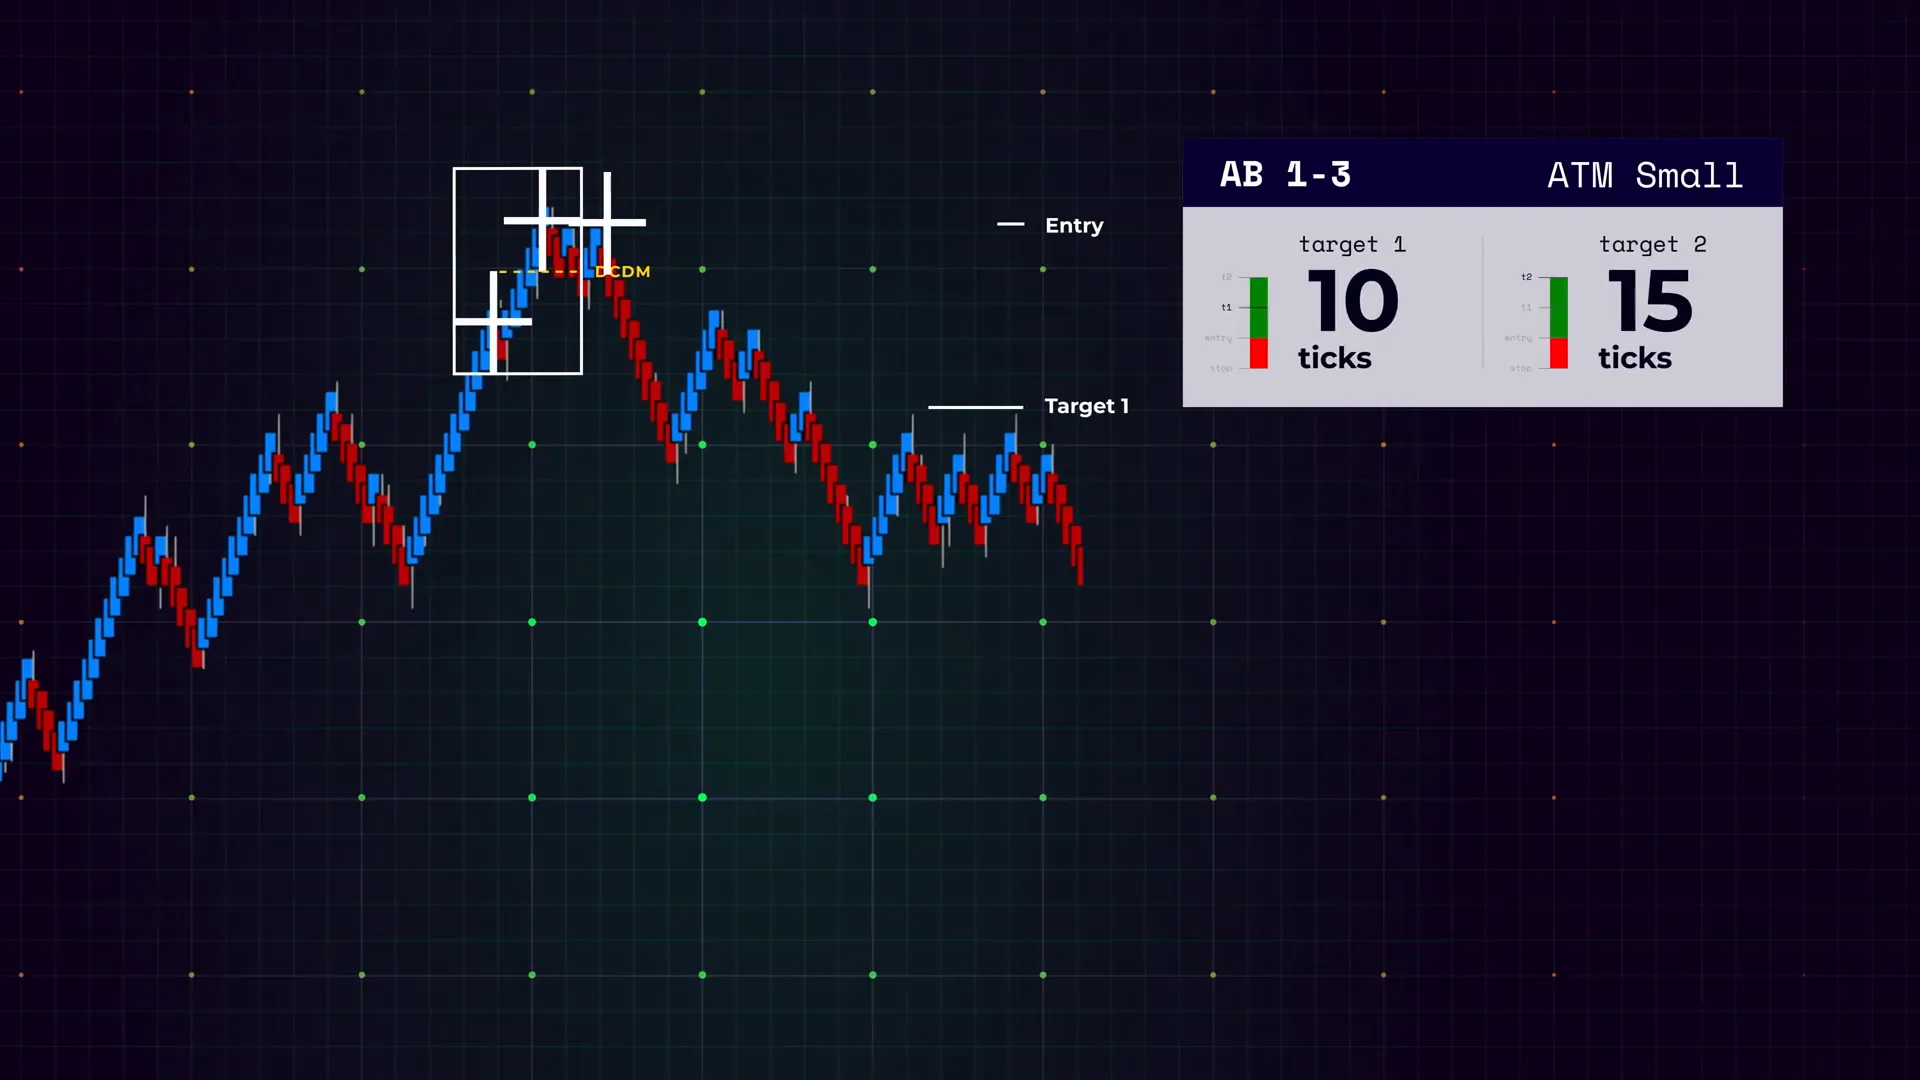
Once in a reversal trade you need a precise plan for targets and scaling. In AlgoBox training I often use ATM targets (Active Trade Management) to handle initial targets and runners. The target sizing depends on your bar type and the instrument’s volatility.
General target rules I use:
- Algo bar 1–3 (fast bar types): I use smaller ATM targets and tighter targets because the move can be quick and momentum can exhaust rapidly. Typical initial targets are conservative — for example, 3–6 ticks on the ES depending on volatility and instrument.
- Algo bar 5 and range bars: I aim for a larger Target 1 around 15 ticks on the ES (adjust for the instrument). This gives the trade room to breathe while still capturing a meaningful swing. I also scale out: take some profits at the initial target and leave runners to capture momentum.
Scaling rules and runners:
- Determine contract allocation per target: e.g., if I trade 2 contracts, I might take 1 contract off at Target 1 and let 1 run to a secondary target or trail.
- If momentum is strong after Target 1 (wide range continuation, aggressive prints), I will trail for runners and set a wider trailing stop behind structural points or behind the cluster area.
- If momentum fades after Target 1, I’ll often close the remainder to lock profit and avoid giveback.
Your target values should be instrument-specific. For the E-mini S&P (ES) a 15-tick initial target is typical on algo bar 5, but for smaller or larger futures you’ll adjust accordingly (e.g., micro ES might use smaller ticks; NQ may require larger tick values due to higher volatility).
One concept to master is reward-to-risk per trade. With a tight stop behind a cluster and a 15-tick first target, your R:R may be favorable. But don’t let attractive R:R lure you into oversized position sizes. R:R only matters when combined with win rate and position sizing discipline.
Step 6: Risk Management and Stops — protect the thesis
Risk management is the backbone of this strategy. A cluster reversal provides a logical invalidation point: the cluster itself. If the price invalidates the cluster — i.e., moves back through it decisively — the reversal thesis is weakened or broken.
My stop placement rule for this setup:
- Place the stop behind the cluster. Concretely, this means a few ticks beyond the extreme of the clustered crosses (above for shorts, below for longs).
- Allow for context: if the cluster sits at a session high/low or near a round number, give the stop an additional buffer (but still within my risk tolerance).
- Use a hard tick-based stop and do not widen it impulsively unless you consciously adjust your risk allocation and document the change.
Position sizing example:
Assume you trade an instrument where the contract multiplier and tick value are known (ES: $50 per point, 1 tick = $12.50). If your maximum per-trade risk is $250 and your stop is 10 ticks, each contract’s risk is 10 ticks × $12.50 = $125. That means you should trade 2 contracts (2 × $125 = $250) to stay within your per-trade risk limit. If your stop is 15 ticks, then each contract risks $187.50; with a $250 risk limit you would only trade a single contract.
Key risk management principles I follow:
- Only risk a fixed percentage of the account per trade (commonly 0.25%–1% depending on your tolerance).
- Place stops before entering or ensure your routing allows immediate stop placement on entry.
- If a trade goes against you and hits stop, accept it and log the outcome. Avoid revenge trading to “get it back.”
- Maintain a daily max drawdown limit and stop trading for the day if you hit it.
Finally, treat invalidations as learning opportunities. Review why the cluster failed — Was it news? A late session liquidity event? Overlap with other structural levels? Documenting these will accelerate your learning curve.
Step 7: Practice in a Simulated Environment — market replay and bootcamp
I can’t emphasize this enough: do not take cluster reversal trades in a live account before you’ve practiced them in a simulated replay. NinjaTrader’s Market Replay is ideal because it lets you step through historical sessions at real speed and execute trades as if the market were live.
Here’s a reproducible two-week practice plan I recommend:
- Week 1 — Observation & Recognition
- Open Market Replay to two recent sessions (e.g., active overnight plus regular session).
- Step through the session and mark every FlowMaster cross and alpha-omega signal.
- Highlight clusters (three or more signals within 10–15 algo bars) and note context (session, news, support/resistance).
- Do not trade yet. Log each cluster with time, price range, and eventual price outcome (reversed, continued, sideways).
- Week 2 — Execution & Management
- Replay sessions and execute trades using the entry and stop rules discussed earlier.
- Use ATM targets: set Target 1 and runners per your instrument rules.
- Commit to a fixed position size that respects risk rules regardless of outcomes.
- After each session, review trades and journal: what was done well, what failed, why the cluster worked or didn’t.
Sign up for training: If you want a structured curriculum, AlgoBox offers an eight-session bootcamp that covers the full system. I encourage using their two-week trial download and joining the bootcamp to see the system applied across many market conditions.
Practice tips I use personally:
- Replay diverse sessions: high volatility, low volatility, news sessions, and quiet sessions.
- Test the setup across instruments: ES, NQ, YM, CL. Clusters may look similar but behave differently by instrument.
- Timebox practice: do focused 60–90 minute sessions where the only objective is to recognize and execute cluster setups.
- Track metrics: win rate, average R:R, maximum drawdown, average duration, and largest winners/losers.
Step 8: Putting It All Together — pre-session routine and live-trade checklist
Here’s a reproducible session flow I use for live trading cluster reversals:
- Pre-market preparation
- Scan overnight and premarket for structural levels (overnight high/low, previous day high/low, open gaps).
- Identify any scheduled news events for the session and plan accordingly.
- Set daily trading limits: maximum number of trades, daily dollar loss limit, and daily profit target.
- Load AlgoBox charts (FlowMaster overlays, alpha-omega) on the instruments I intend to trade.
- Execution during the session
- When a cluster appears, go through a checklist: cluster count, price compression, session context, volume spike, and alpha-omega alignment.
- Set entry near last cross, place stop behind cluster, set ATM targets and runners before entry.
- If you’re uncertain, pass. Not every cluster is tradable; prefer quality over quantity.
- Post-trade review
- Journal every trade with screenshots, rationale, and emotional state.
- Calculate outcome metrics and compare to your expected edge.
- Plan improvements for the next session based on observations.
Live trading is as much about process and discipline as it is about signal quality. A reproducible routine prevents randomness and allows you to scale your skill over time.
Conclusion: Why cluster reversals work for me and how to adopt them
Cluster reversals work because they combine two important market concepts: concentrated order flow and failure points. When multiple FlowMaster crosses or alpha-omega signals align tightly, they reveal where liquidity has accumulated and often where momentum exhausts. Entering near the final cross with a disciplined stop behind the cluster gives a logically defined trade with a quantifiable invalidation point.
But no setup is failproof. Cluster reversals are a probabilistic edge that requires strict risk management, practice in simulation, and rigorous journaling. Use NinjaTrader’s Market Replay to master recognition and execution. Use ATM targets to manage your initial take and runners, and always keep position sizing aligned with account risk rules.
If you want a structured approach, sign up for the AlgoBox two-week trial and consider the eight-session bootcamp to see this system applied across dozens of real market examples. Join live sessions to get real-time feedback as you build your skillset.
I look forward to seeing you improve your tape reading and order flow intuition—practice with intention, manage your risk, and treat each trade as a learning step. See you in the next session.
FAQ — Frequently Asked Questions About the Cluster Reversal Strategy
Q: What exactly defines a cluster in terms of bars and time?
A cluster, for my purposes, is three or more FlowMaster crosses or alpha-omega signals tightly grouped within roughly 10–15 algo bars. The concept is flexible: if the signals are extremely tight in price and appear within a shorter bar count, the strength increases. The 10–15 bar window is a practical guideline to reduce false positives while maintaining responsiveness.
Q: Do cluster reversals work on all bar types?
Yes, they can. However, the behavior and parameters change by bar type. On fast algo bars (1–3) you’ll see rapid clusters and need quicker entries and smaller targets. On algo bar 5 and range bars you’ll have a little more structure and often wider targets (e.g., Target 1 ≈ 15 ticks on ES). The key is to calibrate your target and stop sizes to the bar type and instrument you trade.
Q: Can I rely solely on FlowMaster crosses to take trades?
FlowMaster crosses are a high-value cue, but I recommend combining them with context and other signals (alpha-omega alignment, session structure, volume profile, etc.). Treat crosses as prompts to read the market rather than as a solitary “enter” command. The cluster method insists on multiple crosses or combined signals to improve probability.
Q: How do I size positions for cluster reversal trades?
Use your account risk rules. Determine a per-trade dollar risk limit (for example, 0.25%–1% of account equity). Then calculate risk per contract = stop ticks × tick value. Size = floor(max risk / risk per contract). Example: If your stop is 10 ticks on ES and 1 tick = $12.50, risk per contract = $125. If your maximum risk is $250, trade 2 contracts. Never exceed your predetermined risk allocation mid-trade.
Q: What if the cluster forms during news or low-liquidity periods?
Clusters during news are riskier because the market can gap and slingshot unpredictably. If a cluster forms around scheduled news, either reduce position size significantly, widen stops (with commensurate reduction in contracts to keep dollar risk constant), or avoid the trade altogether. Low-liquidity periods can also produce deceptive clusters; prefer to trade during active session hours when possible.
Q: How do I set my stop behind the cluster? How many ticks?
Stop placement is context-dependent. The general rule is “just beyond the cluster extreme.” In practice this often translates to a stop that is a few ticks beyond the highest cross (for a short) or the lowest cross (for a long). The exact number depends on bar type, instrument volatility, and session context. For ES on algo bar 5 I commonly see stops between 8–15 ticks. Map it to your risk rules and always position size accordingly.
Q: What are common mistakes traders make with this setup?
- Taking entries without verifying cluster strength or session context.
- Playing bigger size because the setup “looks good” and ignoring risk limits.
- Failing to use a predefined stop and letting losses grow uncontrolled.
- Not practicing in market replay and then blaming the system when they lack execution skill.
Q: Is there a way to automate these entries and exits?
Yes. Many traders use NinjaTrader’s ATM strategies to automate target and stop placement and can use order conditions to automate entries. However, I recommend mastering manual recognition and execution first. Automation threatens to compound errors if your logic is not robust. Once your edge is proven in simulation and small live size, consider automating certain aspects for consistency.
Q: How long do cluster reversal trades typically last?
Trade duration varies widely. On fast algo bars (1–3) trades may last seconds to a few minutes. On algo bar 5 and range bars trades can last from a few minutes to tens of minutes depending on momentum and session flow. Scale and runner management will define how long you hold partial positions after Target 1.
Q: What should my journal capture for each cluster trade?
Record the following for every trade:
- Timestamp and instrument
- Screenshot of cluster at entry (use your chart software)
- Why you entered (clear rules: cluster count, context, alpha-omega alignment)
- Entry price, stop price, target(s)
- Outcome and P&L
- Emotional state and execution notes
- Post-trade lesson(s) and action items for improvement
Q: How do I adapt the strategy to different futures contracts?
Adjust target sizes, stop sizes, and position sizing to align with the tick value and volatility of the contract. For example, if trading mini contracts or micro contracts, reduce tick values proportionally and consider tighter stops and more frequent targets. For inherently volatile contracts (like crude oil or natural gas), expect larger swings and adjust your risk per trade accordingly.
Q: Where can I continue learning?
Practice: market replay sessions and the AlgoBox bootcamp are excellent next steps. Join live trade rooms to see real-time application and review. Keep a disciplined learning cadence: observe, execute in simulation, journal, and refine.
Appendix: My personal checklist before taking a cluster reversal trade
Use this checklist as a quick reference before clicking submit:
- Cluster confirmation: ≥3 signals within 10–15 algo bars.
- Price compression: signals happen in the same small price range.
- Alpha-omega alignment: directional shifts support the reversal (if available).
- Session context: not immediately into high-impact news or glaring liquidity vacuum.
- Entry proximity: entry order placed near last cross or conditioned to price action breakout of the last cross bar.
- Stop placement: set behind cluster extreme before entry.
- ATM targets: predefine Target 1 (e.g., 15 ticks for ES on algo bar 5) and runner plan.
- Position sizing: risk per trade within account limits.
- Journal: screenshot cluster and note trade rationale.
Applying this checklist consistently will help you convert the cluster reversal concept into a reproducible edge rather than a random gamble.
Final thoughts
Cluster reversals give you a practical way to read short-term order flow exhaustion and make high-probability entries with clear invalidation points. This strategy is a marriage of tape-reading intuition and mechanical rules: recognize clustered FlowMaster crosses or alpha-omega signals, align entries to the last cross, set stops behind the cluster, choose targets appropriate to the bar type, and practice relentlessly in a simulated environment.
I encourage you to follow the two-week simulation approach, keep a detailed journal, and only risk a small portion of your capital as you build confidence. If you want structured help, consider the AlgoBox training bootcamp to see the system applied across many real-world examples.
Trade with discipline, maintain emotional control, and use clusters as one reliable piece of a broader trading toolkit.
This article was created from the video CLUSTER REVERSAL Strategy 🟪 NinjaTrader Futures | AlgoBox Training with the help of AI.