I’m Vinny (authoring in the voice of ALGOBOX Trading) and in this guide I’ll teach you how I identify, analyze, and trade the DCR — the Double Cross Reversal — using the AlgoBox suite for NinjaTrader. This article distills the exact concepts and actionable steps I cover in the training video so you can apply the DCR strategy in your own day trading. I’ll walk you step by step through the setup, recognition cues, entries, targets, risk rules, and practice routine I recommend to build confidence and consistency.
The DCR is a concise, high-probability concept inside the AlgoBox toolkit. It leverages a proprietary Flowmaster cross signal and other order flow cues to identify potential reversals at the edges of consolidation. My goal here is to explain the what, the why, and the how — and to give you a repeatable framework you can practice using NinjaTrader’s market replay or live trading. This is an informational, hands-on tutorial; I write from the first-person so you can see how I think about the setup and execute it in real time.
Table of Contents
- Outline
- Step 1: Understand the DCR concept
- Step 2: Identify the Flowmaster cross
- Step 3: Recognize the double cross (DCR) timing window
- Step 4: Contextualize the crosses with accumulation zones
- Step 5: Watch for audio box signals and order flow reinforcement
- Step 6: Determine your entry area and trigger
- Step 7: Set targets based on MACVU and accumulation zone geometry
- Step 8: Define your stop and risk management rules
- Step 9: Practice the setup with market replay and simulated environments
- Step 10: Resources, trial access, and continued learning
- Conclusion
- FAQ
- Final notes and practice roadmap
Outline
- Step 1: Understand the DCR concept
- Step 2: Identify the Flowmaster cross
- Step 3: Recognize the double cross (DCR) timing window
- Step 4: Contextualize the crosses with accumulation zones
- Step 5: Watch for audio box signals and order flow reinforcement
- Step 6: Determine your entry area and trigger
- Step 7: Set targets based on MACVU and accumulation zone geometry
- Step 8: Define your stop and risk management rules
- Step 9: Practice the setup with market replay and simulated environments
- Step 10: Resources, trial access, and continued learning
- FAQ: Common questions answered
Step 1: Understand the DCR concept
The Double Cross Reversal (DCR) is a concept built to identify reversal opportunities at important junctures in price action. The core idea is simple: the market gives you two Flowmaster crosses in short order — a “double cross” — near a boundary of a consolidation (an accumulation zone). That alignment often indicates significant order flow shifts and can lead to a reversal.
When I say “reversal opportunities at key market junctures,” I mean places where price has been grinding inside a zone — a consolidation — and a renewed surge of participation suggests participants (often larger ones) are taking a new directional stance. The DCR is not a guaranteed trade but a signal that order flow dynamics are changing and that the potential for a meaningful move exists.
The DCR is best thought of as a pattern made from order flow signals, not from simple price bars. It relies on Flowmaster crosses, audio box clacks (order flow audio cues), and the structure of accumulation zones. Combining these elements gives a higher-probability edge than any single indicator alone.
Why the DCR works (conceptually)
Markets move when supply and demand imbalances are created and then exploited by participants with size and intent. The Flowmaster cross highlights areas where that imbalance is materializing — large traded volume at a price level that causes an internal crossing condition. When you see two of these crosses close together near the edge of a zone, it suggests mounting participation on one side of the market and a potential exhaustion or flip from the other side.
In practice, I treat the DCR like a change-of-guard signal. It tells me larger participants may be setting up to push price in the opposite direction of the immediate micro trend. But context matters: a DCR inside a strong trending auction is weaker than a DCR at the top or bottom of an accumulation zone. Keep that contextual discipline tight.
Step 2: Identify the Flowmaster cross
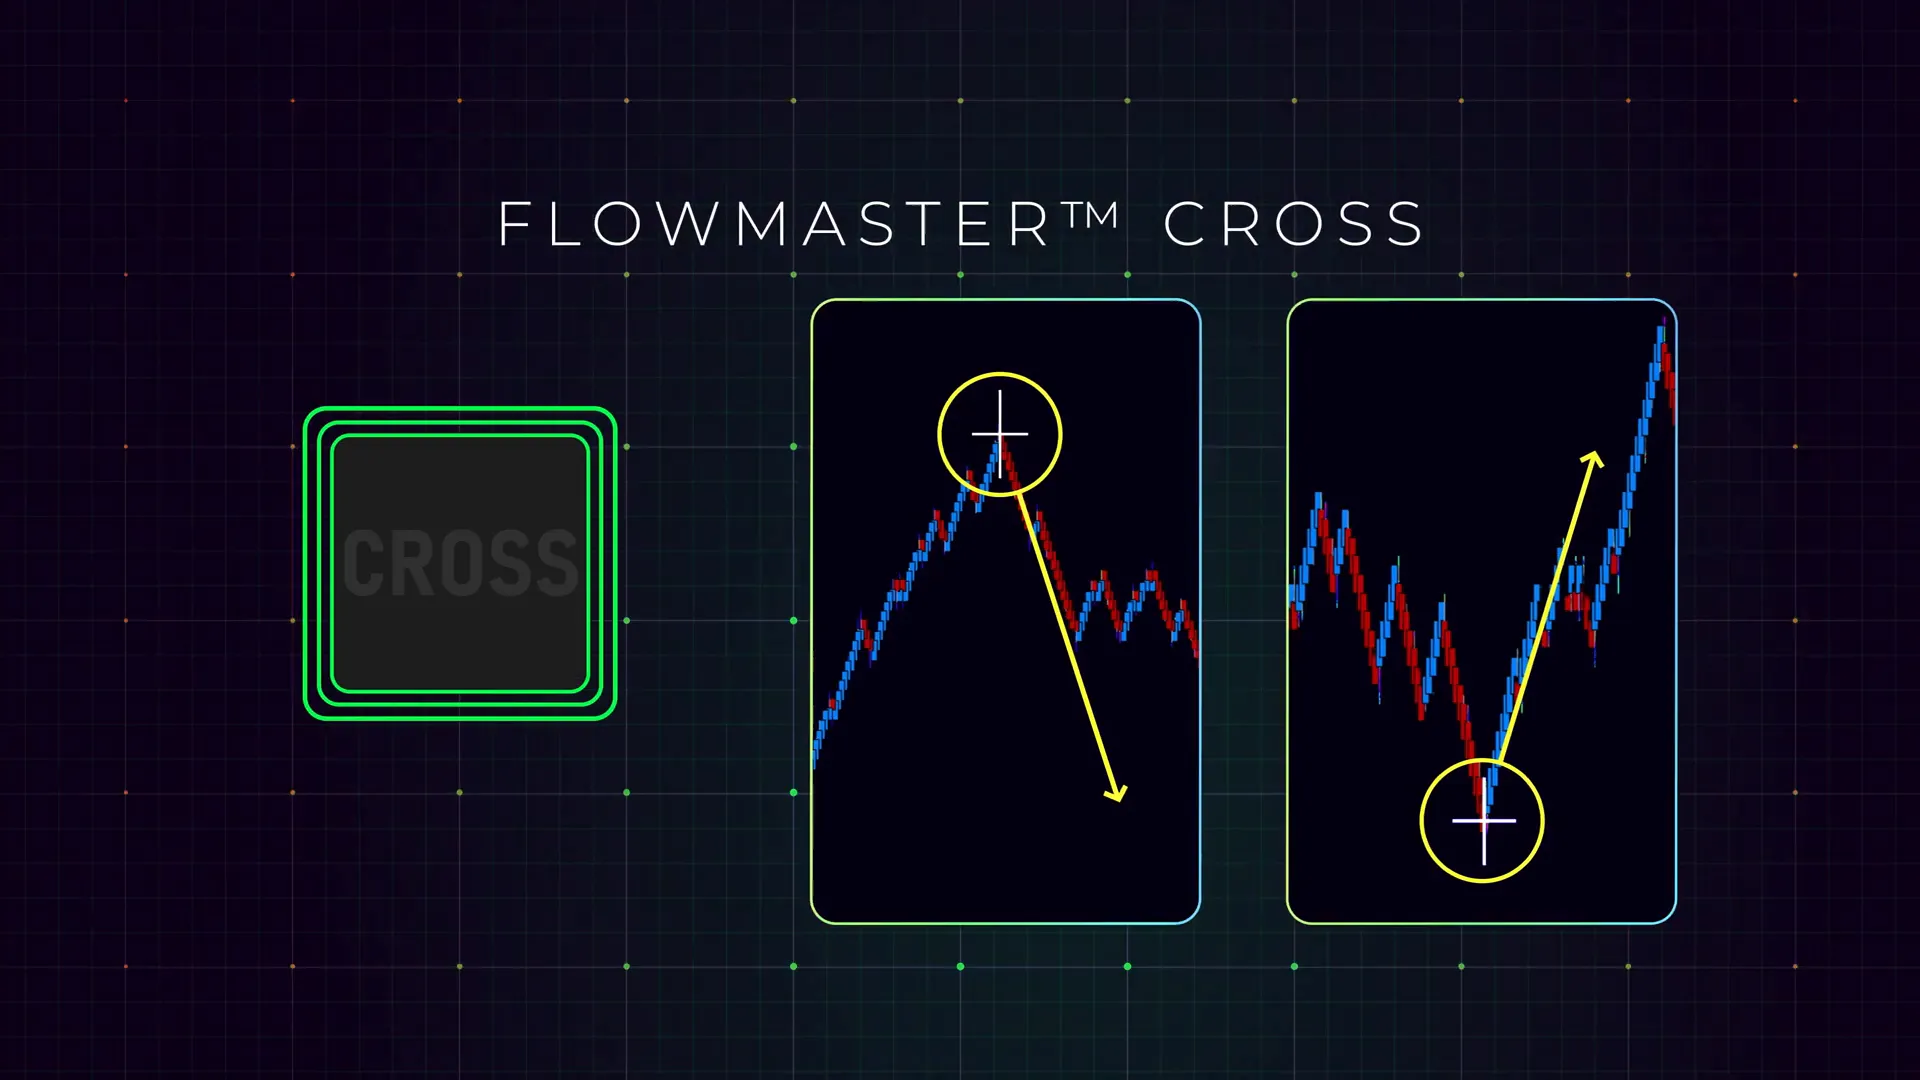
The Flowmaster cross is the foundational indicator for the DCR. It’s a proprietary AlgoBox signal that flags notable order flow events — typically large aggressive trades or clusters that form a “cross” of buying and selling intensity at a price level. When the Flowmaster cross appears, it’s my first cue to pay attention.
Here’s how I treat a single Flowmaster cross:
- I don’t immediately assume a trade; a single cross is an information event — a signal that something is happening.
- I look for follow-through in the next handful of bars — either more crosses, audio box activity, or price movement out of a micro-structure.
- I check the cross in relation to recent price structure: is it against the edge of a consolidation? Is it at a visible support/resistance? If so, it becomes meaningful.
When you first learn to spot Flowmaster crosses, focus on frequency and location. Not every cross matters: the ones that matter are clustered near structural boundaries and accompanied by reinforcing cues. The DCR requires a second cross — that’s the filter that turns a single cross into something tradable.
Practical tips for recognizing Flowmaster crosses
- Configure your chart to show the Flowmaster indicator clearly and use a clean price background.
- Note the timestamp and bar count when a cross appears — it will help you identify if a second cross falls within the DCR window.
- Use a shorter algo bar setting (the AlgoBox environment uses algo bars) so the crosses align with order flow microstructure rather than wider timeframes. This is critical for speed and precision.
Step 3: Recognize the double cross (DCR) timing window
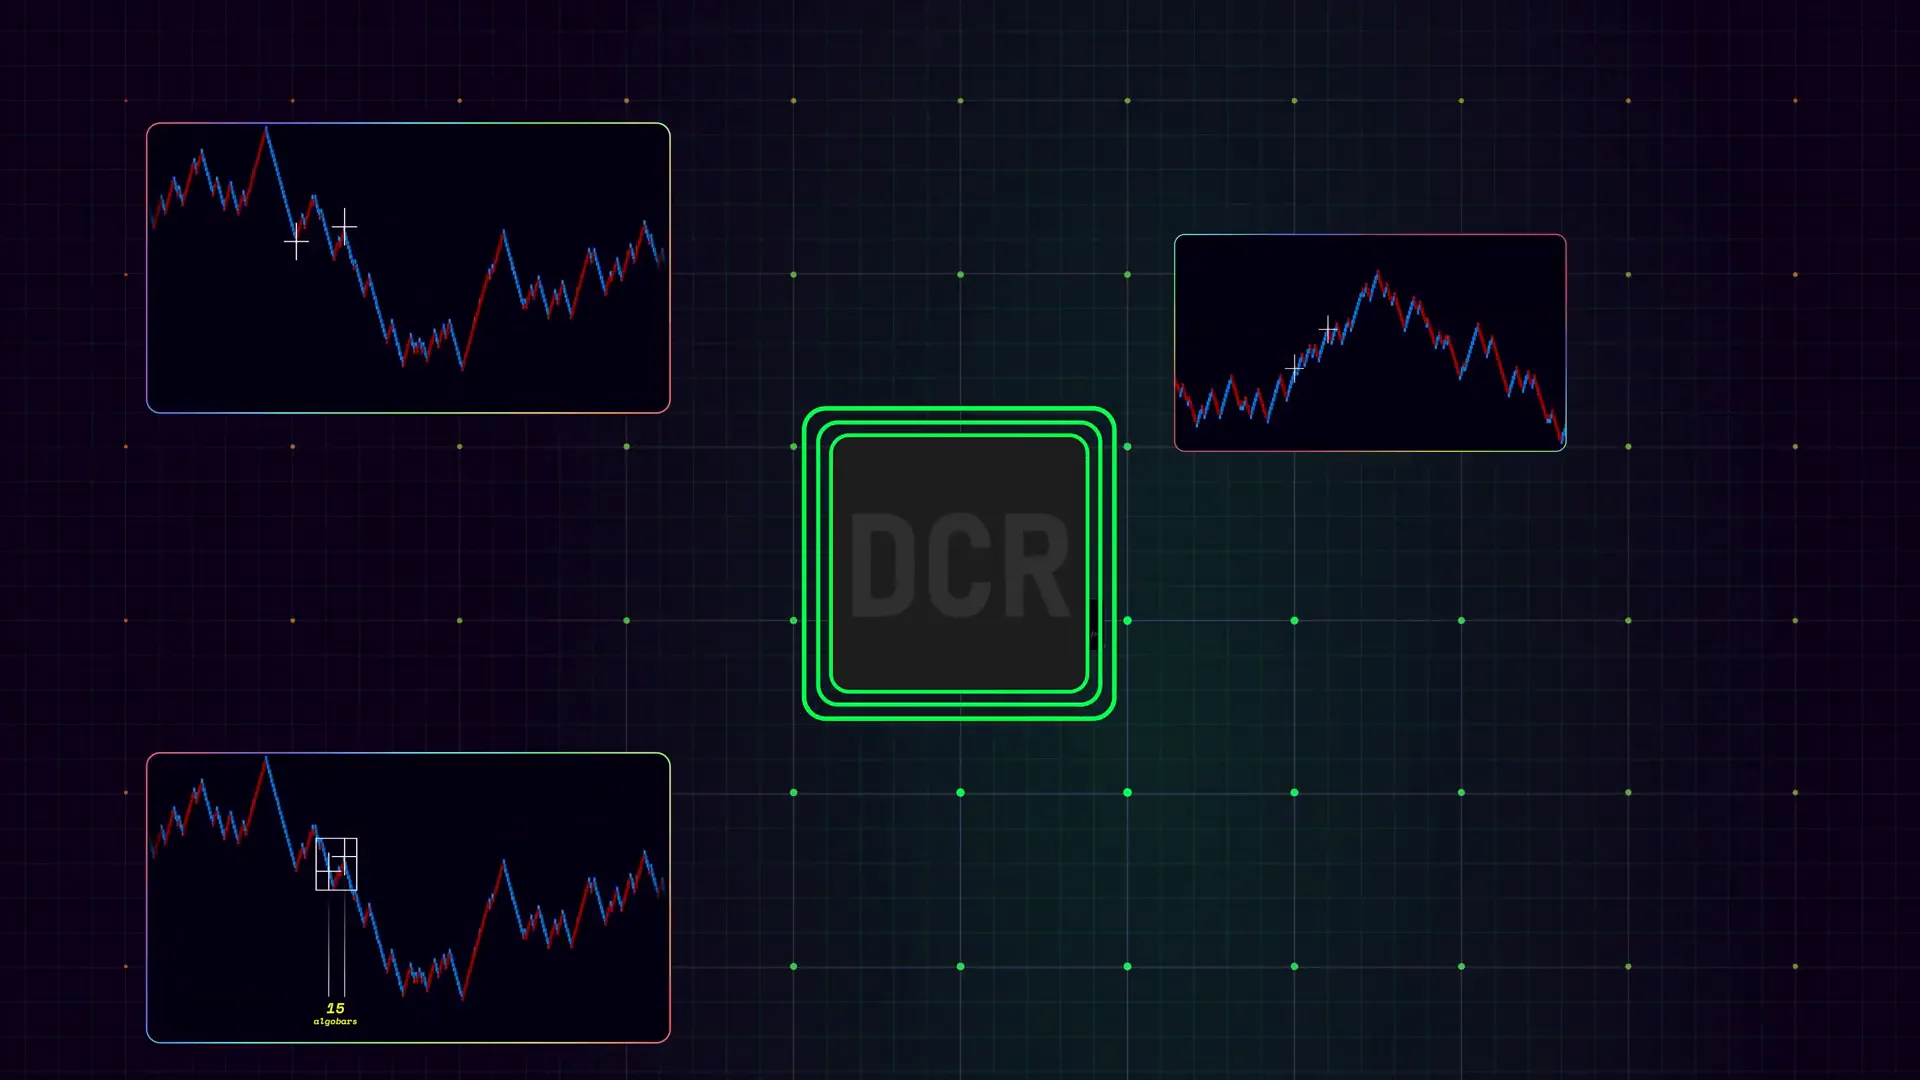
The “double” in Double Cross Reversal is literal. A DCR setup emerges when two Flowmaster crosses form in proximity — typically within 10 to 15 algo bars of each other. This timing window is crucial because it reflects clustered order flow activity rather than two unrelated events.
Why 10 to 15 algo bars? That window balances sensitivity with robustness. If the crosses are too far apart, they may represent separate events and carry less correlation. If they’re too close (like within 1–2 algo bars), they might be a single extended event rather than a genuine double cross. Ten to fifteen bars gives us a clear cluster while allowing for normal micro-intermission in execution.
When I see two Flowmaster crosses within this window and they’re both near the boundary of a consolidation area, my attention moves from “observe” to “prepare.” I start drawing the zone edges, marking the nearest Flowmaster cross for stop placement, and watching for audio box or MACVU confirmations.
Pattern recognition checklist for the DCR timing
- First Flowmaster cross appears — note the bar and price level.
- Within 10–15 algo bars, a second Flowmaster cross appears near the same price region or the zone boundary.
- Both crosses are connected by local price action that suggests the crosses are part of a concentrated order flow episode (not two isolated spikes across different structures).
If all three items check, you have a DCR candidate. If one fails, step back and let price reveal more structure. I prefer to wait for higher-quality setups than to force trades.
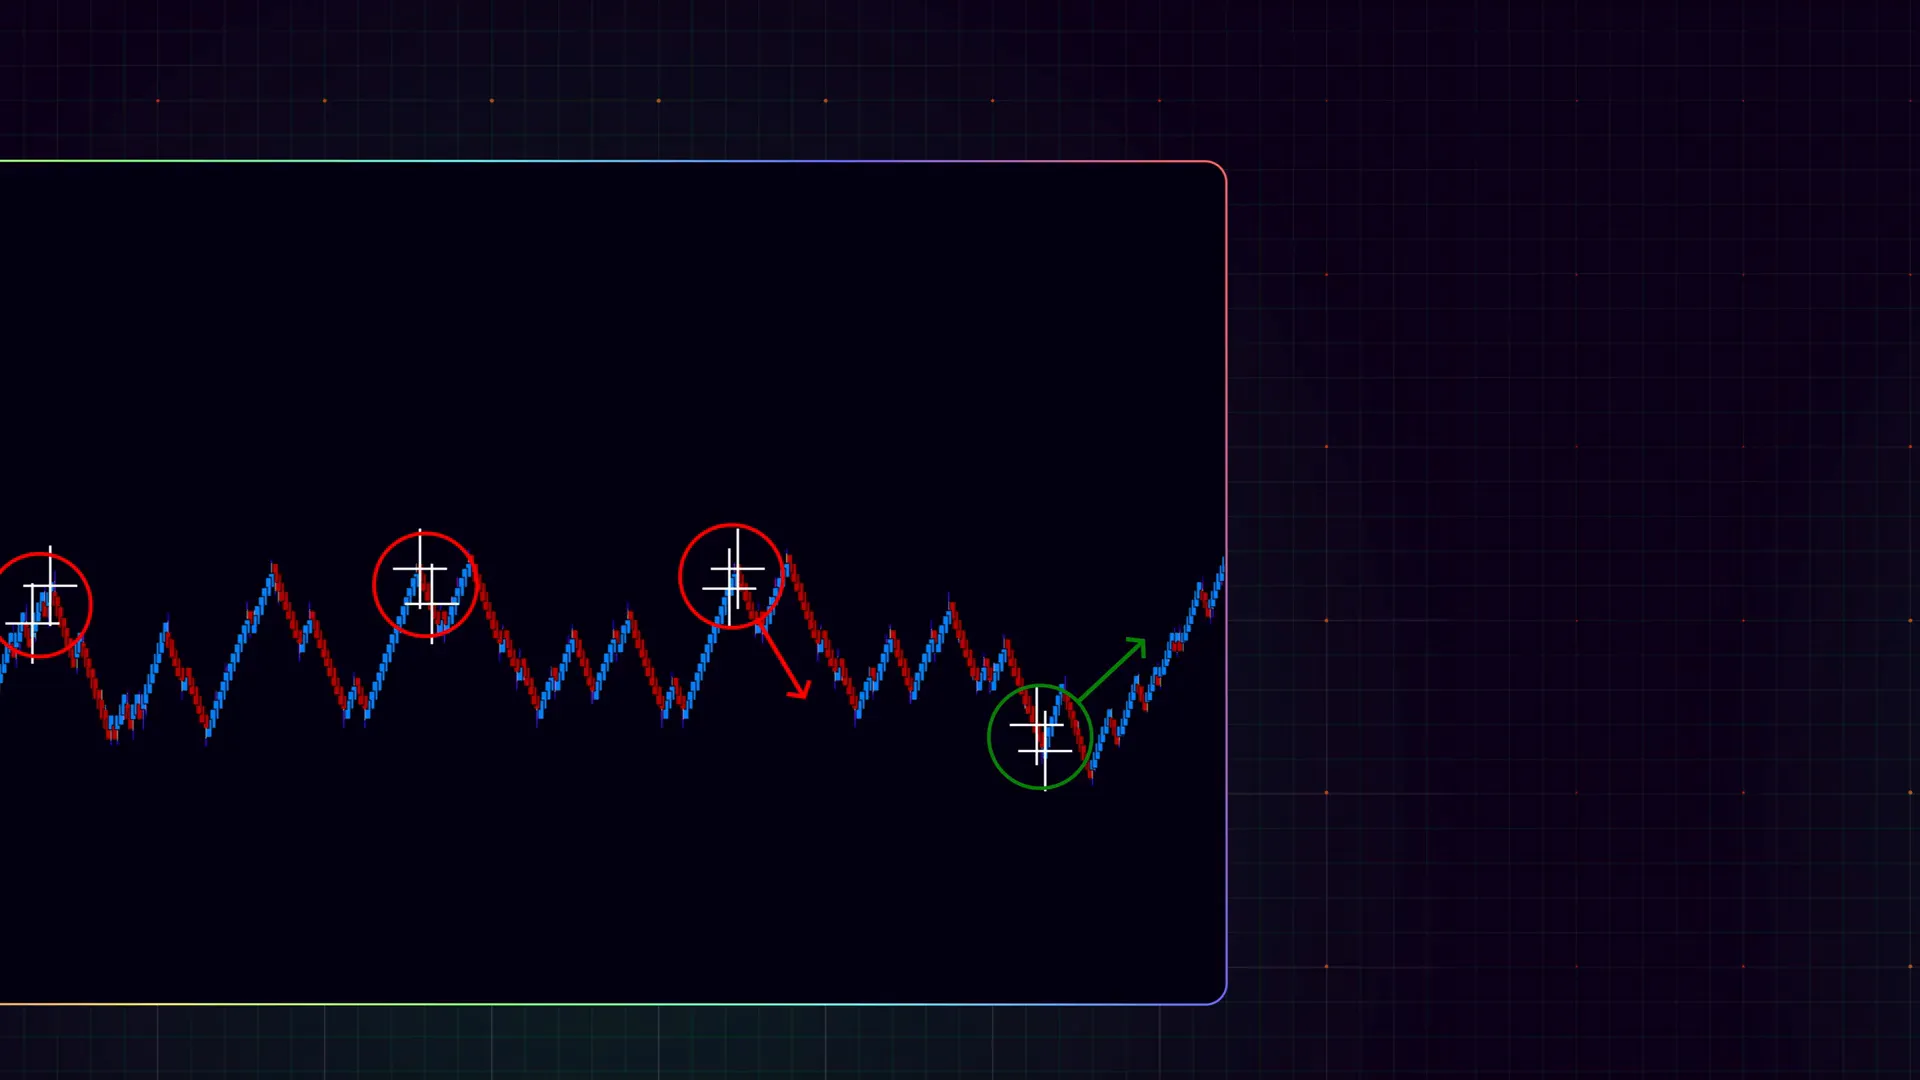
Step 4: Contextualize the crosses with accumulation zones

Context is king. A double cross that occurs randomly in a trending market is less compelling than a double cross that forms at the perceived top or bottom of an accumulation zone. Accumulation zones are ranges where buyers and sellers have been absorbing each other’s activity; edges of these zones are where decisions — breakouts or reversals — often happen.
When I assess a DCR candidate, I always ask: Where is this relative to the nearest accumulation zone boundary? If the pair of Flowmaster crosses align with the boundary, the potential for a reversal increases. The market often “tests” the edges of accumulation before choosing direction. The DCR is one of those tests translated into an order flow signal.
There are three common outcomes when price interacts with a zone boundary alongside DCR signals:
- Reversal — price pivots away from the edge after the second cross and order flow follows, giving a clear move into the opposite side of the zone or beyond.
- Fade and fail — the crosses occur but no follow-through arrives; price grinds and the signal becomes a whipsaw.
- Breakout continuation — the crosses are followed by aggressive continuation, suggesting the DCR was part of the breakout mechanics rather than a reversal; this is why stop placement is critical.
I favor DCR trades that align with a clean, visible accumulation zone and where other indicators (audio box clacks, MACVU alignment) provide confirmation. Without that context, the double cross is simply a curiosity.
Step 5: Watch for audio box signals and order flow reinforcement
One of the most immediate reinforcing cues I look for after the second Flowmaster cross is the audio box clack. The audio box is an AlgoBox audio-volume indicator that provides audible cues when larger participants or concentrated volume enter the market. When audio box clacks begin almost immediately after the DCR, it strongly suggests the trade is attracting more participants — a behavior I want on my side.
Why audio box clacks matter:
- They indicate real-time market participation from larger traders or institutions.
- They reinforce the order flow signal provided by Flowmaster crosses — independent confirmation gives weight to the setup.
- They often align with volume surges that lead to measurable price moves — ideal for short-term targets.
Audio confirmations aren’t mandatory, but when present they increase my conviction. I also monitor MACVU (another AlgoBox metric) to see if it’s aligned with the audio box. If both MACVU and audio box reinforce the move, I’ll size up more confidently and target a larger portion of the accumulation zone.
Step 6: Determine your entry area and trigger
Entries with the DCR are about precision. The setup is most often played near a key price level — usually the edge of the accumulation zone or a nearby micro-support/resistance that coincides with the Flowmaster crosses. I’ll outline my preferred entry approaches so you can choose the one that best fits your style and risk tolerance.
Primary entry options I use:
- Passive entry at a tight retracement near the Flowmaster cross: After the second cross and audio confirmation, wait for a small retracement and buy/sell near the cross or the zone boundary. This gives a better price and a cleaner stop placement.
- Immediate aggressive entry: If the audio box and MACVU show strong alignment and volume surges, I may enter aggressively as the move begins to accelerate. This captures momentum but increases the chance of whipsaw.
- Confirming bar entry: Some traders prefer to wait for a full algo bar close in the direction of the expected reversal before entering. This approach reduces false signals but may give up some edge.
I personally prefer a hybrid: small initial position on a passive/near-cross entry and add-on as the move confirms with continued audio box activity and price clearing micro-structure. This lets me manage risk while exploiting momentum if the market cooperates.
Entry checklist
- Two Flowmaster crosses within the 10–15 algo bar window.
- Crosses occur at/near the accumulation zone boundary.
- Audio box clacks and/or MACVU align for added confirmation.
- Entry executed near the cross or after a small retracement depending on your plan.
Step 7: Set targets based on MACVU and accumulation zone geometry
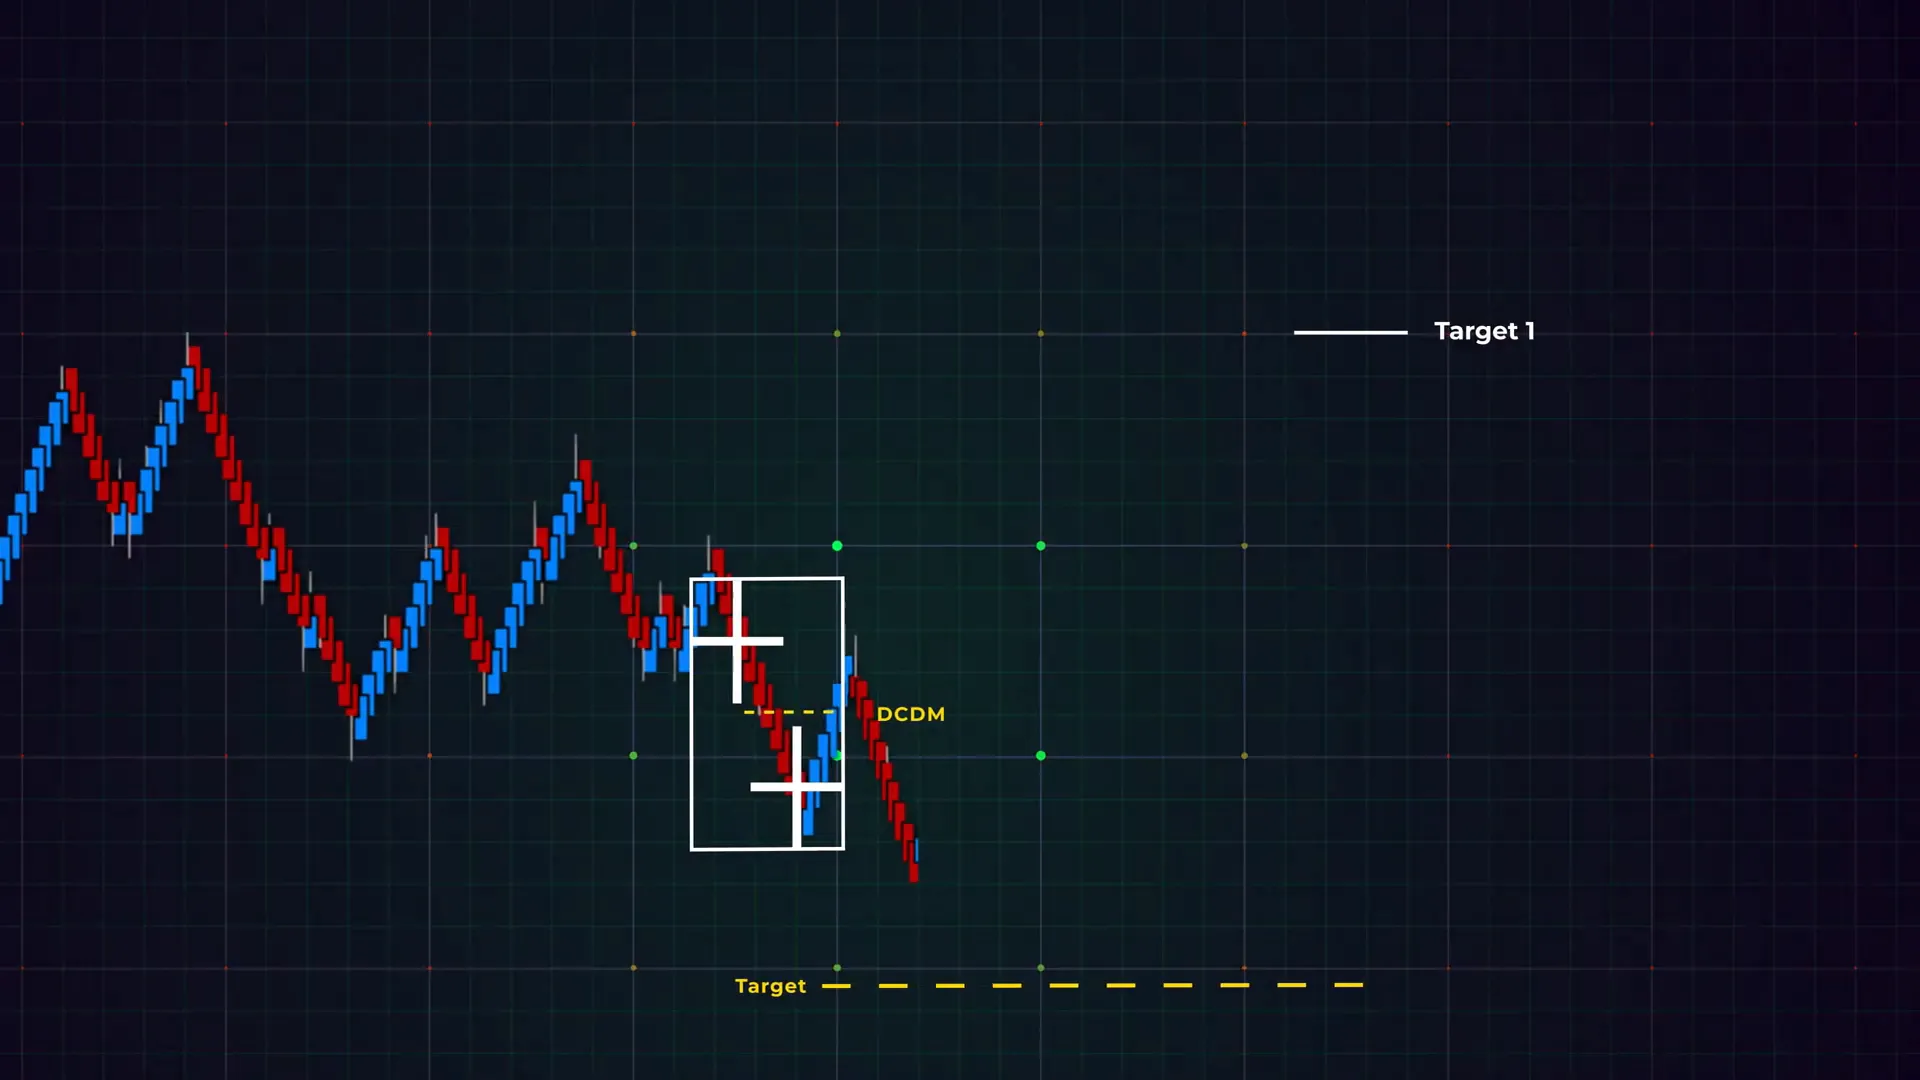
Targets with the DCR are straightforward but conditional. The idea is to measure targets relative to the accumulation zone geometry and the MACVU alignment. MACVU is an AlgoBox volume metric that helps determine whether pressure is likely to sustain all the way across the zone or just halfway.
Target rules I follow:
- If MACVU is aligned with the audio box (both supporting the reversal), I generally target the other side of the accumulation zone. This is a larger target and assumes sufficient momentum to carry price through the zone.
- If MACVU is not supportive or audio clacks are weak/short-lived, I target the middle of the zone. This is the lower-risk, smaller-reward approach that preserves a favorable risk-to-reward while acknowledging limited momentum.
- Partial exits: I sometimes scale out — take a portion at the midpoint and leave a runner to target the far edge if momentum continues.
Remember that accumulation zones vary in width. In a narrow zone, the distance to the other side may be small, so adjust your expectations accordingly. Always relate target sizing to the stop size to maintain consistent risk management.
Step 8: Define your stop and risk management rules
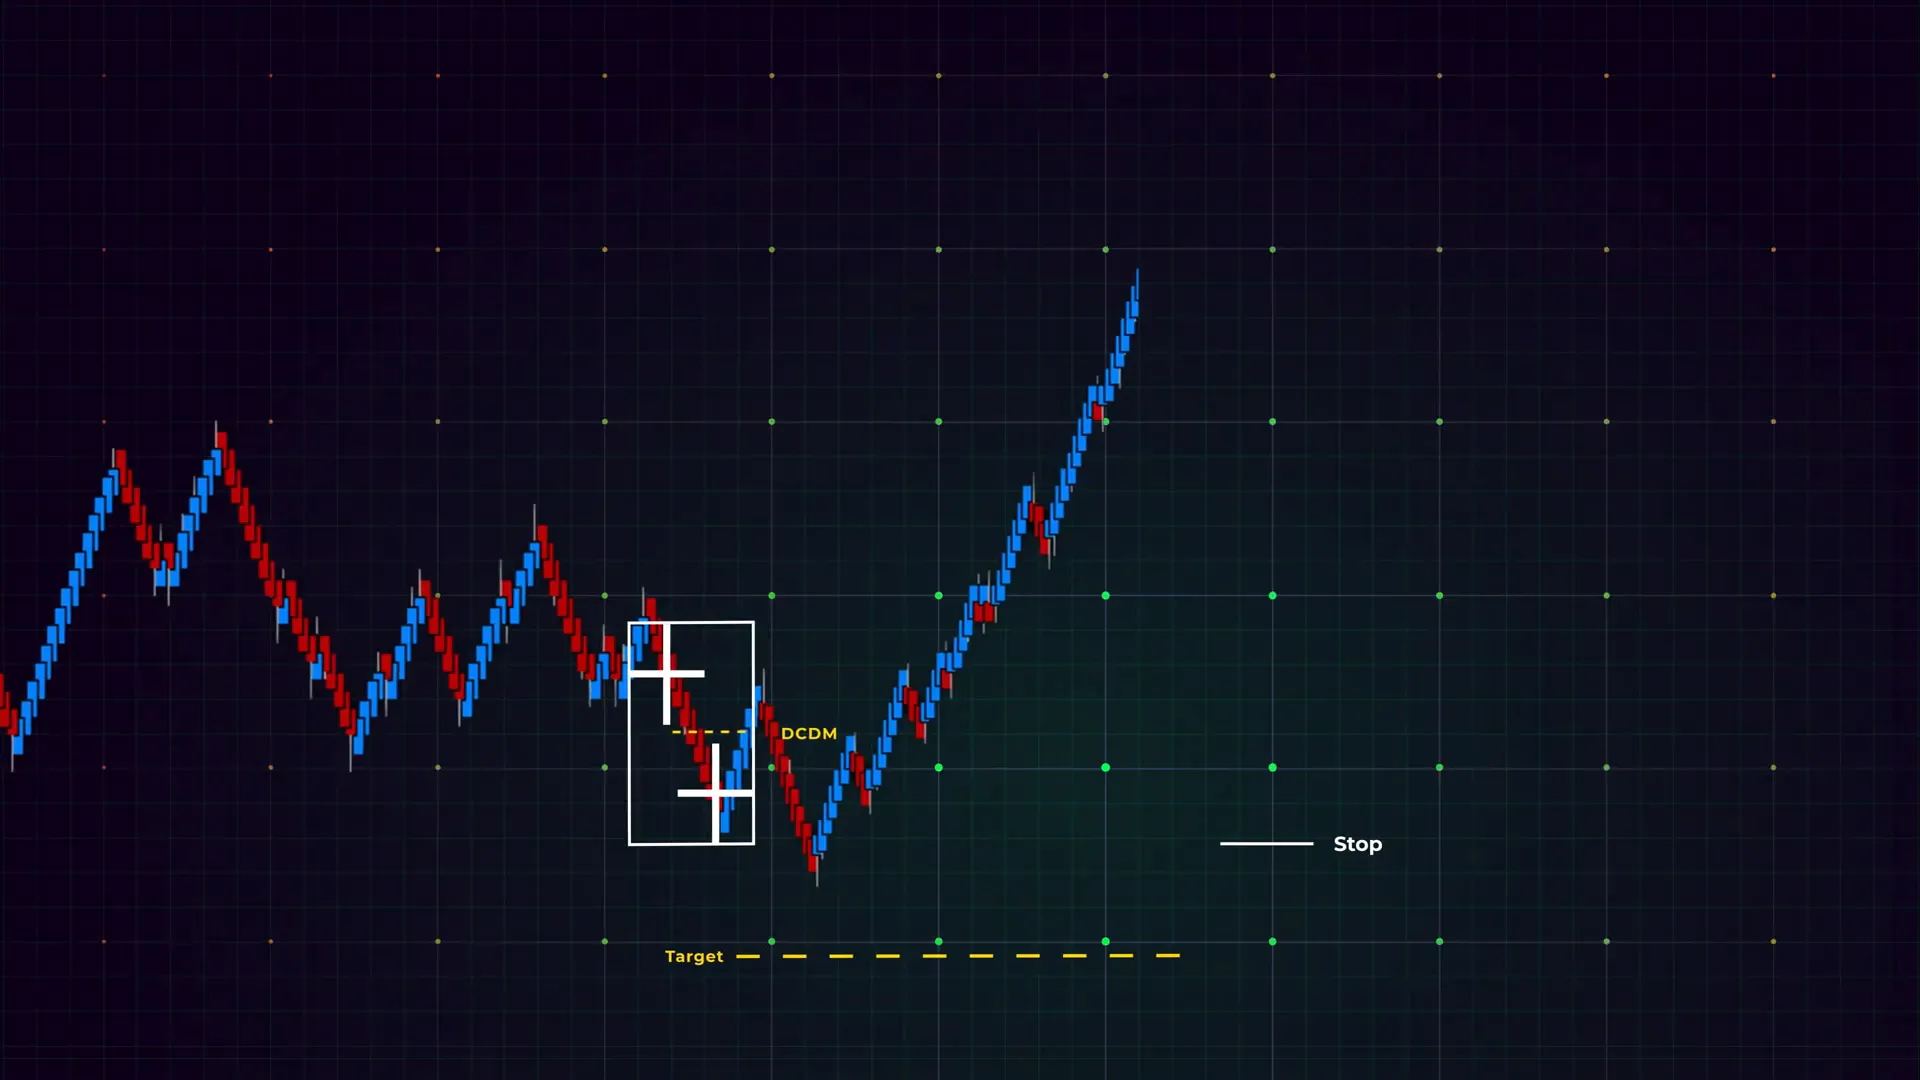
Risk management is non-negotiable. For the DCR setup I typically place my protective stop below the nearest Flowmaster cross (for long trades) or above the nearest Flowmaster cross (for shorts). The logic is simple: the Flowmaster cross is the structural marker of the signal, and if price undercuts/overthrows it, the premise of the DCR is invalidated.
Stop rules I adhere to:
- Primary stop: just beyond the nearest Flowmaster cross. This gives the market enough room for small fluctuations but keeps risk controlled.
- Maximum stop: define a maximum acceptable loss per trade in your account terms (e.g., no more than 0.5%–1.5% of trading capital on any single trade depending on your risk tolerance).
- Adjust for volatility: widen stops in inherently more volatile contracts or during major news events. Alternately, avoid trading volatile windows if your strategy is not built for them.
- Scale down size: if the stop must be larger than your ideal, reduce position size to keep the dollar risk within acceptable limits.
Also, consider the scenario of a DCR fail. Not every double cross leads to a reversal — sometimes it’s a fakeout. If the trade reverses and crosses back through your stop level, accept the loss quickly and move on. My experience tells me that preserving capital is the most reliable route to long-term success.
Sample risk calculation
Suppose you’re trading a futures contract where each point is worth $25, and your account risk limit per trade is $250. If the stop distance from entry to the Flowmaster cross is 2 points, your position size should be 5 contracts ($25 × 2 × 5 = $250). If the stop is 4 points, reduce to 2 contracts to keep risk near $200. Always do the math before you press the trigger.
Step 9: Practice the setup with market replay and simulated environments
Mastering the DCR — like any order flow strategy — requires repetition. I recommend using NinjaTrader’s market replay feature to practice in a risk-free environment. Market replay lets you replay historical sessions with full order flow and AlgoBox indicators so you can build recognition and refine your execution without losing real capital.
Practice routine I follow:
- Choose a recent session with clear consolidation zones and pull up the AlgoBox indicators (Flowmaster, audio box, MACVU).
- Run the replay at a speed that allows you to observe the sequencing of crosses and audio signals; speed it up only when you’re comfortable.
- Mark each DCR candidate and record your thought process: why would you or wouldn’t you take the trade? Where would you place stops and targets?
- Execute simulated orders using the replay. Treat each trade like real money — follow your position sizing and stop rules.
- Review your trades: what worked, what failed, and why? Look for patterns in failures to adjust your decision criteria.
Consistency in practice accelerates your recognition of the 10–15 algo bar window, the characteristic look of a Flowmaster cross, and the meaning of audio box clacks. The goal is to make the decision process fast, systematic, and repeatable.
Step 10: Resources, trial access, and continued learning

If you want to test the full AlgoBox suite while practicing the DCR, I suggest starting with a trial and pairing that with a structured learning path. A two-week trial lets you explore the suite; an eight-day bootcamp distills multiple AlgoBox strategies into a focused curriculum. I recommend combining the trial with market replay drills to accelerate learning.
Beyond the tools, join a community for real-time insights. I participate in group trade rooms and discussion channels because they’re helpful for learning nuance and for seeing how other traders approach entries, targets, and risk. Watching others trade the same signals exposes you to variations and edge cases you might not encounter alone.
Finally, treat this as a progressive journey. The DCR is powerful when executed consistently, but that consistency is built over weeks and months of disciplined practice. Use the tools, follow the rules I’ve outlined here, and iterate based on objective trade review.
Conclusion
The Double Cross Reversal (DCR) is a practical, order-flow-driven strategy for identifying reversal opportunities at the edges of accumulation zones. It relies primarily on the Flowmaster cross signal, requires two crosses within a 10–15 algo bar window, and gains conviction from audio box clacks and MACVU alignment.
When I trade the DCR, I look for:
- Two Flowmaster crosses clustered in time
- Location near a visible accumulation zone boundary
- Audio box clacks and MACVU alignment for confirmation
- Entries near the cross/zone edge with a stop beyond the nearest Flowmaster cross
- Targets set to the midpoint or far edge of the zone depending on confirmation strength
My single best piece of advice: practice. Use NinjaTrader’s market replay with the AlgoBox indicators to train your eyes and ears on the DCR signature. Keep a disciplined risk process and review trades objectively. Over time, you’ll be able to identify high-probability DCR setups quickly and manage them with confidence.
FAQ
Q: What exactly is a Flowmaster cross?
A: The Flowmaster cross is a proprietary AlgoBox indicator that highlights significant, concentrated order flow activity at a price level. It indicates where large, aggressive trades have intersected buying and selling pressure in a way that forms a “cross” condition — a cue that market participants with size may be acting. It’s the primary signal used to identify the DCR pattern.
Q: How strict is the 10–15 algo bar window for the double cross?
A: The 10–15 algo bar window is a guideline, not an immutable law. It balances sensitivity and reliability. If the two crosses happen too far apart, they’re likely unrelated. Too close might be a single prolonged event. For beginners, stick to the 10–15 bar range to build pattern recognition. As you gain experience, you’ll develop an intuition for minor deviations based on context and volume profile.
Q: Can the DCR be used on any instrument or timeframe?
A: The DCR is an order-flow concept so it translates best to instruments with good order flow transparency (futures and some high-liquidity FX pairs). It’s primarily designed for algo-bar environments and short-term day trading. While you can adapt the concept across different timeframes, the specific settings (algo bar size, volume thresholds) should be adjusted for the instrument’s volatility and liquidity.
Q: What if audio box clacks don’t appear after the double cross?
A: Absence of audio box clacks reduces conviction. I don’t automatically trade every DCR candidate without audio confirmation unless price action and MACVU strongly support it. In weaker confirmation scenarios I either target the midpoint of the zone or skip the trade. The audio clacks are a high-conviction signal because they indicate larger participants entering; when they’re missing, treat the setup cautiously.
Q: How do I size my position for DCR trades?
A: Position sizing should be based on your risk per trade (an absolute dollar amount or percentage of capital) and the distance from your entry to your stop (which is usually near the Flowmaster cross). Calculate the contract size such that your maximum potential loss at the stop equals your pre-defined risk limit. If stop distance increases, reduce size proportionally.
Q: Can the DCR be used with only one Flowmaster cross?
A: A single Flowmaster cross is informational but not a DCR. Some traders will trade off a single cross if supported by other strong contexts and confirmations, but the DCR definition explicitly requires two crosses in proximity. The double cross filter reduces false positives and improves the statistical edge of the setup.
Q: What is MACVU and how does it affect my target?
A: MACVU is an AlgoBox volume metric that measures aggregated volume characteristics and helps gauge momentum strength. If MACVU is aligned with the audio box and is supporting the reversal, I aim for the other side of the accumulation zone. If MACVU is not in alignment, I conservatively target the zone midpoint. MACVU helps scale your expectations for how far price may travel after the DCR.
Q: How often do DCR setups occur?
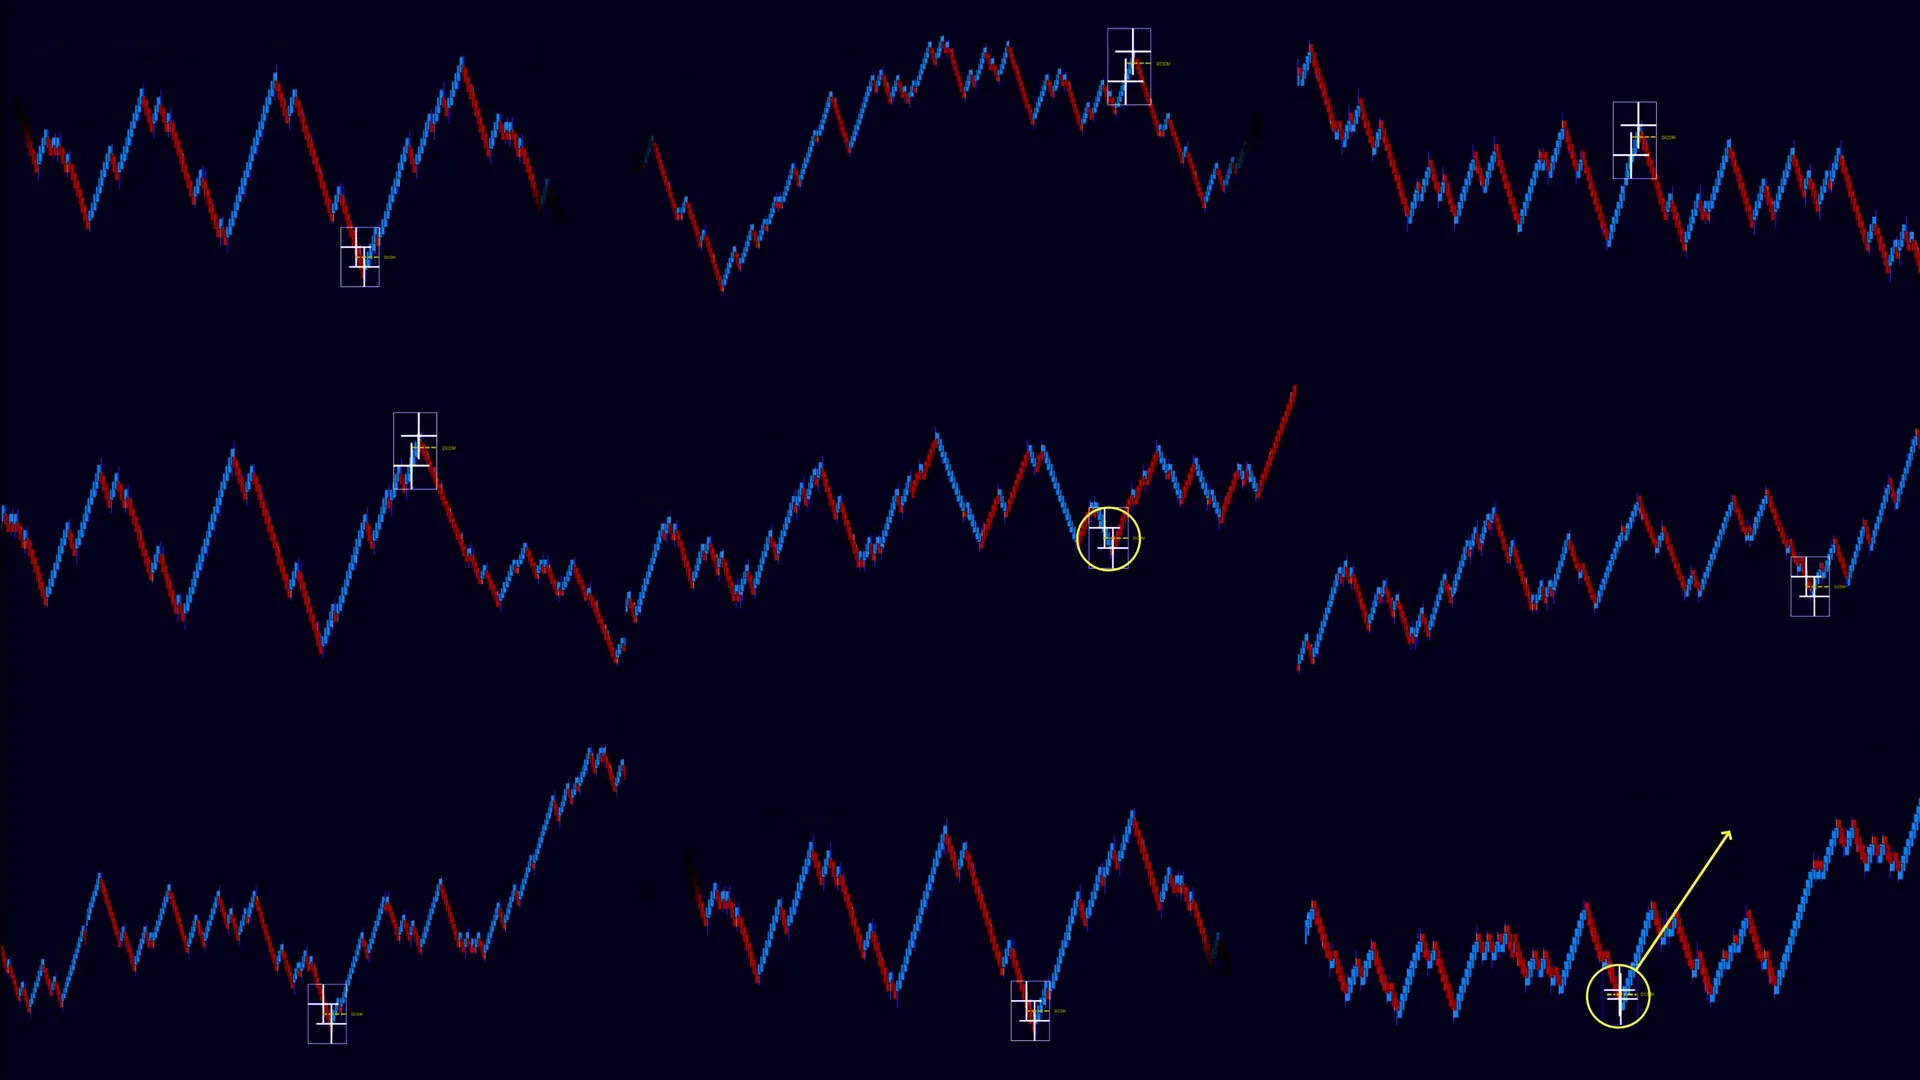
A: Frequency depends on market conditions and the instrument. In more range-bound markets you’ll see DCR candidates more often as price interacts with accumulation zones. In strong trending markets DCRs are rarer. I emphasize quality over quantity — it’s better to trade fewer high-probability setups than many marginal ones.
Q: What should I watch for to avoid fakeouts?
A: Fakeouts are common when volume and participation are inconsistent. To reduce fakeouts:
- Look for audio box clacks and MACVU alignment.
- Prefer DCRs that occur at clear structural boundaries of accumulation zones.
- Avoid trading during major news events or times of illiquidity.
- Use a stop placement at or beyond the nearest Flowmaster cross and size to your risk tolerance.
Q: How should I journal DCR trades?
A: Keep a structured journal with at least the following fields: date/time, instrument, entry price, stop price (and rationale), target(s), size, Flowmaster timestamps for both crosses, audio box behavior, MACVU reading, and a short commentary on why you took the trade. Review your journal weekly to identify pattern failures, sizing mistakes, or confirmation quality issues.
Q: Are there variations of DCR I should know about?
A: Yes — traders often adapt the DCR to their style. Common variations include using different algo bar sizes, trading only on the long or short side based on higher timeframe bias, or combining DCR with profile or footprint clusters. These variations can be effective but should be backtested and practiced to ensure they preserve the core logic of the double-cross confirmation.
Final notes and practice roadmap
To wrap up, here’s a simple 4-week practice roadmap you can follow to internalize the DCR concept:
- Week 1 — Familiarization: Watch historic sessions and mark every Flowmaster cross you see. Note the ones that form doubles within 10–15 algo bars.
- Week 2 — Context practice: Replay sessions and focus on accumulation zones. Identify where DCR candidates align with zone edges and annotate whether audio/MACVU confirm.
- Week 3 — Simulated execution: Use NinjaTrader market replay to place simulated orders on DCR setups. Follow strict stops and sizing rules and journal each trade.
- Week 4 — Review and refine: Analyze your trade journal. Identify your top two recurring mistakes and create explicit rules to prevent them (e.g., “don’t take DCRs without audio clacks unless MACVU > X”).
The DCR is a practical strategy when combined with disciplined risk control and consistent practice. Focus on pattern recognition, audio/volume confirmations, and rigorous trade management. Use the tools and resources available, join the community for real-time examples, and iterate constantly.
Good luck, stay disciplined, and I’ll see you in the markets.
This article was created from the video DCR Strategy 🟪 NinjaTrader Futures | AlgoBox Training with the help of AI.