I created this guide to walk you through the LATE NATE signal inside the AlgoBox system so you can confidently spot potential exhaustion points in intraday futures and forex trading. The concepts and examples here are drawn from my training material and the accompanying video produced by ALGOBOX PRO | Automated Trading. I’ll explain how Flowmaster crosses work, what a white Flowmaster cross (the “Late Nate”) really signals, how it fits into a confluence-based game plan, and how to practice and refine the setup using simulation tools like NinjaTrader’s market replay.
My objective is practical: give you step-by-step instructions you can apply in a demo environment, reduce costly mistakes, and add a useful tool to your orderflow and harmonics toolkit. I’ll cover definitions, the decision process, example trade execution, risk management, common pitfalls, and a plan for mastering the signal through deliberate practice.
Table of Contents
- Outline
- Step 1: Understand Flowmaster Crosses — What They Tell You
- Step 2: Identify the Late Nate — A White Flowmaster Cross That Signals Exhaustion
- Step 3: Use the Late Nate as a Confluence Marker — Combine Signals
- Step 4: Read the Setup Sequence — Ready DD, King Timing, Enigma, Then Late Nate
- Step 5: Entry, Targets, and Stop Placement
- Step 6: Practice and Backtest — Use NinjaTrader Market Replay
- Step 7: Integrate the Late Nate into Your Trading Routine
- Common Mistakes and How I Avoid Them
- Trade Journal Template I Use for the Late Nate
- Advanced Considerations: Market Regimes and Instrument Choice
- Putting It All Together: A Full Example Walkthrough
- Final Checklist Before Trading a Late Nate Setup
- Continuous Learning: Bootcamp, Live Sessions and Community
- Conclusion — Practical Summary and Next Steps
Outline
- Step 1: Understand Flowmaster crosses and what they reveal about clustered trading activity
- Step 2: Identify the Late Nate — what a white Flowmaster cross typically indicates
- Step 3: Use the Late Nate as a confluence marker — not as a standalone signal
- Step 4: Read the setup sequence: Ready DD, King Timing, Enigma, then Late Nate
- Step 5: Entry, targets, and stop placement using enigma projections and the Late Nate context
- Step 6: Practice and backtest — NinjaTrader Market Replay and simulation tips
- Step 7: Integrate the Late Nate into a broader trading routine and continuous learning
- Conclusion: Checklist and final recommendations
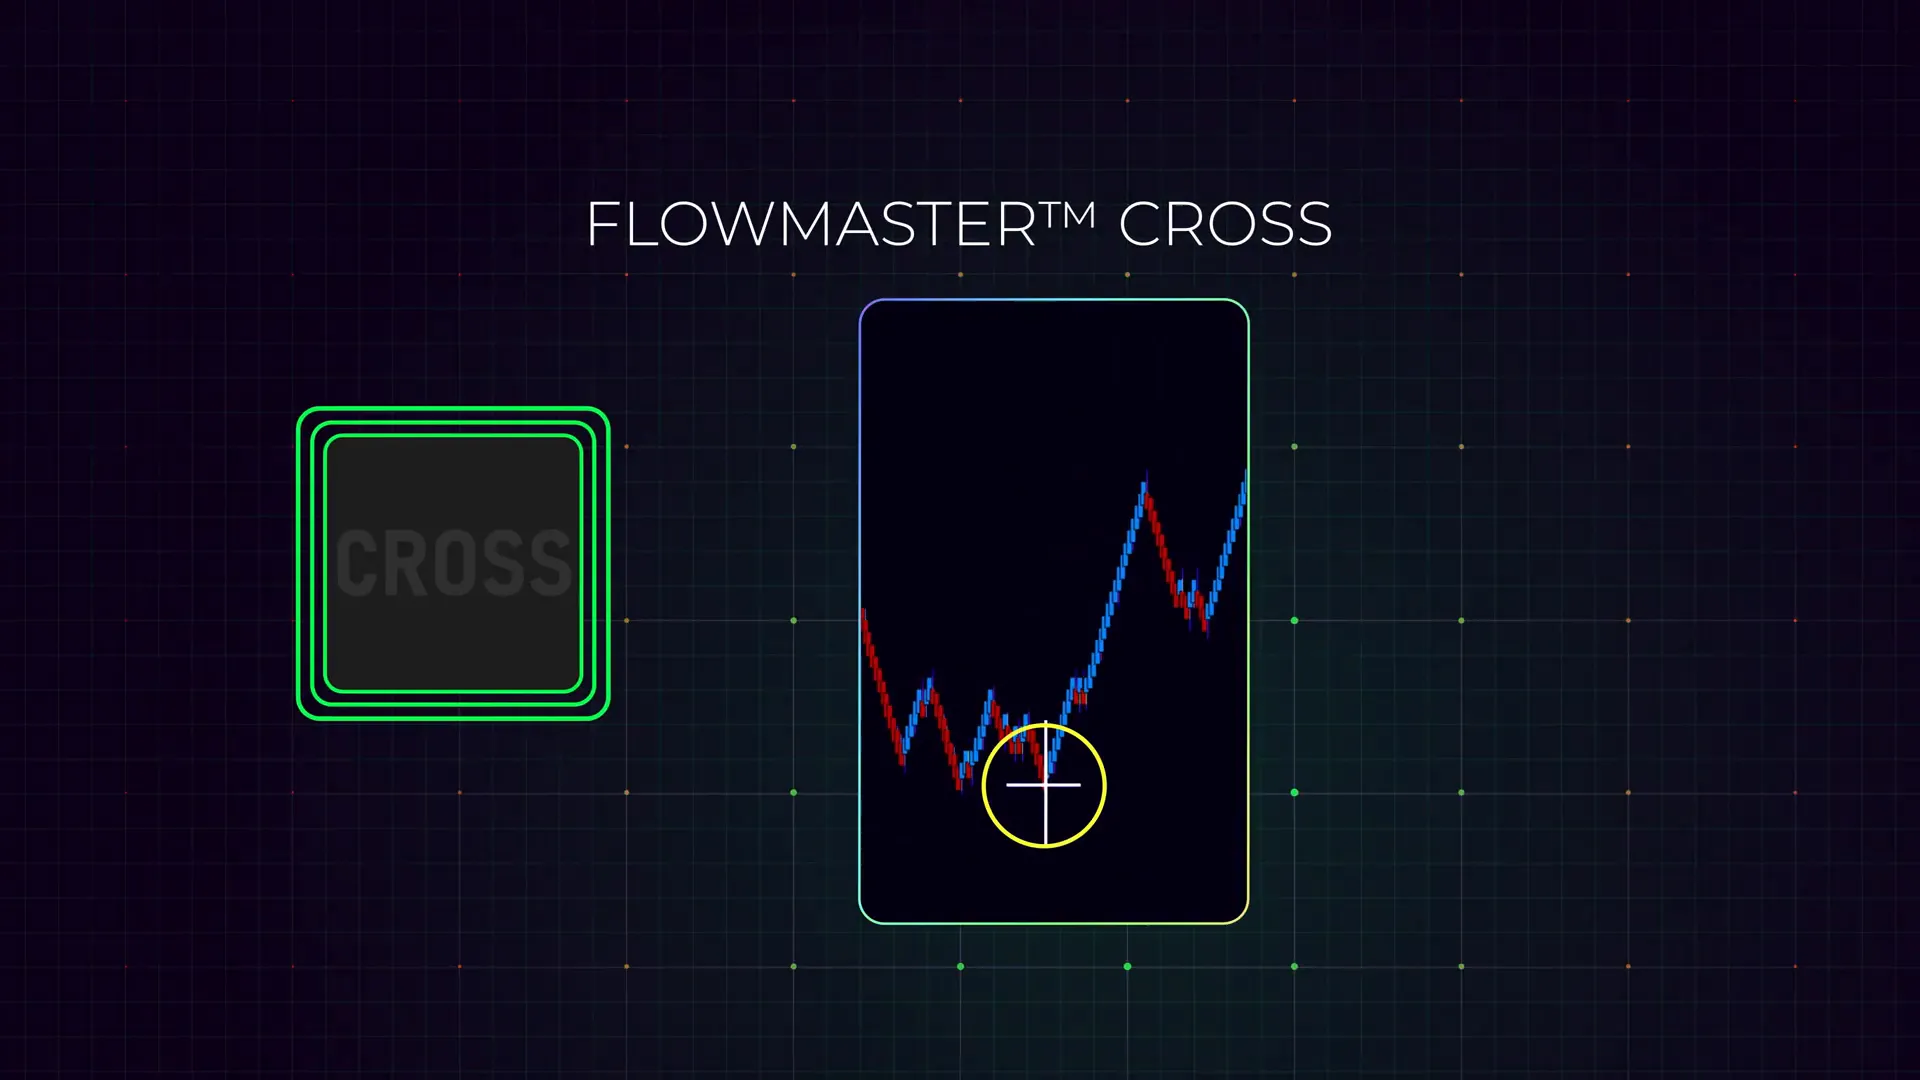
Step 1: Understand Flowmaster Crosses — What They Tell You
Flowmaster crosses are visual markers that highlight clusters of intensified trading activity on your chart. Think of them as a way to quickly see where volume, orderflow, or aggressive participation has concentrated in a short window.
These crosses serve two important functions:
- Cluster Visualization: They condense complex orderflow and volume dynamics into a single, easy-to-interpret mark so you can see where traders are most active at a glance.
- Potential Turning Points: Because intense clusters often occur where buying or selling pressure reaches a climax, Flowmaster crosses can highlight areas where momentum might slow, stall, or reverse.
Why does clustering happen? In intraday markets, participation tends to concentrate around certain levels: institutional resting interest, liquidity pools, session highs/lows, and reaction areas to news. When retail traders notice a move and rush to join, you’ll often see a cluster as large numbers of small aggressive orders hit the market. Flowmaster crosses capture those moments.
Important caveat: clusters and crosses do not guarantee a reversal. They are signals about participation and intensity, which need interpretation. My approach is to treat Flowmaster crosses as context — a map of where the market is heating up — and then combine them with directional tools and bias filters to make a decision.
How I Watch Flowmaster Crosses
I monitor the appearance of different colored Flowmaster crosses and how they align with price structure. For example:
- Blue/green crosses in a pullback zone can reinforce continuation bias if they appear alongside supportive orderflow.
- White crosses (the Late Nate, discussed below) near a swing extreme often indicate late retail participation — traders joining a move near its end.
- Clusters that align with harmonic or enigma projections carry extra weight because different perspectives are agreeing on the same area.
Over time I learned to look for the story behind a cross: who is trading, why are they trading here, and does the broader structure support their activity? That narrative helps me decide if this is a true opportunity or just noise.
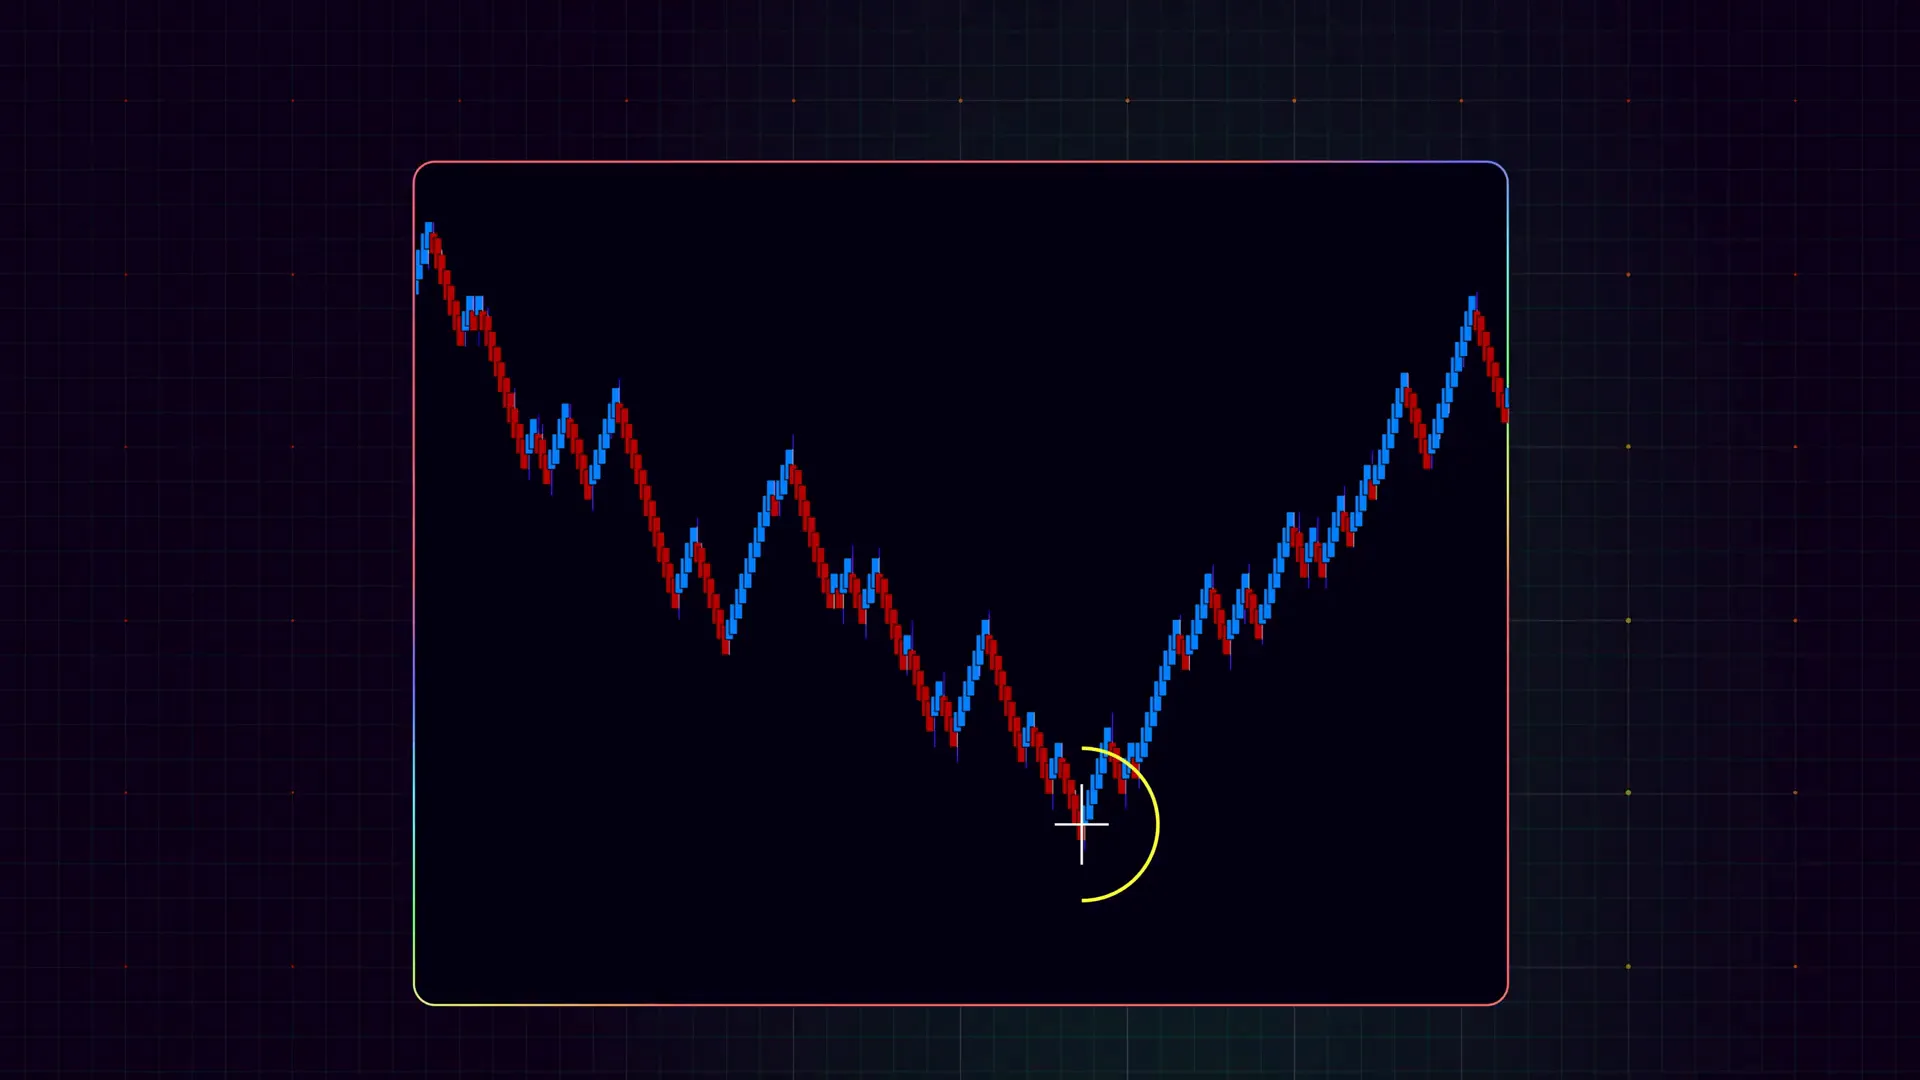
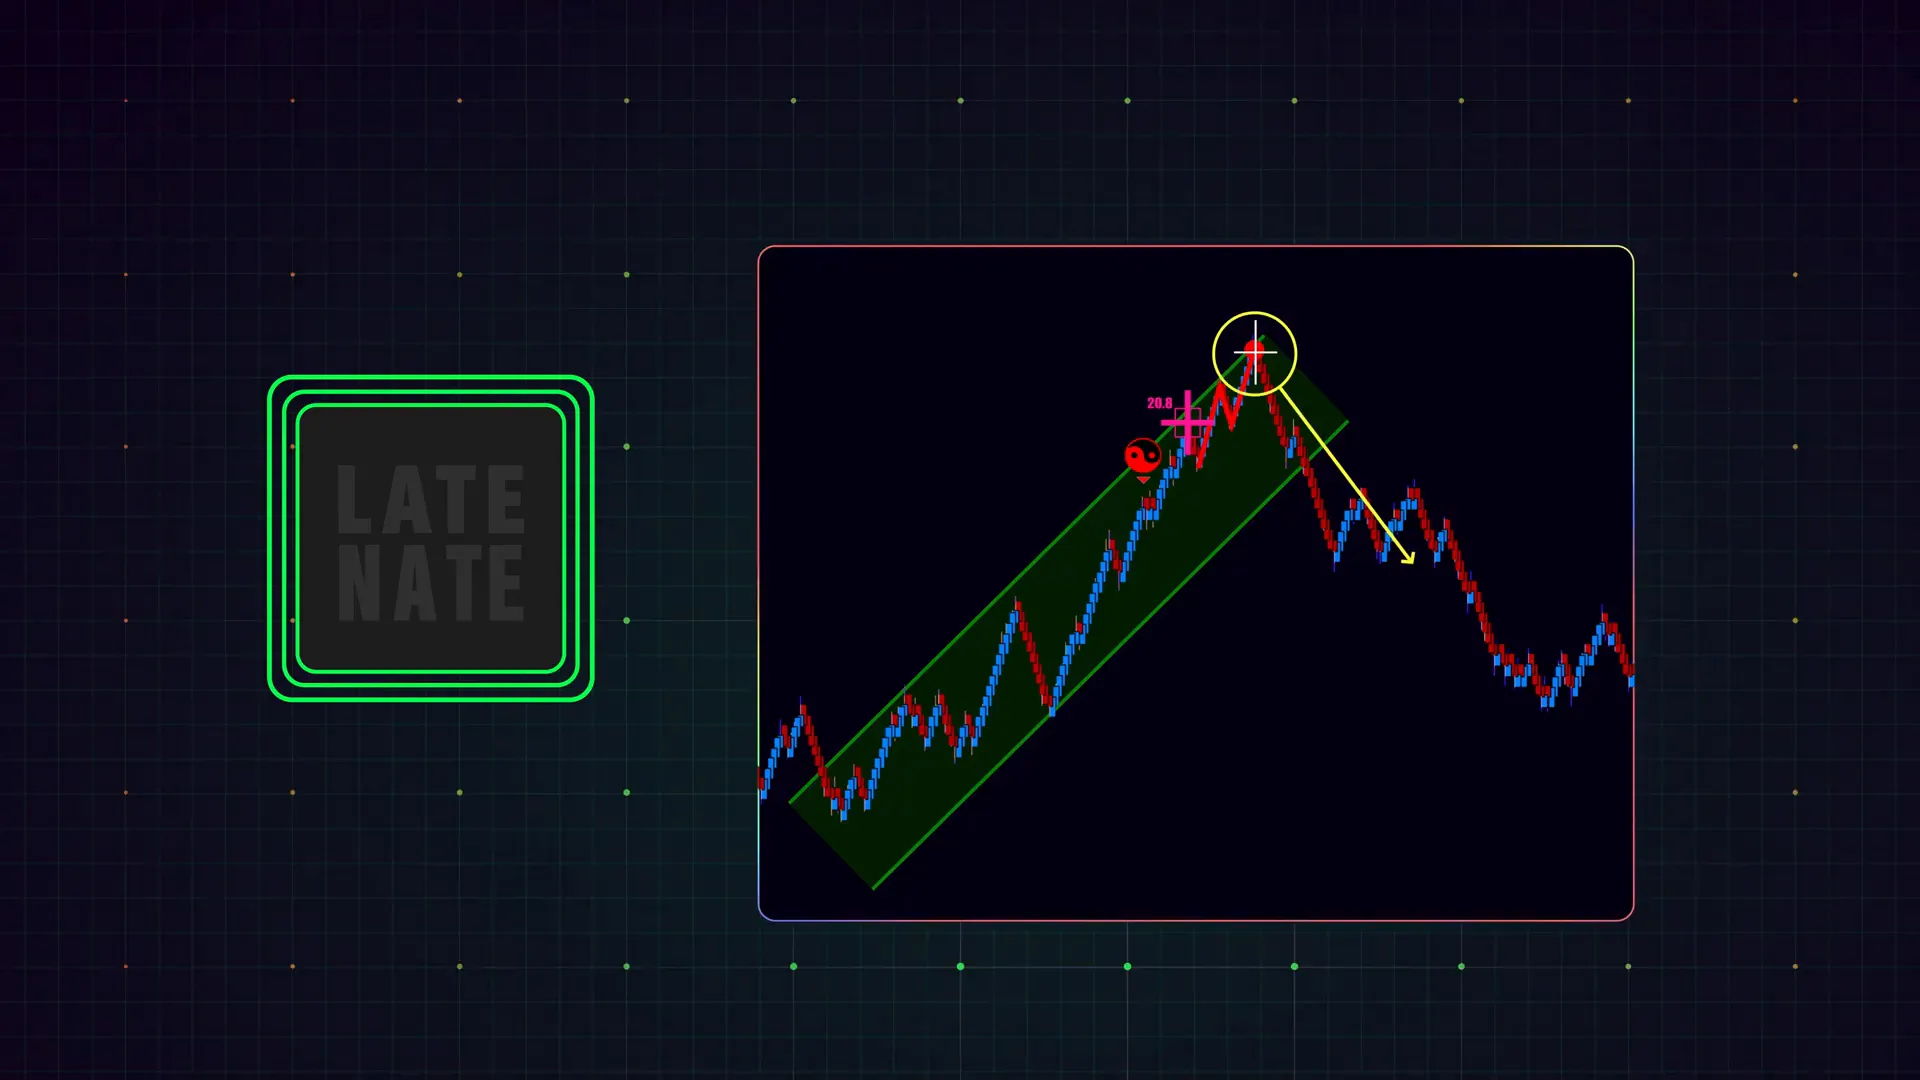
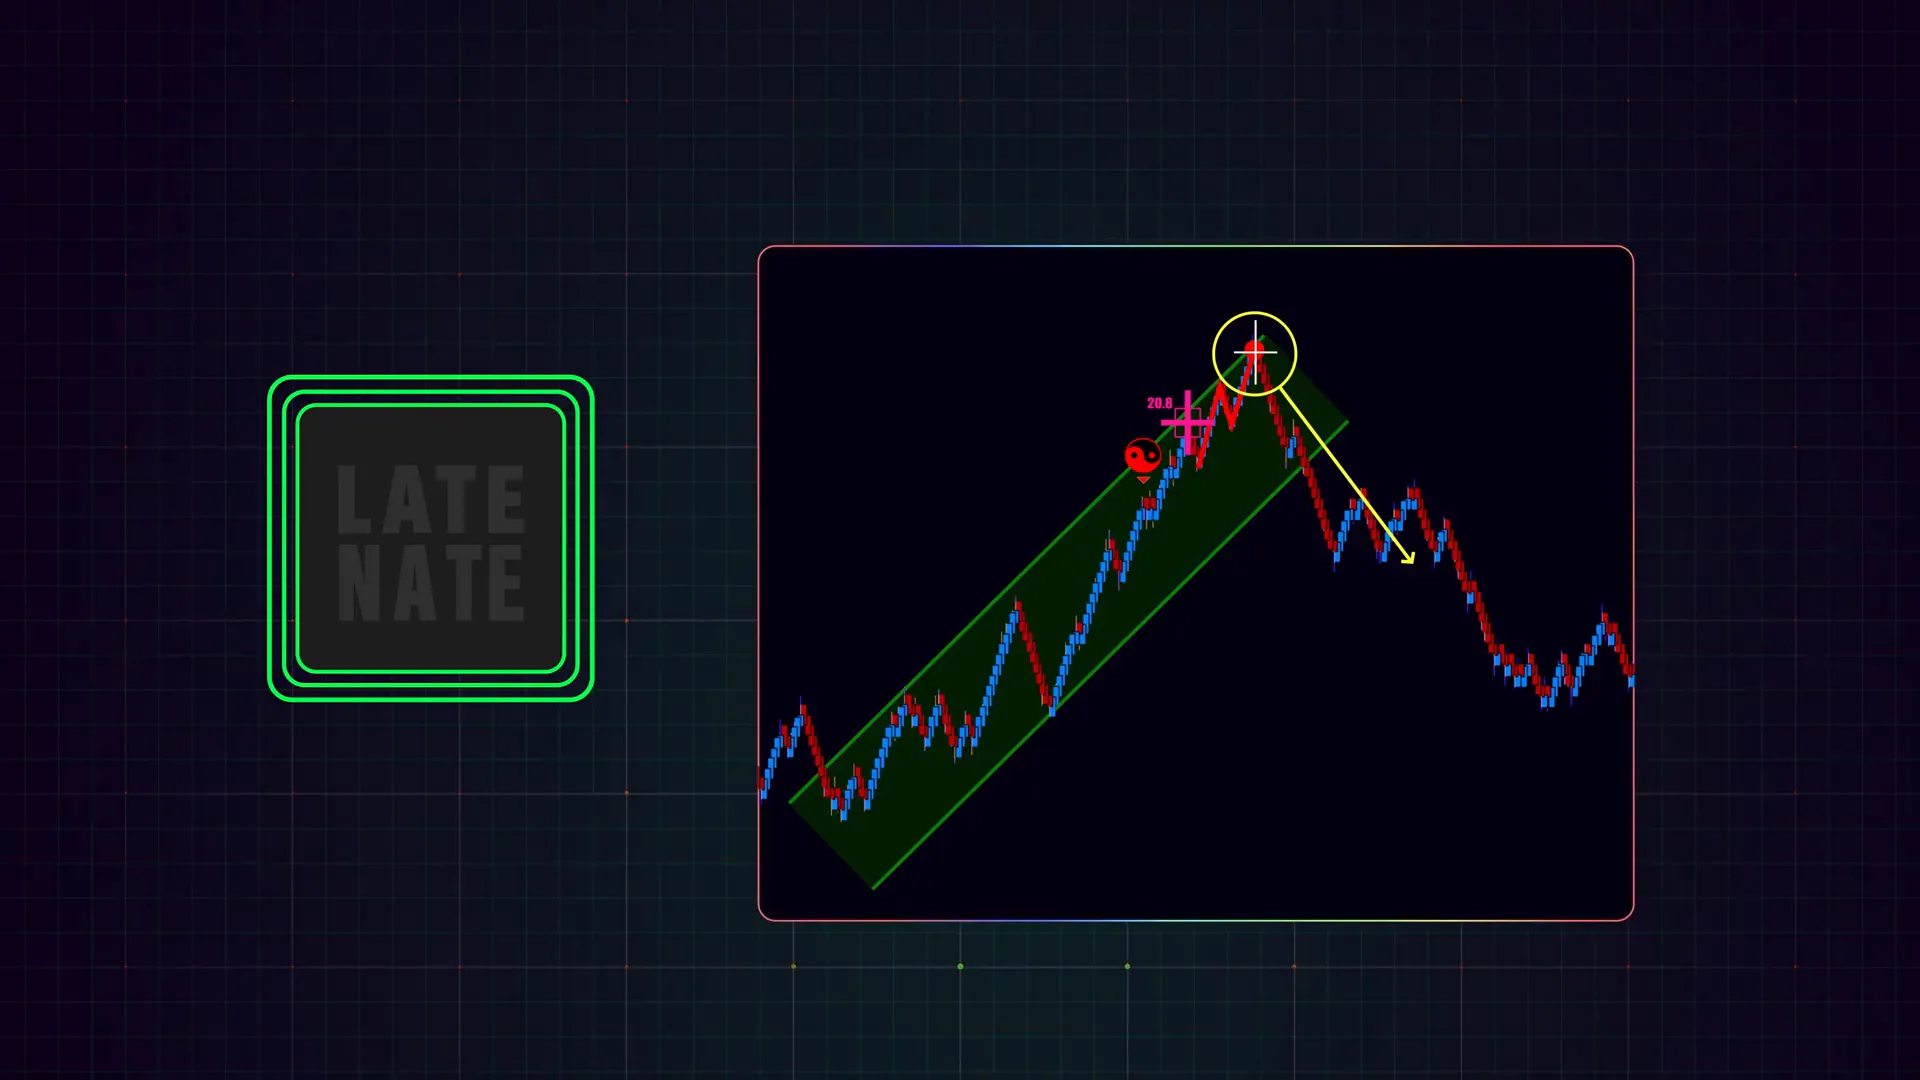
Step 2: Identify the Late Nate — A White Flowmaster Cross That Signals Exhaustion
The Late Nate is a specific white Flowmaster cross that typically appears toward the end of price swings. In plain language, it often represents late retail participation — traders who are buying high or selling low as a move finishes.
Key characteristics of the Late Nate:
- Color: White (in the AlgoBox color scheme).
- Timing: It tends to show up near the end of a momentum swing, not at the beginning.
- Behavioral implication: It frequently signals that the marginal participant is retail chasing the move, which can suggest a waning of momentum.
When I see a white Flowmaster cross near an obvious swing high or swing low, my first thought is: “Is this the last gasps of the move?” The psychological pattern behind this is consistent across markets — humans are loss-averse and tend to jump in late, creating a cluster of late entries when price feels like it’s still running.
But I must emphasize: the Late Nate is not a trade trigger by itself. It’s an informative marker — a red flag that tells me to look deeper. Alone, it’s insufficient; paired with other confirmations, it becomes actionable.
Step 3: Use the Late Nate as a Confluence Marker — Combine Signals
My rule: never trade a single indicator in isolation. The Late Nate is best used as a confirmatory element in a confluence-based approach. Confluence means multiple independent signals point to the same directional inference.
How I combine the Late Nate with other tools:
- Harmonics / Enigma projections: If an enigma projection lines up with a Late Nate, the probability of a meaningful reaction increases.
- Ready DD label: A green Ready DD label ahead of a potential setup gives me an early heads-up to prepare.
- Session and structure context: Is price at a session high/low, prior support/resistance, or a measured move target?
- Orderflow confirmation: Look for exhaustion prints, delta divergences, or decreasing aggressive buy volume on the run.
- Time of day: Late morning or afternoon liquidity often looks different than open or close; context matters.
By demanding confluence I reduce false signals dramatically. The Late Nate becomes valuable when it appears in a zone where price is already showing technical reasons to stall. I treat it like a “last call” sign for the move and prepare accordingly.
Example Confluence Checklist I Run
- Is the Late Nate appearing near a swing extreme or projected harmonic target?
- Is there a Ready DD or other early alert in the same zone?
- Does the enigma projection agree with the level and direction?
- Does orderflow show signs of exhaustion (e.g., decreasing aggressive volume on continuation candles)?
- Are there session structure reasons (e.g., session high, overnight high, round number) supporting a reaction?
- Is the risk/reward favorable given where a stop would be placed?
If the answer to most of these is “yes,” I move to the next step: reading the setup sequence and mapping an execution plan.
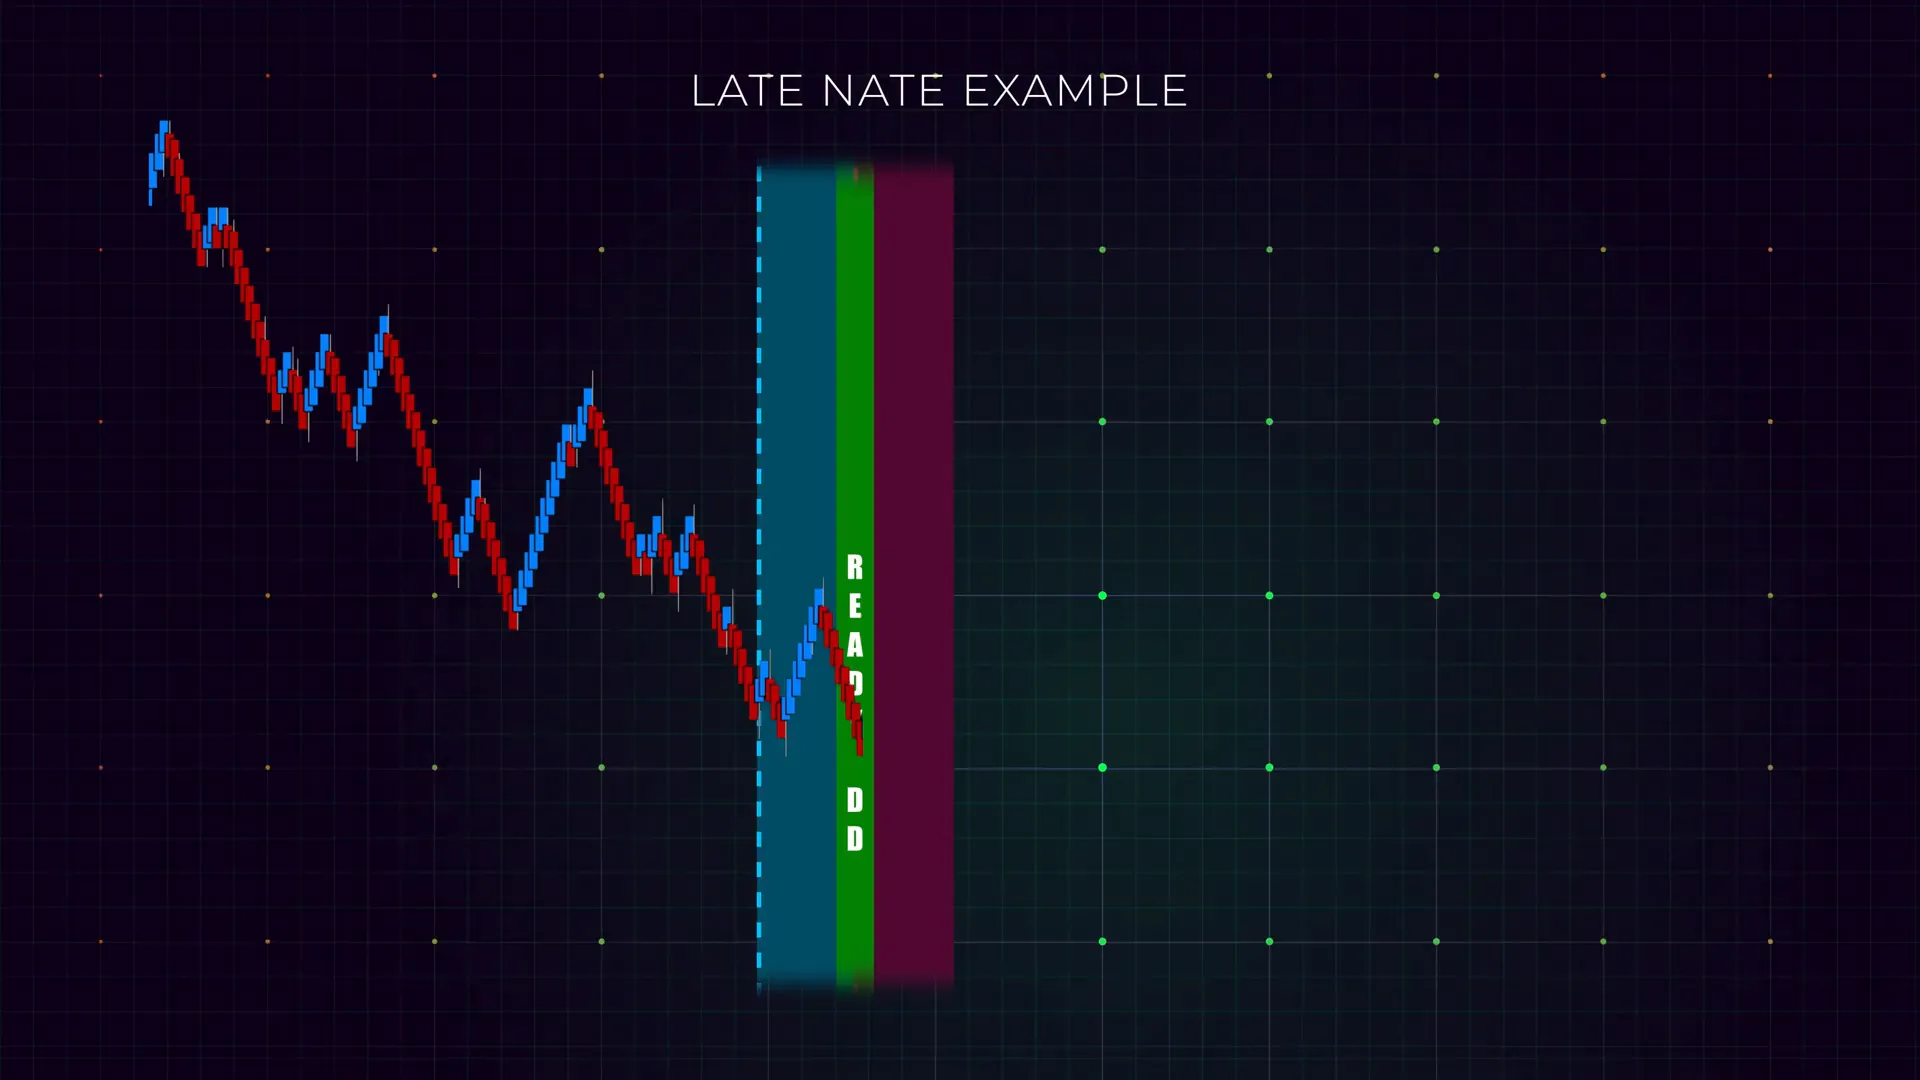
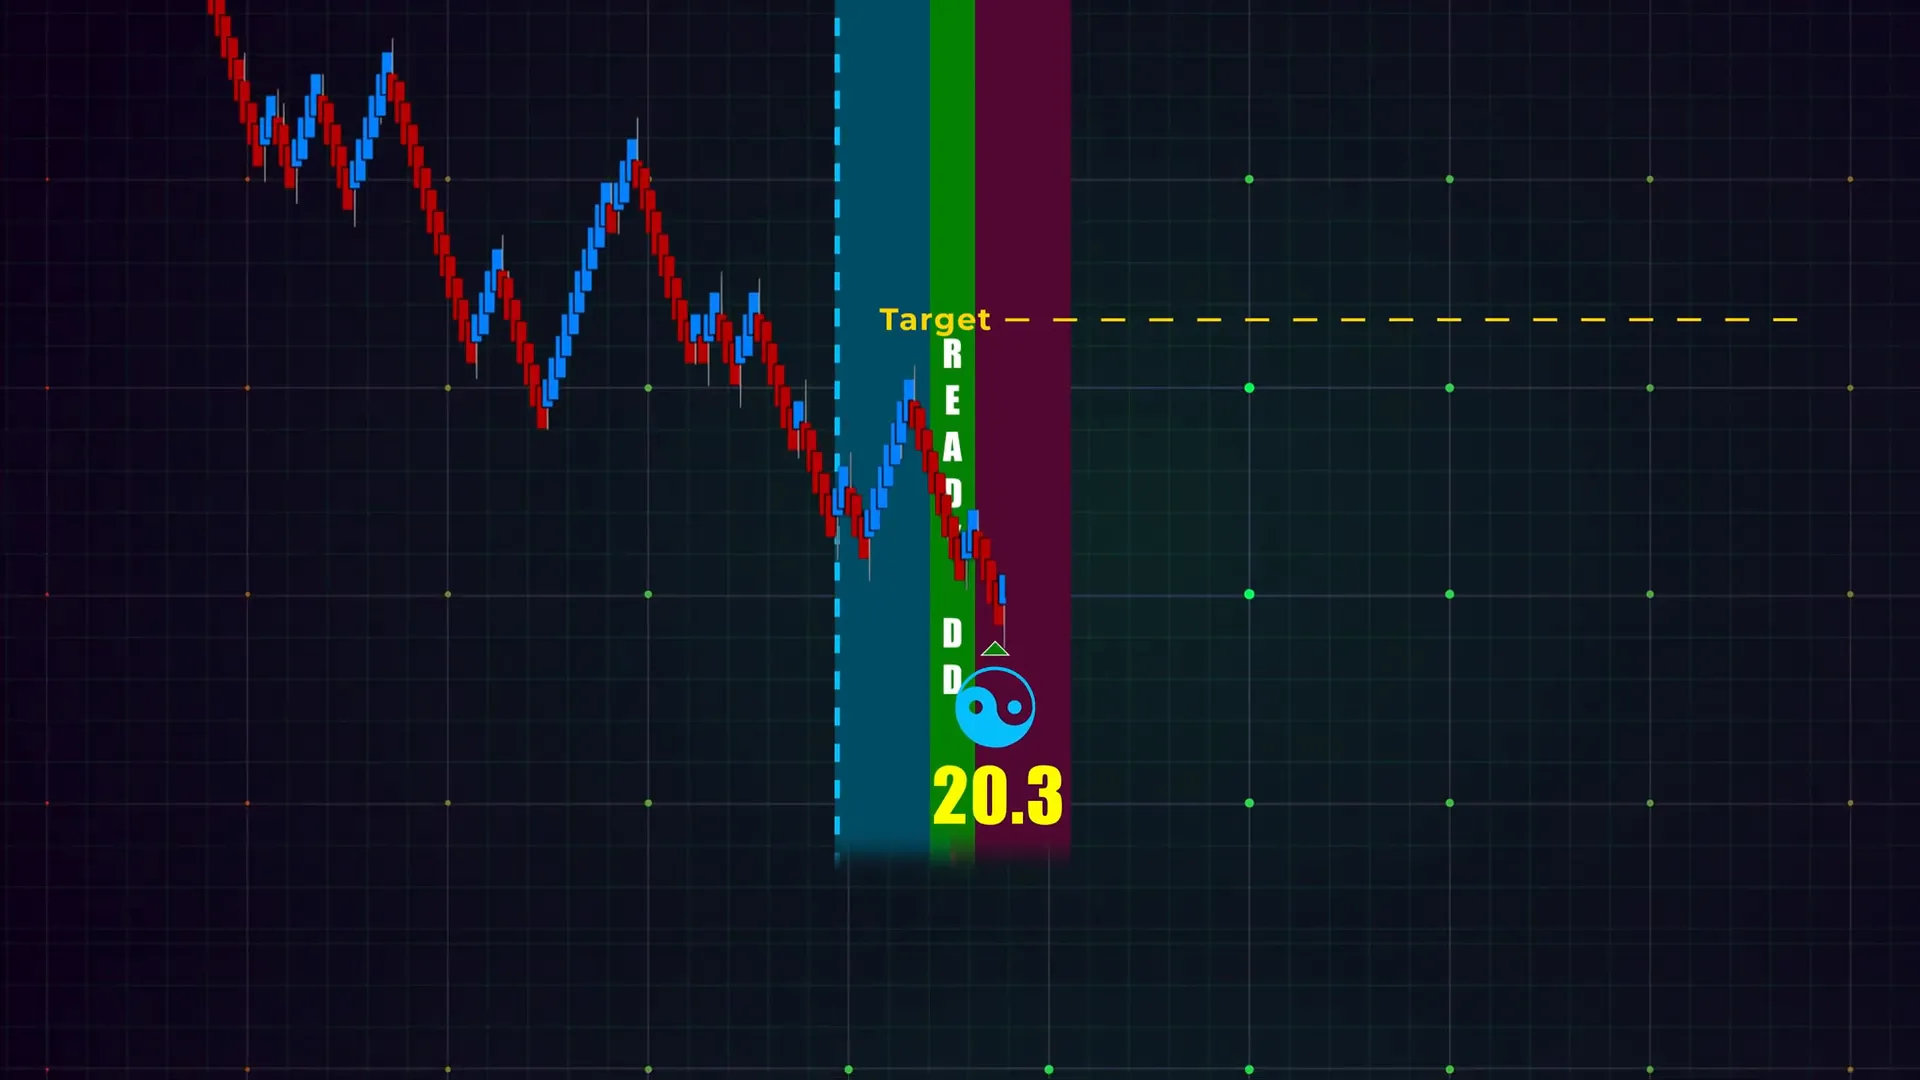
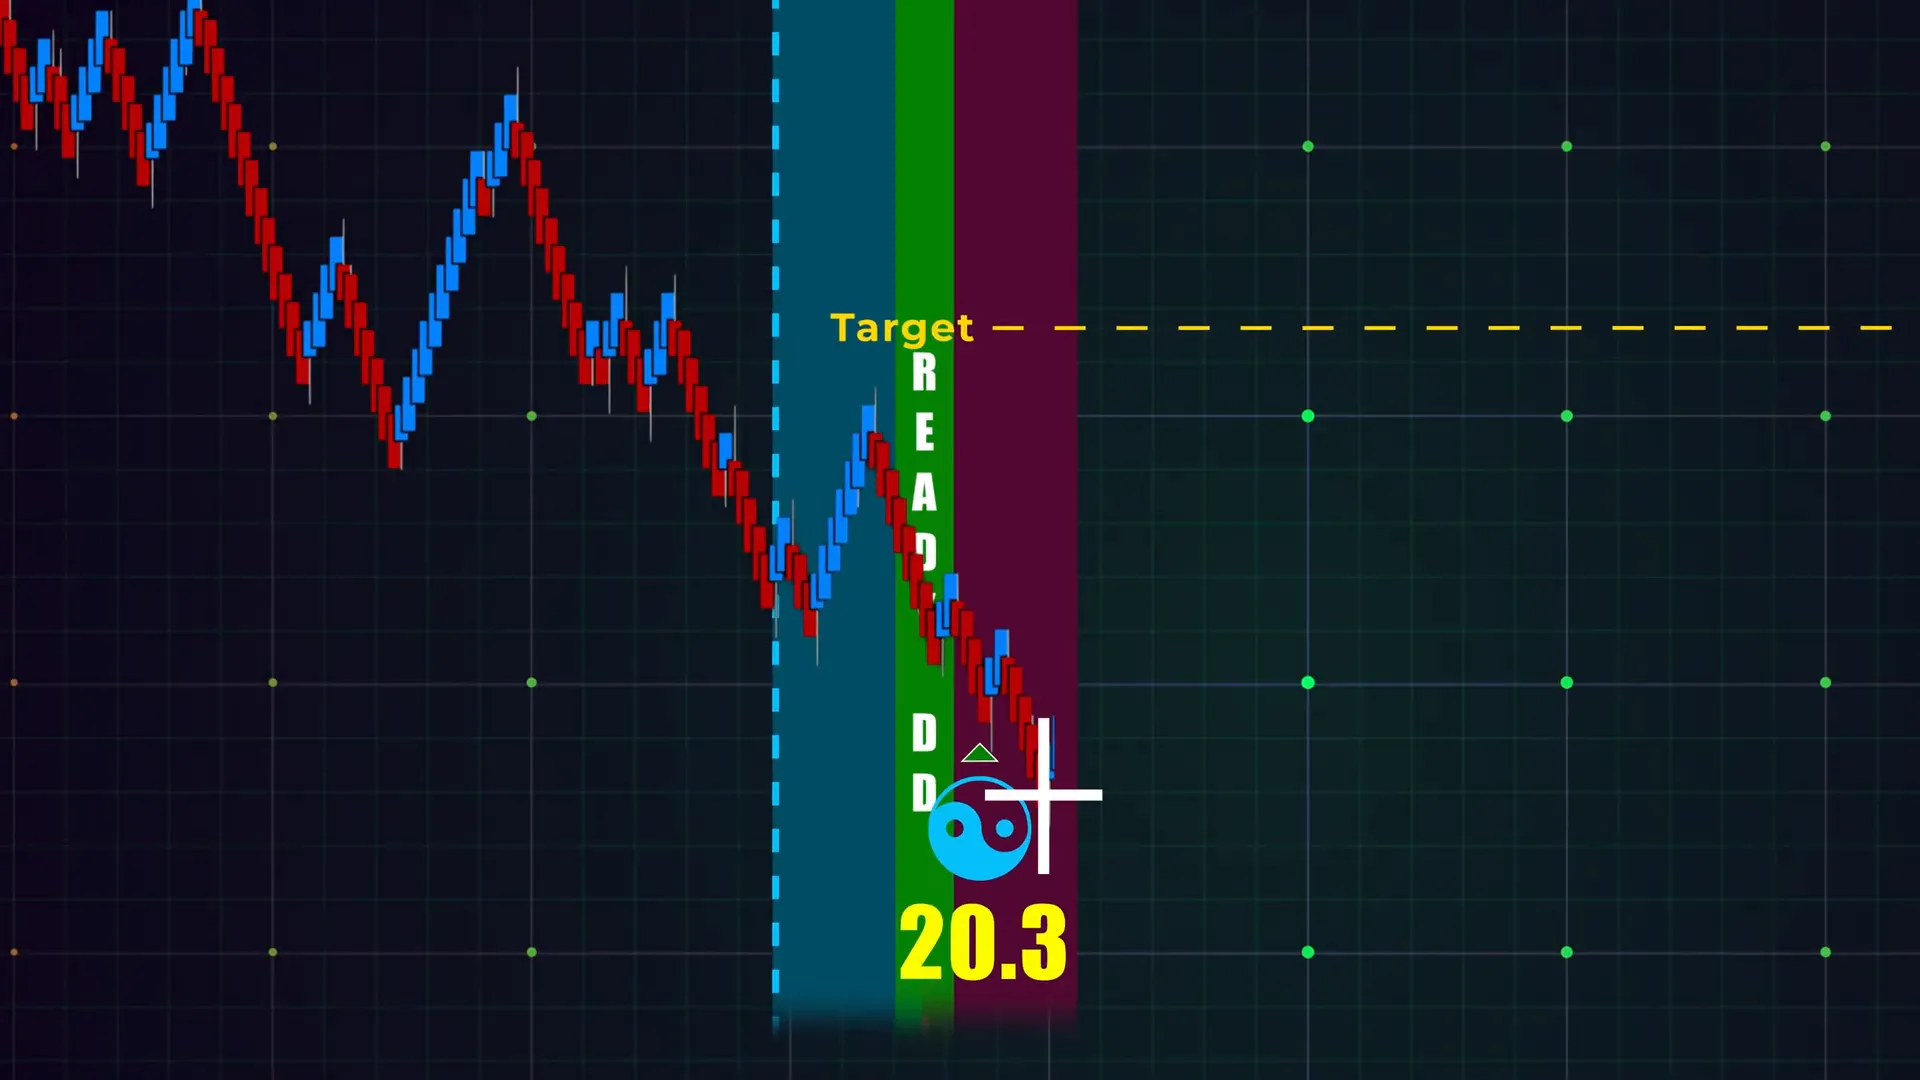
Step 4: Read the Setup Sequence — Ready DD, King Timing, Enigma, Then Late Nate
One of the most instructive ways to understand the Late Nate is to see it in sequence with other AlgoBox markers. A common progression I watch for is:
- Green Ready DD label — an early notification to prepare
- King timing occurs — a timing window indicating a potential inflection
- Blue Enigma forms — projecting a target and suggesting directional bias
- White Flowmaster cross appears — the Late Nate signaling retail jumping in late
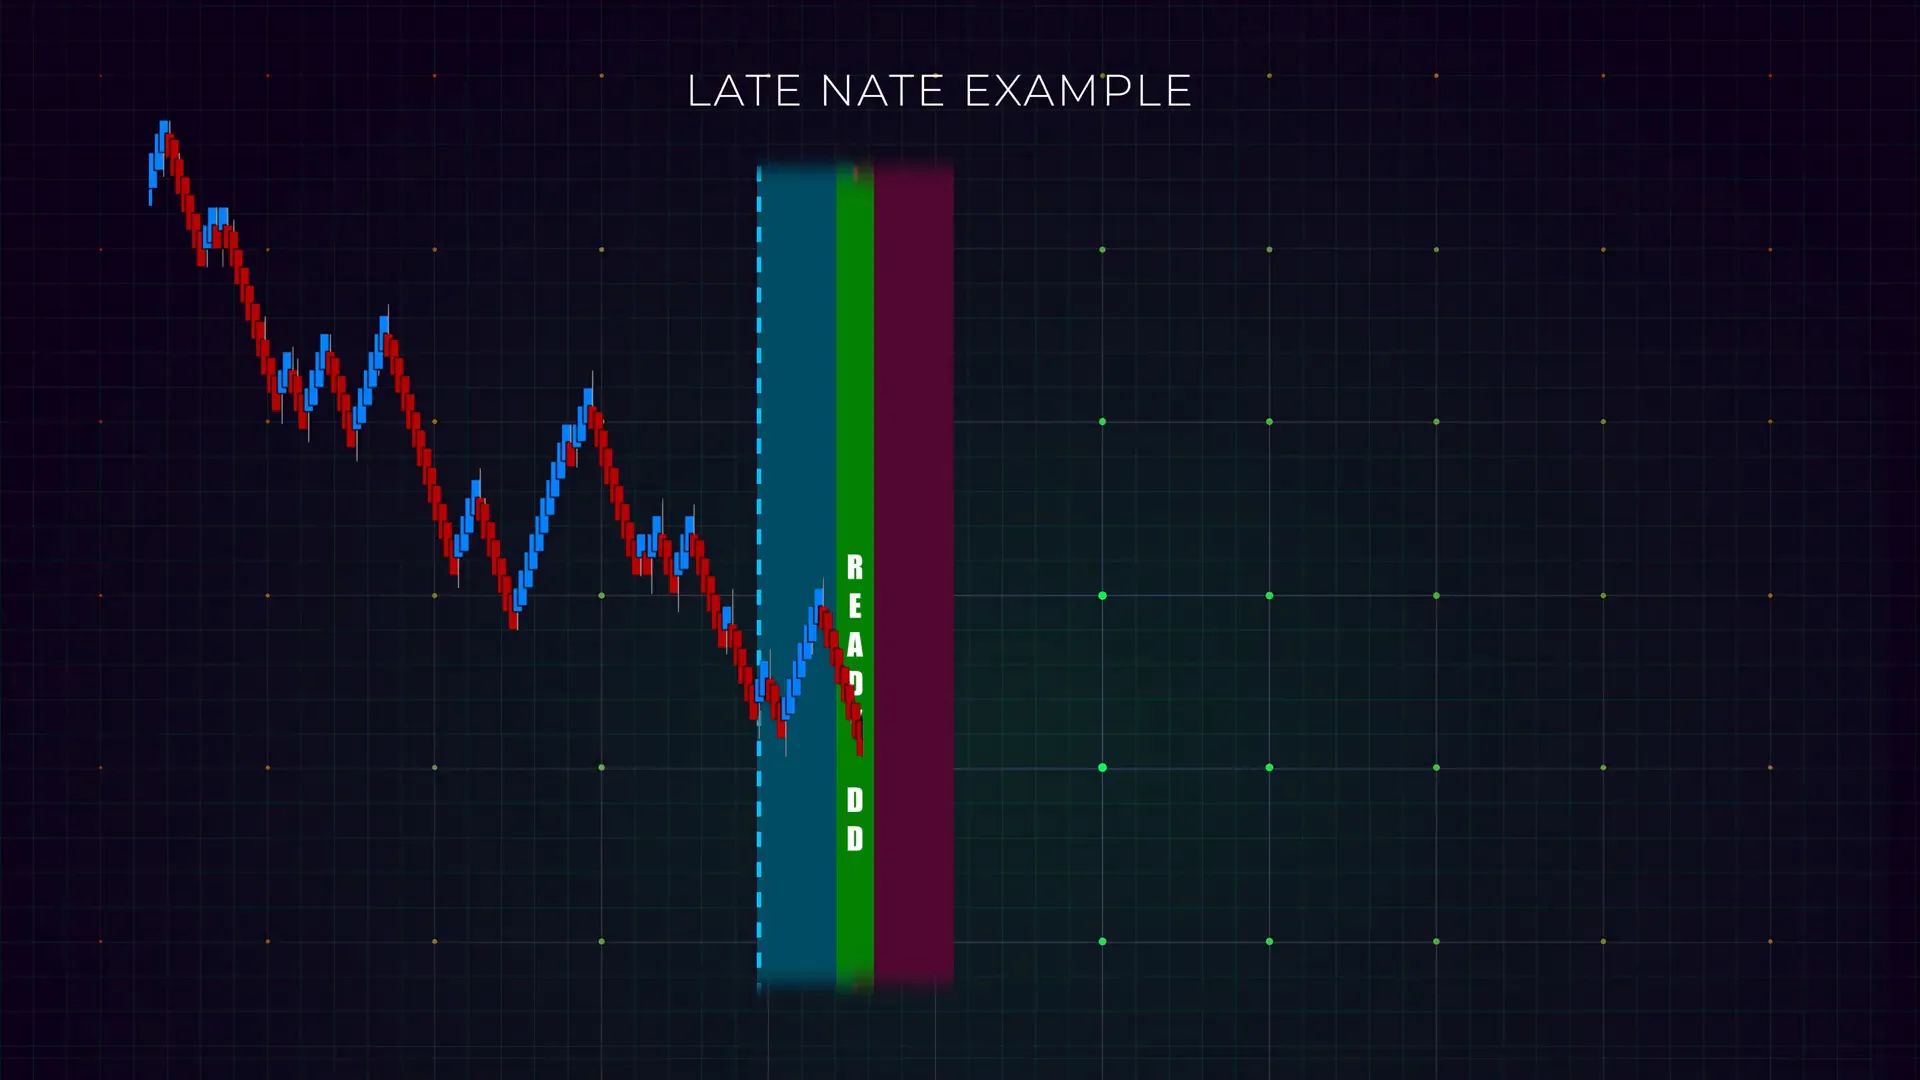
Let me walk you through that sequence and the reasoning behind each element.
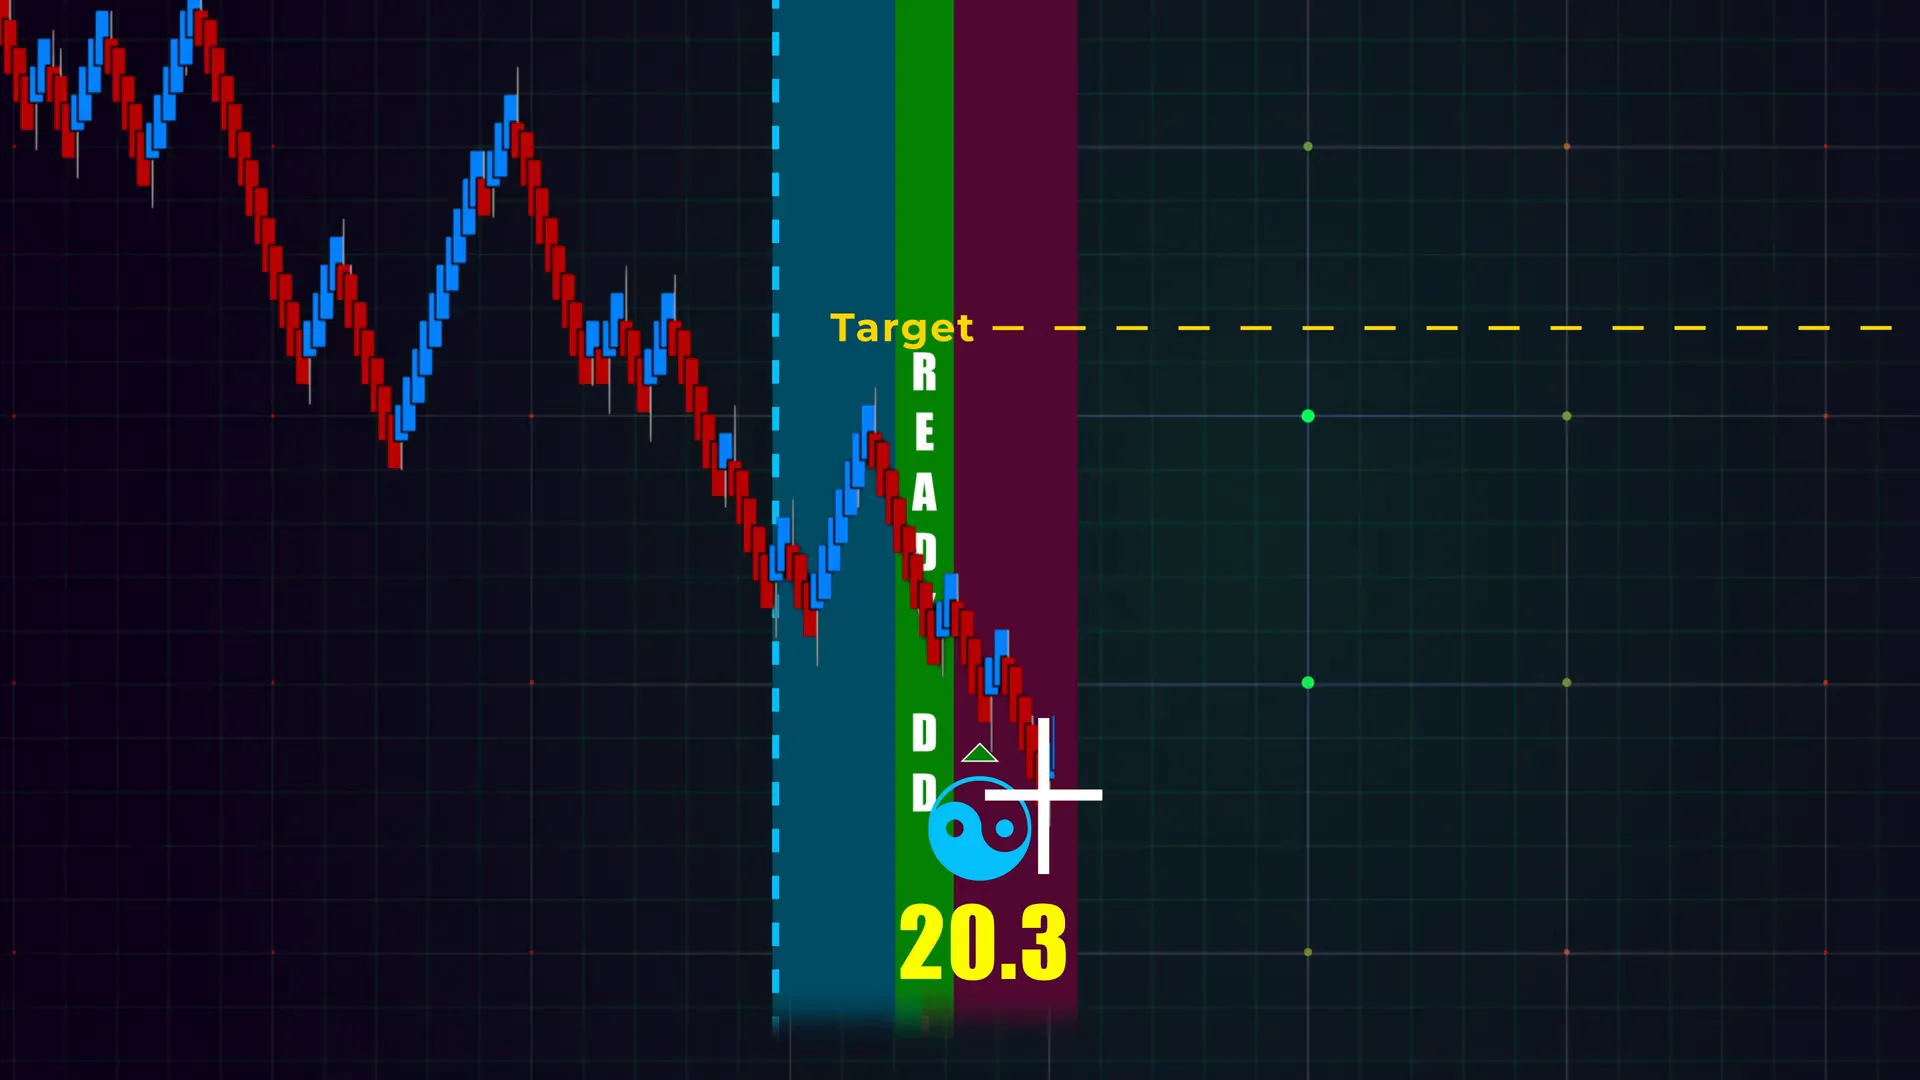
Green Ready DD Label — The Early Heads-Up
The Ready DD label is my cue to pay attention. It’s not a signal to trade immediately, but it says: “This zone might set up soon.” When I see a green Ready DD in a region that aligns with higher time frame structure and projected targets, I bookmark that area mentally and start preparing my trade plan.
Preparation activities I do when Ready DD appears:
- Zoom out to confirm higher timeframe structure and nearby levels.
- Set chart alerts for the enigma projection and Flowmaster cross zones.
- Calculate position sizing and a preliminary stop based on worst-case distance to my stop level.
King Timing — An Optic for When to Watch
King timing is an algo scheduling marker that highlights windows where probability of a reaction increases. When king timing lines up with your other markers, it elevates the setup. It doesn’t create a direction, but it suggests higher efficacy for whatever signals you are watching.
Combined with Ready DD, king timing changes my posture from “prepare” to “active watch.” I tighten my attention and move my cursor to key levels so I can act quickly if price reacts.
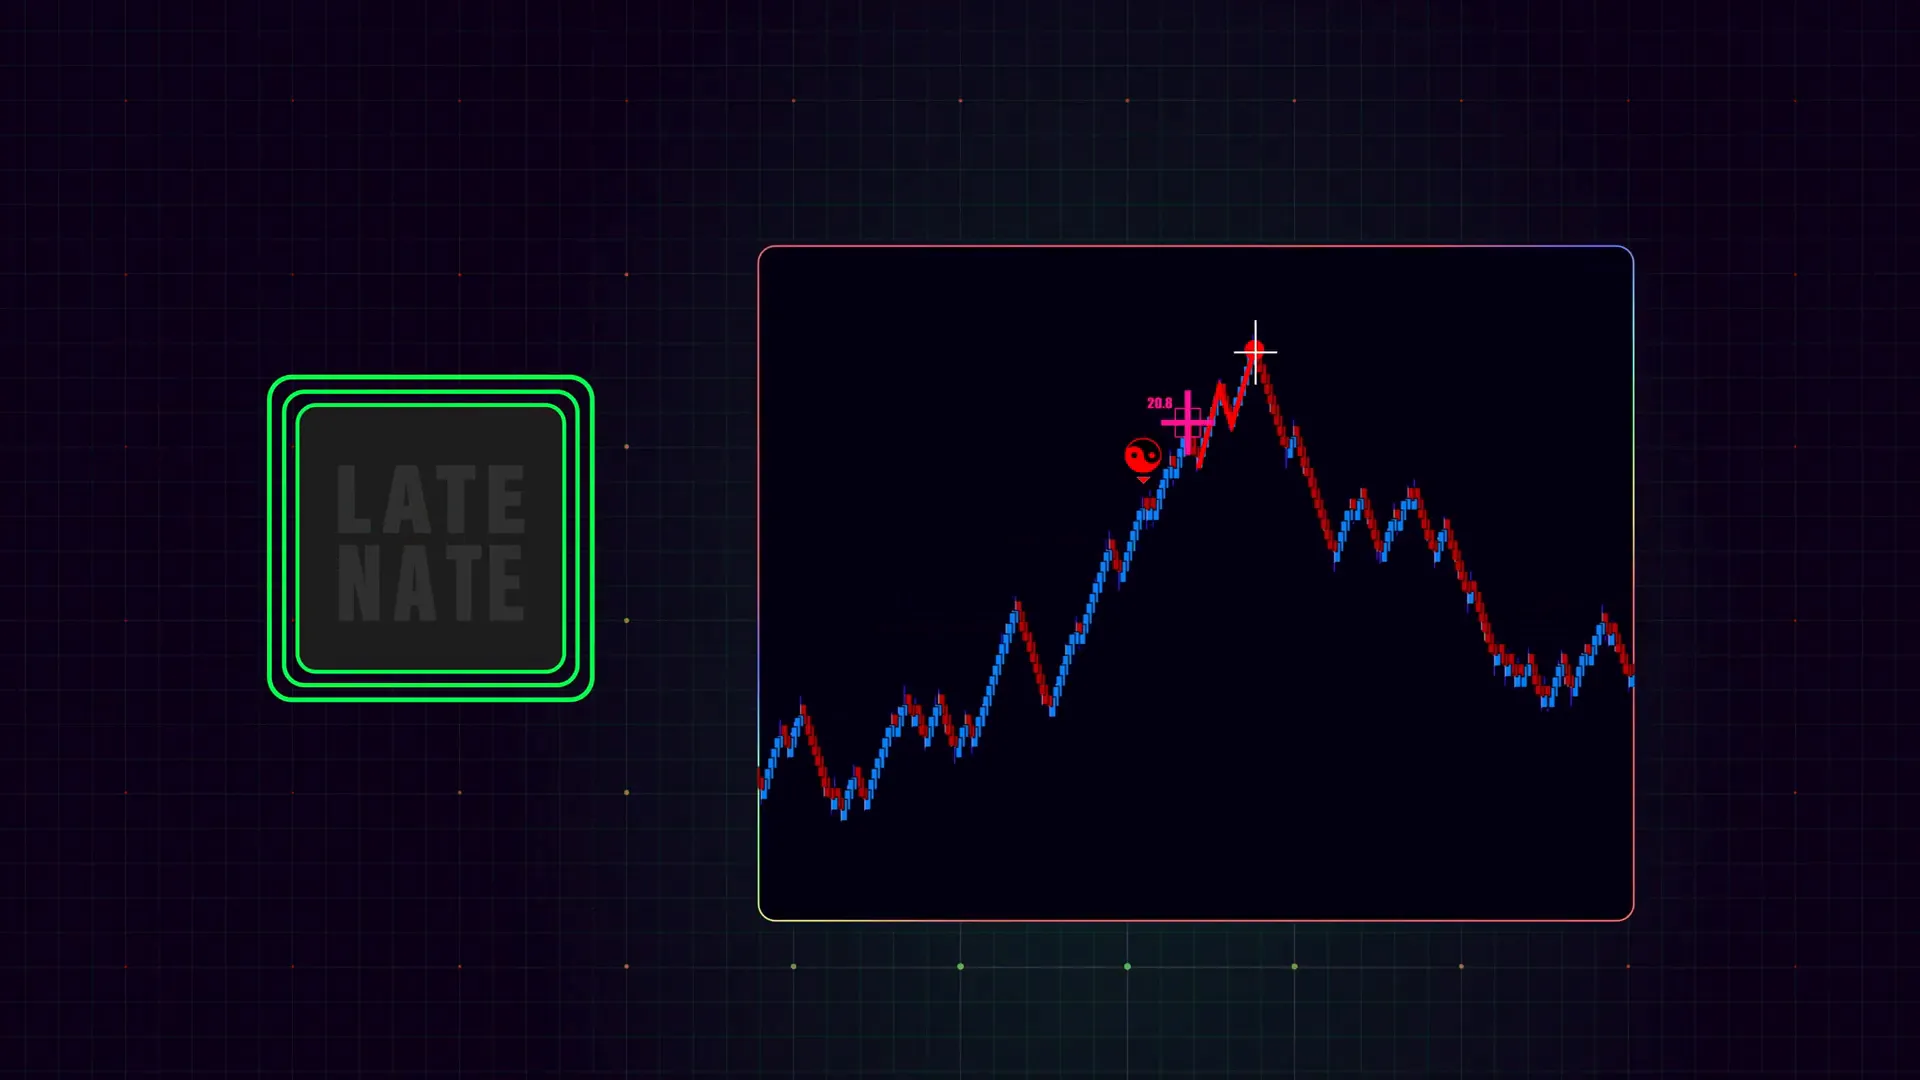
Blue Enigma — A Strong Directional Reinforcer
The enigma is one of the more actionable components in AlgoBox because it projects a line — a price path or target — and suggests a directional bias when it appears alongside aggressive orderflow. When an enigma forms in the same zone as Ready DD and king timing, I consider it a primary bias tool.
In the example sequence I often see a blue enigma forming during the king timing window and reinforcing a long bias if buyers are in control. That projected line becomes a first place to look for profit targets if a reversal or continuation trade materializes in my favor.
Late Nate — The White Flowmaster Cross of Exhaustion
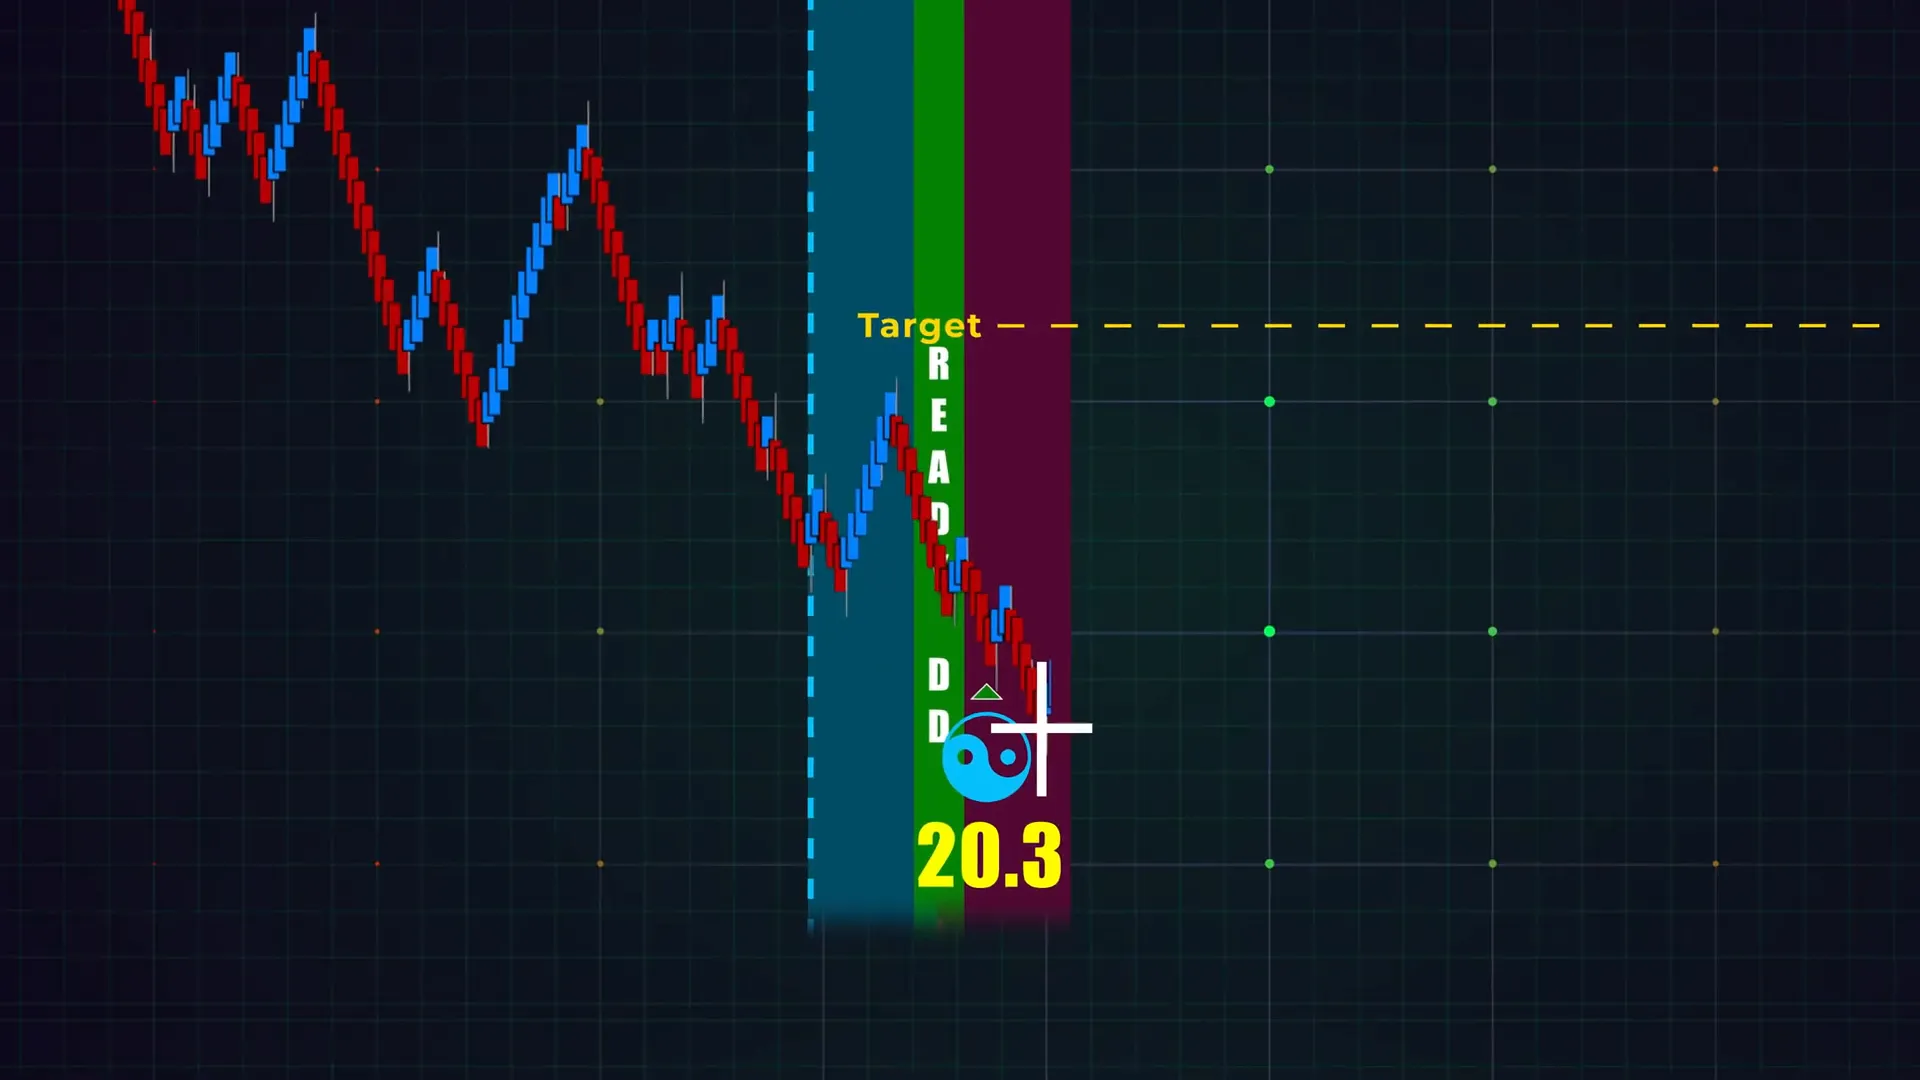
Finally, the Late Nate appears. It often shows up after the enigma and sometimes in the same small price band. The Late Nate’s timing — appearing after the move is already in motion — suggests retail traders are late to the party. That late participation frequently precedes a retracement or reversal because the pool of fresh buyers or sellers at the move’s price is declining.
At this point I want to know whether the enigma’s projection will act as a target for a mean reversion or whether the market will break and extend. The Late Nate tilts the odds toward exhaustion and a possible counter move.
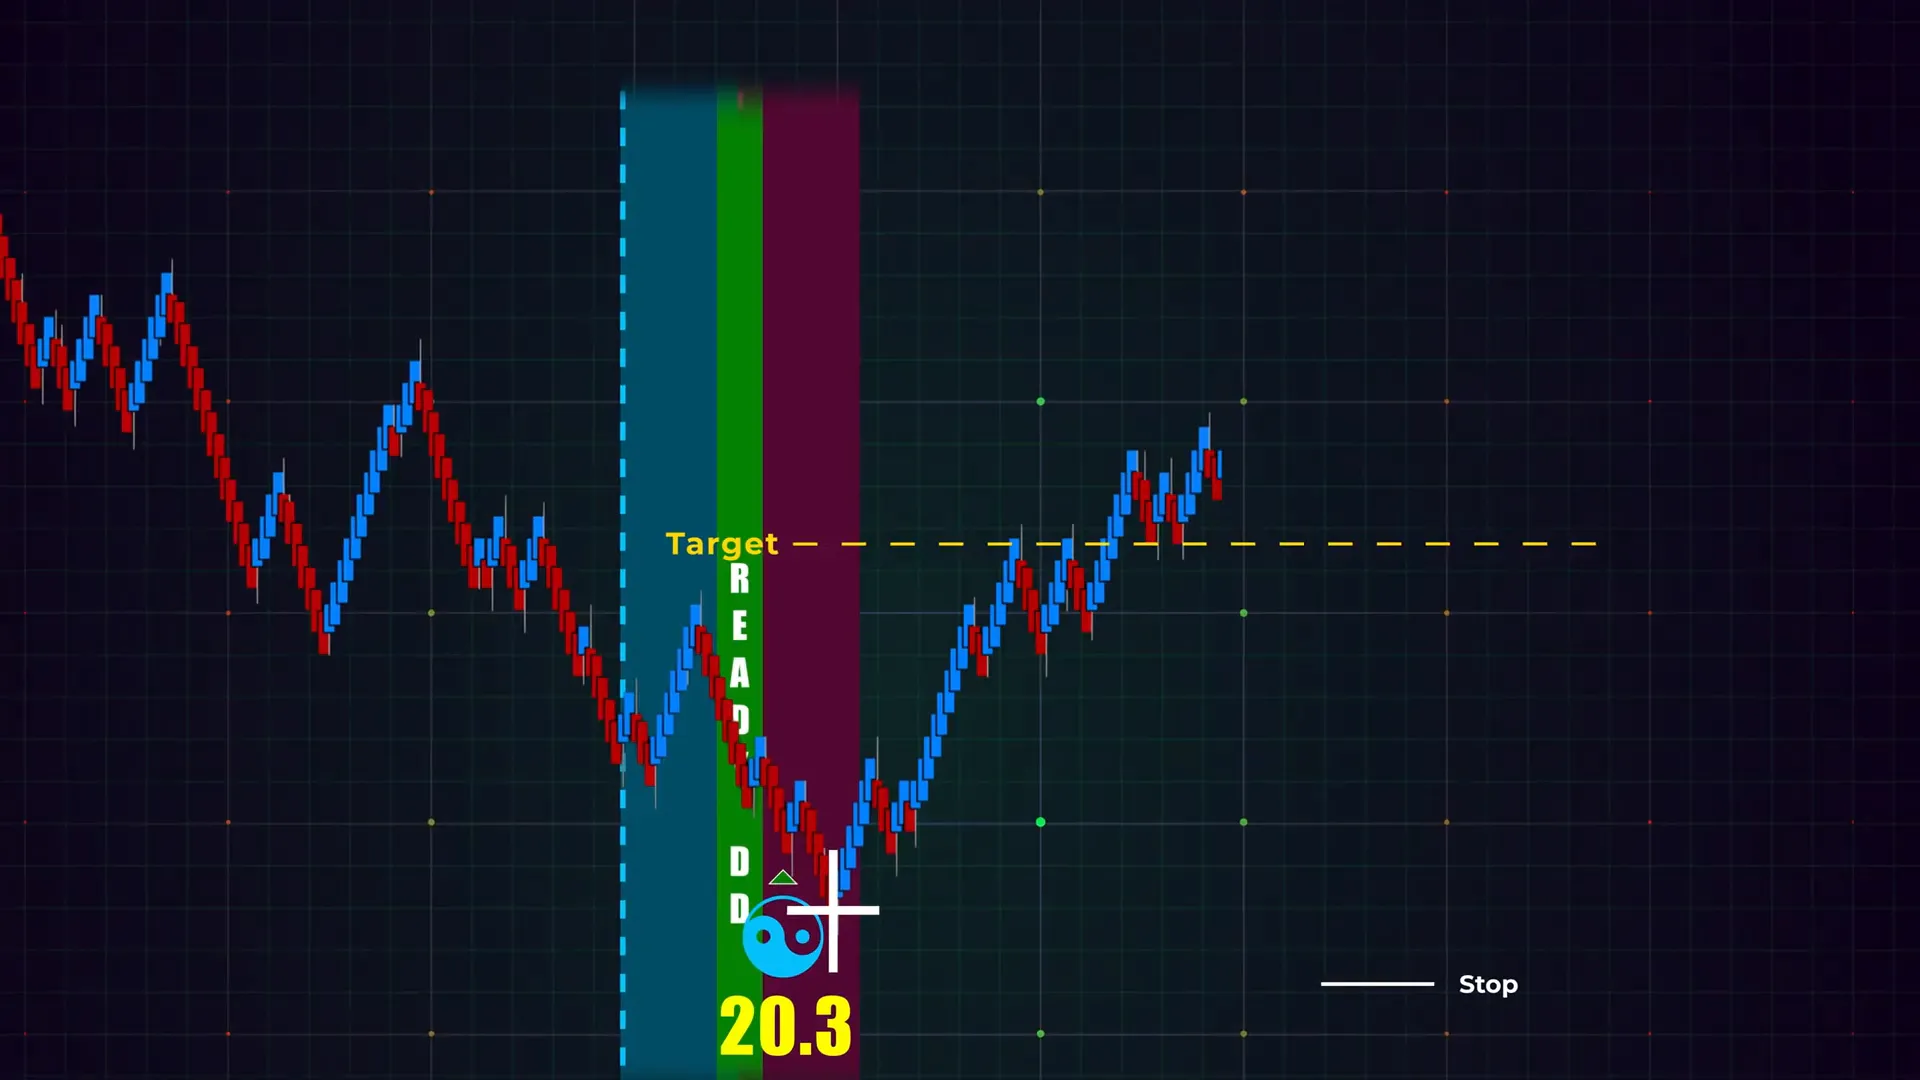
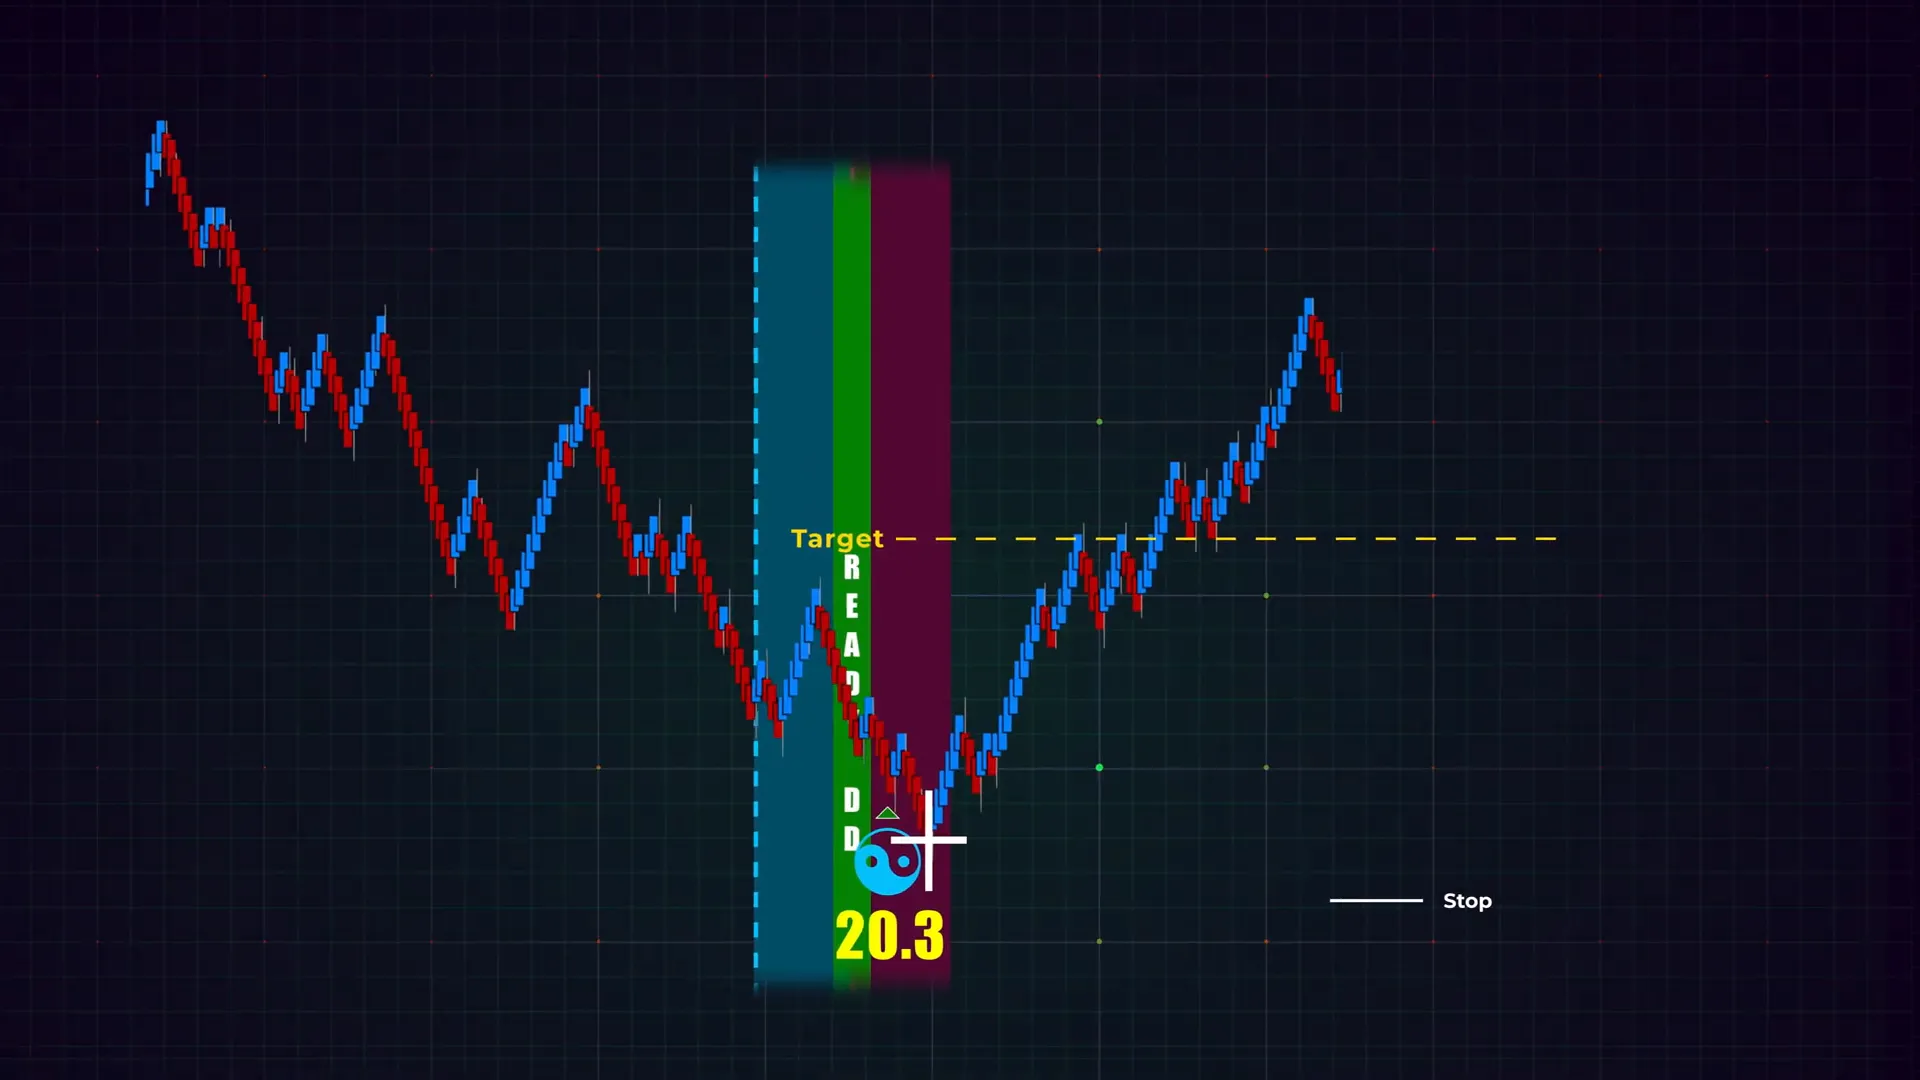
Step 5: Entry, Targets, and Stop Placement
With the sequence read and confluence established, I map an execution plan. The plan focuses on an entry trigger, targets, and stop placement — all pre-defined before I pull the trigger.
Entry Principles
My entries are based on the following principles:
- Wait for a clear reaction: I don’t just enter because the Late Nate appears. I wait for a short, confirming price reaction such as a rejection wick, a counter candle showing absorption, or a small orderflow read indicating the aggressive side is weakening.
- Prefer lower time frame confirmation: A 30-second or 1-minute microstructure rejection combined with a Late Nate near the enigma is the quality entry I like.
- Use the enigma projection as a targeting framework: If enigma projected line is above, a long bias is reinforced and the line gives me a reasonable target to scale out into.
Entry Examples
Typical intraday entries include:
- Limit entry at a visible micro rejection low/high formed right after the Late Nate appears (less slippage but requires precision).
- Aggressive market entry on confirmation candle close and orderflow weakening on the continuation side.
- Staggered entries where I commit part of the size at a conservative point and add more on a tighter, second confirmation.
Targets — Use Enigma Projections
The enigma’s projected line is my primary reference for targets. It is an objective, system-driven level based on AlgoBox’s algorithms and harmonics. Targets should be realistic — I’m looking for a favorable risk/reward relative to my defined stop.
Common target strategies:
- Target 1: First enigma projected line intersection or a nearby structural level (take partial profits).
- Target 2: Full enigma projection or measured move derived from the swing (take additional partial profits).
- Trail remaining position with a break-even stop or a volatility-based trailing stop to capture extended moves.
Stops — Behind the Enigma Marker
Stops should be logical and placed where invalidation of the trade idea occurs. I usually consider stops “behind the enigma marker” because the enigma represents a structural projection. If price invalidates the enigma area in a clear way, the trade thesis fails.
Stop placement rules I use:
- Place the stop beyond a recent swing extreme that would invalidate the bias.
- Allow for price noise; don’t place stops at obvious micro levels where random wick-outs will kill the trade.
- Size position so that stop distance matches risk tolerances (e.g., 0.25–1.0% of account per trade depending on your plan).
I view stops as a cost of doing business. The stop is where I accept being wrong and protect my capital. The enigma’s marker is a convenient, data-aligned place to anchor that decision.
Step 6: Practice and Backtest — Use NinjaTrader Market Replay
Mastering the Late Nate requires repetition. You need to see the signal in many contexts so you learn its quirks, failure modes, and how it interacts with other indicators. My recommended environment is NinjaTrader’s market replay because it allows you to fast-forward, slow down, and replay ticks to see microstructure in detail.
How I Practice the Late Nate in Simulation
- Set up a demo account in NinjaTrader and install the AlgoBox indicators.
- Load past market sessions that include volatile days, quiet days, news events, and different time-of-day behaviors.
- Use market replay to replay each day at 2x–4x speed, pausing on setups where Ready DD, enigma, king timing and Late Nate align.
- Record every trade idea in a practice journal: time, reason, entry, stop, target, outcome, and post-trade narrative.
- After a session of practice, review your outcomes and identify recurring mistakes — e.g., entering too early, poor stop placement, not waiting for lower time frame confirmation.
Repetition is how pattern recognition becomes reliable. I recommend trading at least 50–100 simulated setups before applying the Late Nate in a small live account. The goal is to see the signal in myriad contexts so you can quickly judge its quality in real-time.
Backtesting Tips
Backtesting the Late Nate requires an approach that isn’t purely mechanical because the signal is contextual. Use a hybrid approach:
- Quantify occurrences: how often does a Late Nate appear near enigma projections?
- Measure outcomes: what percent of those setups lead to profitable counter-moves vs. continued extension?
- Qualify nuances: note the conditions that produced the best results (time of day, market, structure, orderflow patterns).
Document your findings and create a decision checklist that captures the most predictive conditions. Over time, you’ll refine the checklist to increase signal quality and reduce false positives.
Step 7: Integrate the Late Nate into Your Trading Routine
Having a reliable signal is only useful if it is embedded in a consistent routine. I use a pre-market and intra-day checklist that ensures I only trade setups that meet my rules. The Late Nate fits into that routine as one of several high-quality checks.

My Daily Routine Including the Late Nate
- Pre-market: Review economic calendar and note sessions likely to have higher volatility.
- Pre-session chart prep: load the enigma and Flowmaster cross indicators; mark key prior session highs/lows and overnight ranges.
- Monitor for Ready DD labels and king timing windows to know when setups may form.
- When a potential confluence forms, move to a higher attention posture and have entry/stop/targets pre-calculated.
- Use market replay drills once per week to keep your pattern recognition sharp.
- End-of-day review: log trades, record what went well and where you can improve.
In addition to this routine, I attend training sessions and review community trade-room examples. Continuous exposure to real trades and different interpretations helps me fine-tune the Late Nate application across multiple instruments and volatility regimes.

Scaling from Demo to Live
When I transition a signal from simulation to live trading, I scale risk progressively:
- Start with a small fraction of your intended live size (e.g., 10–25%) so you acclimate to live fills, slippage, and emotional differences.
- After a statistically significant sample of trades with positive expectancy, gradually increase size.
- Maintain a daily loss cap so a string of bad outcomes doesn’t erode your confidence or capital.
Scaling gradually and respecting position sizing discipline mitigates the risk of overconfidence and reduces the psychological cost when trades don’t go your way.
Common Mistakes and How I Avoid Them
The Late Nate is useful, but traders can misapply it. Below are common mistakes I see and the practical steps I take to avoid them.

Mistake 1: Trading the Late Nate Alone
Issue: Treating the white Flowmaster cross as a standalone entry signal leads to many false trades.
My fix: Always demand confluence — require at least one other independent confirmation (enigma, ready DD, orderflow divergence). If none is present, the Late Nate triggers a “watch” posture, not a trade.
Mistake 2: Poor Stop Placement
Issue: Stops too tight or too wide relative to the trade idea can destroy expectancy.
My fix: Use the enigma marker and swing structure to guide stops. Calculate position size so the dollar risk aligns with your plan. Never move stops to accommodate a trade — adjust size instead.
Mistake 3: Ignoring Time-of-Day Effects
Issue: Trading the Late Nate in illiquid windows or near major macro events can produce erratic behavior.
My fix: Avoid trading during market open volatility without a very strict plan, and be cautious around major economic prints. Prefer to trade the Late Nate in normal liquidity windows or when liquidity is predictable.
Mistake 4: Overtrading on Small Signals
Issue: The Late Nate appears frequently on lower time frames; indiscriminate trading quickly erodes capital.
My fix: Place a quality filter that limits me to setups where multiple elements line up. If the Late Nate is the only positive, I skip the trade.
Trade Journal Template I Use for the Late Nate
Recording trades is how you learn. I use a structured journal that captures the objective facts and the subjective lessons from every setup.

- Date / Time
- Instrument / Timeframe
- Setup elements present (Ready DD, Enigma, King Timing, Late Nate)
- Entry type and price
- Stop price and rationale
- Targets and scaling plan
- Outcome (P/L)
- Execution notes (slippage, fills)
- Emotional state and decision clarity
- Post-trade lessons and action items
This template forces me to evaluate whether I traded the signal according to rules or out of emotion. Over time it reveals behavioral leaks and mechanical edge weaknesses.
Advanced Considerations: Market Regimes and Instrument Choice
Not every instrument or market regime is equally suitable for the Late Nate application. Understanding where it works best helps you concentrate effort where the signal has the highest expectancy.
Trending vs. Rotational Markets
In strongly trending markets, late retail entries (Late Nates) are more likely to be chased and absorbed before a meaningful reversal. In rotational or mean-reverting environments, Late Nates near harmonic targets can produce sharper counter moves.
My approach:
- In strong trends: prefer to wait for clearer orderflow exhaustion or multi-timeframe rejection before acting.
- In rotational markets: the Late Nate often gives a cleaner short-term opportunity because liquidity is more predictable.
Instrument Selection
Some instruments are better suited to this method:
- Highly liquid futures (e.g., ES, NQ) where orderflow is meaningful and slippage is low.
- Instruments with good microstructure data and reliable session behavior.
- Avoid very thin or highly volatile instruments unless you have experience with their idiosyncrasies.
I recommend starting with a 1–2 instruments and mastering their behavior rather than spreading focus across too many markets. This deep instrument knowledge helps you read the Late Nate with greater precision.
Putting It All Together: A Full Example Walkthrough
To make the method concrete, here’s a step-by-step example I use in demos, combining everything covered so far. This is a hypothetical reconstructed sequence that mirrors a real setup I teach.

- Pre-market: I mark yesterday’s high and low and load the enigma and Flowmaster on a 5-minute and 1-minute chart.
- During the morning, a green Ready DD label appears near the prior session high. I note it and calculate potential stop distances.
- King timing window approaches, so I prepare to watch price action closely. I switch to market replay or slow live ticks if practicing.
- Price probes the Ready DD zone and a blue enigma forms, projecting an upward target into the next resistance band. This gives a directional bias of long.
- Price attempts to extend. Aggressive buying shows up, pushing price to a local high — and a white Flowmaster cross (Late Nate) appears at the upper tail of the move.
- I watch microstructure: the continuation candles show lower aggressive buy volume and increase in selling absorption. A small rejection candle forms on the 1-minute chart.
- Entry plan: partial size at a limit on a pullback to the micro rejection low, second scale in if the rejection holds and enigma projection is still in reach.
- Stop: placed just beneath the enigma marker and recent swing low — a logical invalidation point.
- Targets: take 50% at the enigma projected line intersection and trail the remainder to break-even, then ride a potential extension.
- Outcome: if the trade hits target, log the trade and analyze any deviations from plan. If stopped, log and analyze what went wrong (e.g., misread of orderflow, inadequate confluence).
This step-by-step approach reduces impulsive decisions and keeps your entries grounded in structural logic and a risk-managed framework.
Final Checklist Before Trading a Late Nate Setup
Use this checklist to ensure a disciplined application of the Late Nate strategy:
- Ready DD label present and the zone aligns with higher timeframe structure? (Yes/No)
- King timing window active or approaching? (Yes/No)
- Enigma projection lines up with the Late Nate zone? (Yes/No)
- Orderflow shows signs of exhaustion or decreasing aggressive volume? (Yes/No)
- Time-of-day/liquidity conditions acceptable? (Yes/No)
- Entry, stop, and target pre-defined and position sized to risk tolerance? (Yes/No)
- Journal template ready to log the trade? (Yes/No)
I will only take the trade if most answers are “Yes.” This binary filter dramatically improves discipline and helps maintain a long-term edge.
Continuous Learning: Bootcamp, Live Sessions and Community
Signals like the Late Nate are best learned through immersion. I encourage traders to use structured training like the AlgoBox eight-session bootcamp and to engage with live sessions where trades are discussed in real-time.

Why this helps:
- Seeing the same signal across dozens of examples accelerates pattern recognition.
- Live feedback from experienced instructors clarifies edge cases.
- Community trade reviews reveal mistakes you won’t notice alone and expose you to different interpretations.
I combine formal training with a disciplined practice plan and daily journaling. That three-pronged approach — education, practice, and review — is how I progressed from novice to a confident practitioner using the Late Nate signal.
Conclusion — Practical Summary and Next Steps
The Late Nate (white Flowmaster cross) is a high-value informational marker that often points to late retail participation near the end of price swings. When used correctly and in context — alongside Ready DD labels, king timing windows, enigma projections, and orderflow readouts — it becomes a powerful confluence marker for short-term reversals or pullbacks.
Key takeaways:
- Treat the Late Nate as an informative confluence marker — not a standalone trigger.
- Require additional confirmation (enigma, orderflow, structure) before entering.
- Use the enigma projected line for targets and place stops behind the enigma or structural invalidation points.
- Practice extensively in NinjaTrader market replay to build pattern recognition and execution skills.
- Keep a disciplined trade journal and follow a checklist to maintain quality control.
If you’re ready to practice, start by replaying sessions where the Ready DD, king timing, and enigma aligned. Observe how the Late Nate appears and how price typically reacts. After sufficient practice and journaled trades, consider scaling into a small live account while maintaining tight risk control.
Thank you for reading — I hope this detailed breakdown helps you add the Late Nate to your toolkit in a practical, risk-aware way. Keep practicing, document what you learn, and use confluence to guide your decisions.
See you in the next session, and trade thoughtfully.