
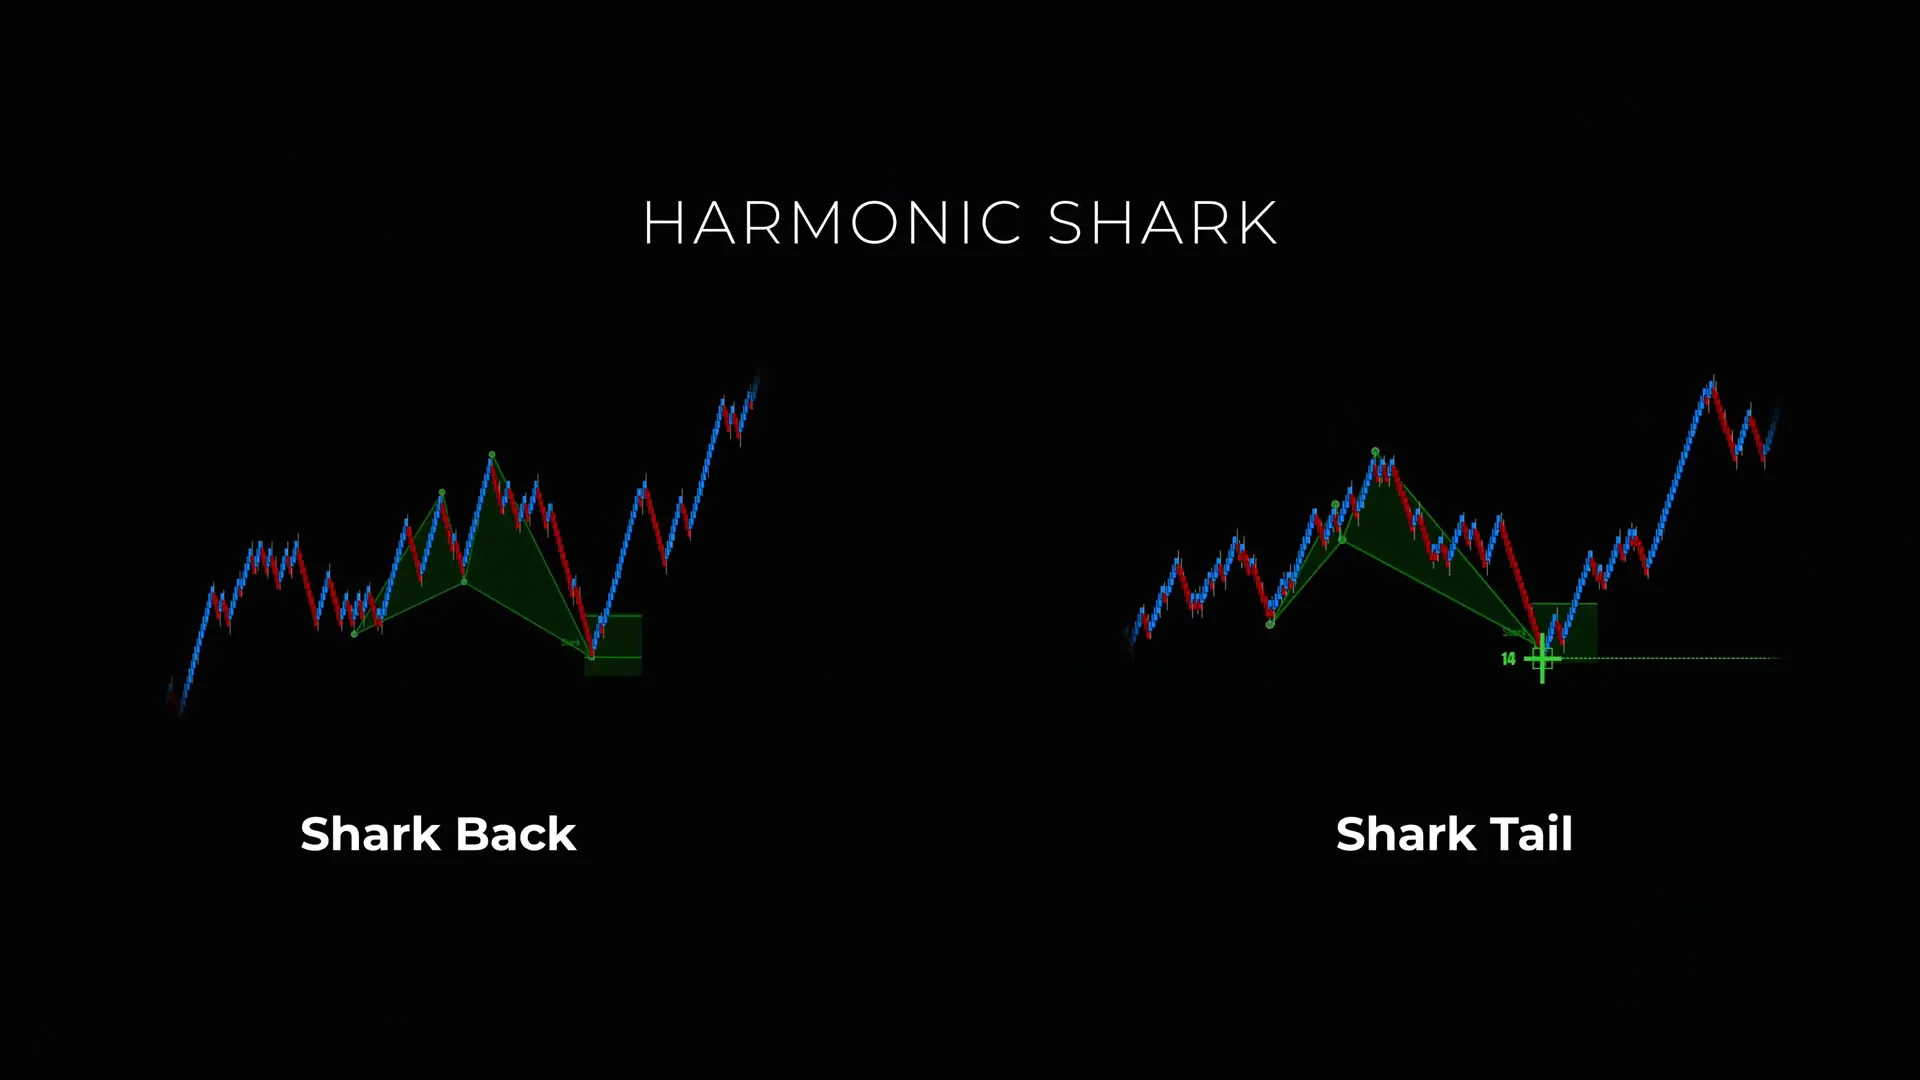
I created this guide to teach you a clear, repeatable approach to trading harmonic reversals using two of my favorite setups: the Shark Back and the Shark Tail. In the original training I released on my channel, I broke these strategies down in plain terms and showed how they work inside the AlgoBox environment for NinjaTrader. Here, I expand that guidance into a step-by-step tutorial you can use on any charting platform, with practical rules, examples, and risk-management techniques designed for day traders and futures traders.
Table of Contents
- Step 1: Understand Harmonic Patterns and the PRZ (Potential Reversal Zone)
- Step 2: Identify the Shark Back Line Inside the PRZ
- Step 3: Enter the Trade on the Shark Back — Rules and Execution
- Step 4: Manage Stops and React to a Shark Back Stop-Out
- Step 5: Recognize the Shark Tail Setup — Breakthrough and Confirmation
- Step 6: Confirmation Signals — Alpha, Omega, Enigma, Cross, and Fib Dot
- Step 7: Re-entering the Trade on Shark Tail — Entry, Stop, and Target Rules
- Step 8: Practical Examples — How I Read the Chart Step by Step
- Step 9: Trade Management, Psychology, and the Two-Try Rule
- Step 10: Implementing Shark Back and Shark Tail in AlgoBox and NinjaTrader
- Step 11: Common Mistakes and How to Avoid Them
- Step 12: Advanced Tips — Combining Shark Strategies with Orderflow
- Conclusion: Trade Like a Shark — A Systematic Two-Attempt Approach
- FAQ
Step 1: Understand Harmonic Patterns and the PRZ (Potential Reversal Zone)
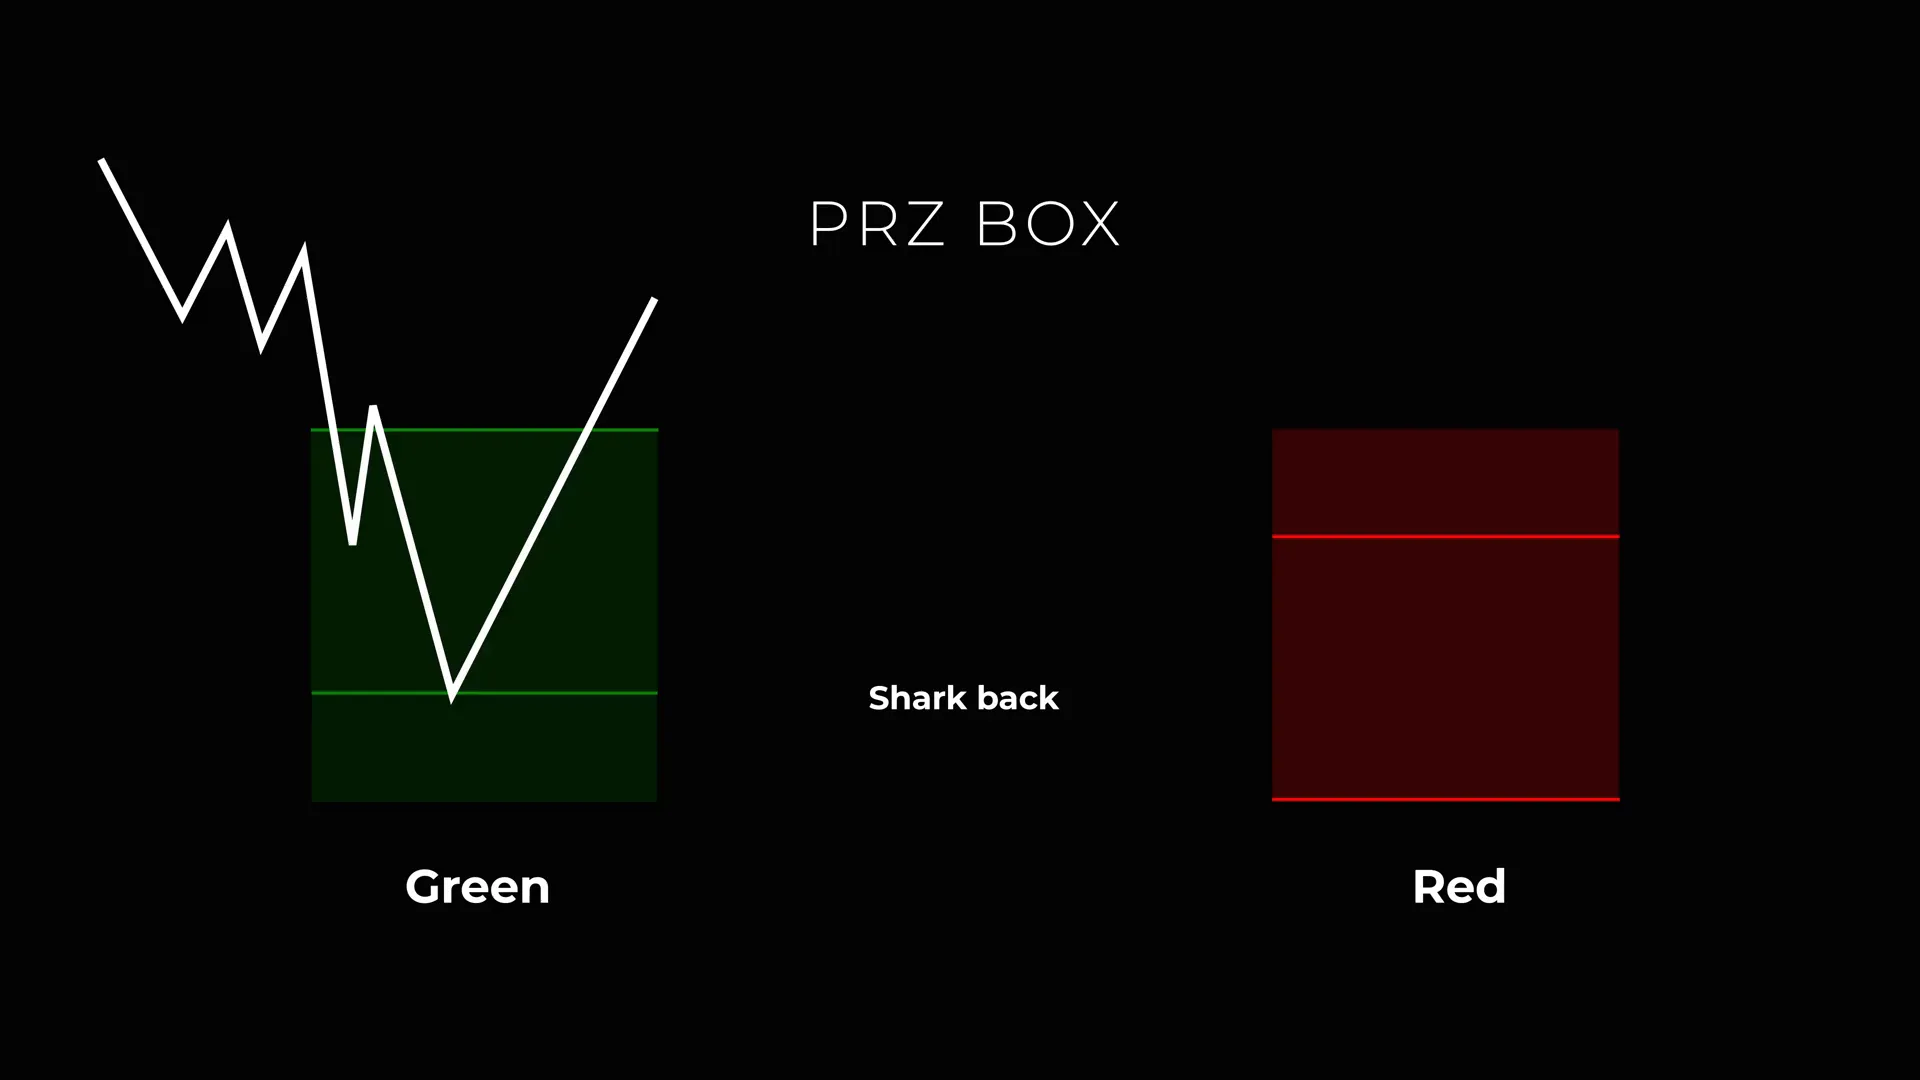
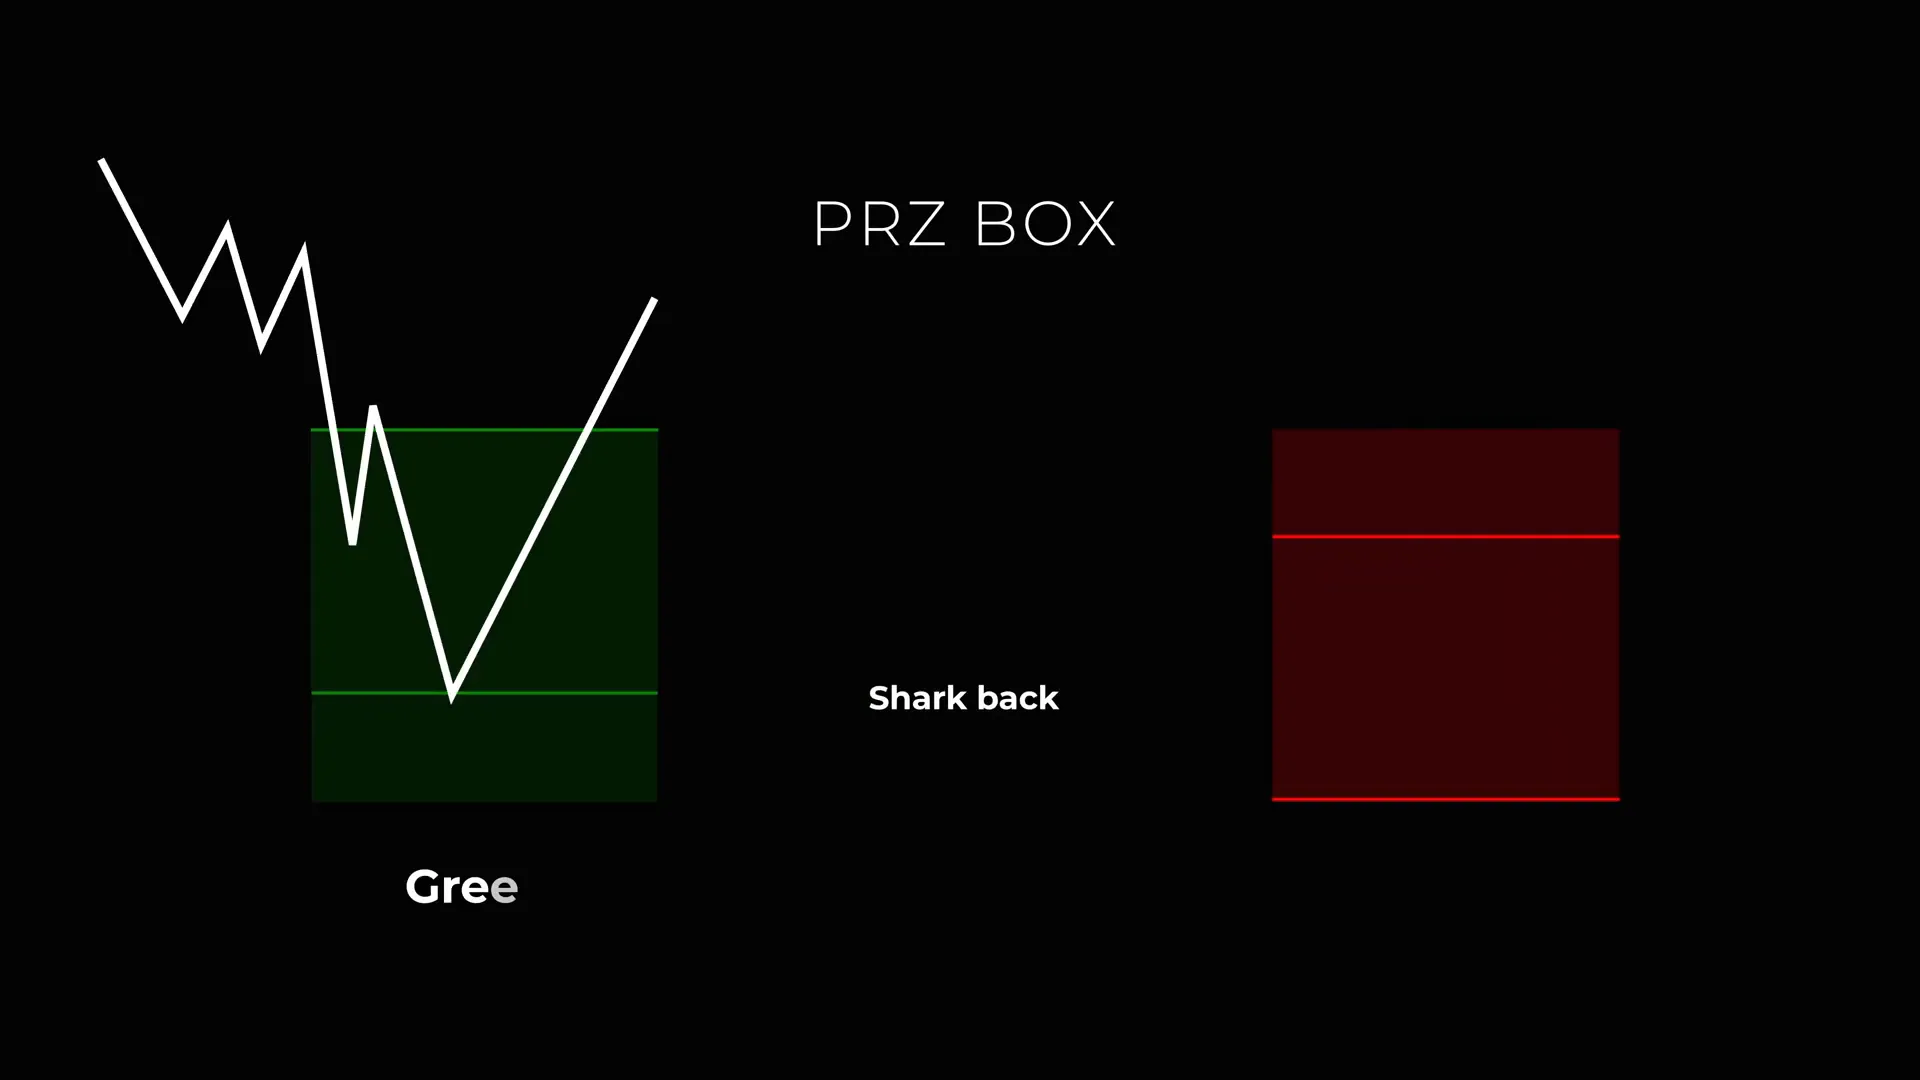
Harmonic patterns are a class of price-structure tools that use precise Fibonacci relationships to anticipate where a market is likely to reverse. The Potential Reversal Zone (PRZ) is the collection of price levels derived from those Fibonacci relationships where the reversal is most likely to occur. In my trading, I treat the PRZ as a zone of probability rather than a precise point—it’s where probability clusters, and where I start looking for price action or confirmation signals.
When you trade harmonic patterns, you are not guessing; you are making a probabilistic decision based on geometry and historical repetition. The PRZ is the central concept: it compresses the relevant Fibonacci extensions and retracements into a box, and within that box there are substructures I watch for high-probability entries.
- Why PRZ matters: it consolidates multiple Fibonacci confluences into a single trading zone.
- How to draw a PRZ: use the harmonic pattern tool or manually plot the relevant Fibonacci legs and mark the overlapping levels.
- Zone mindset: treat the PRZ as a range where confirmation signals must appear to justify an entry.
When teaching this, I emphasize that the PRZ is not an automatic buy or sell zone. It’s a zone that merits increased attention. The two setups I focus on—Shark Back and Shark Tail—are both built around the PRZ, but they use different intra-zone price behaviors to determine an entry.
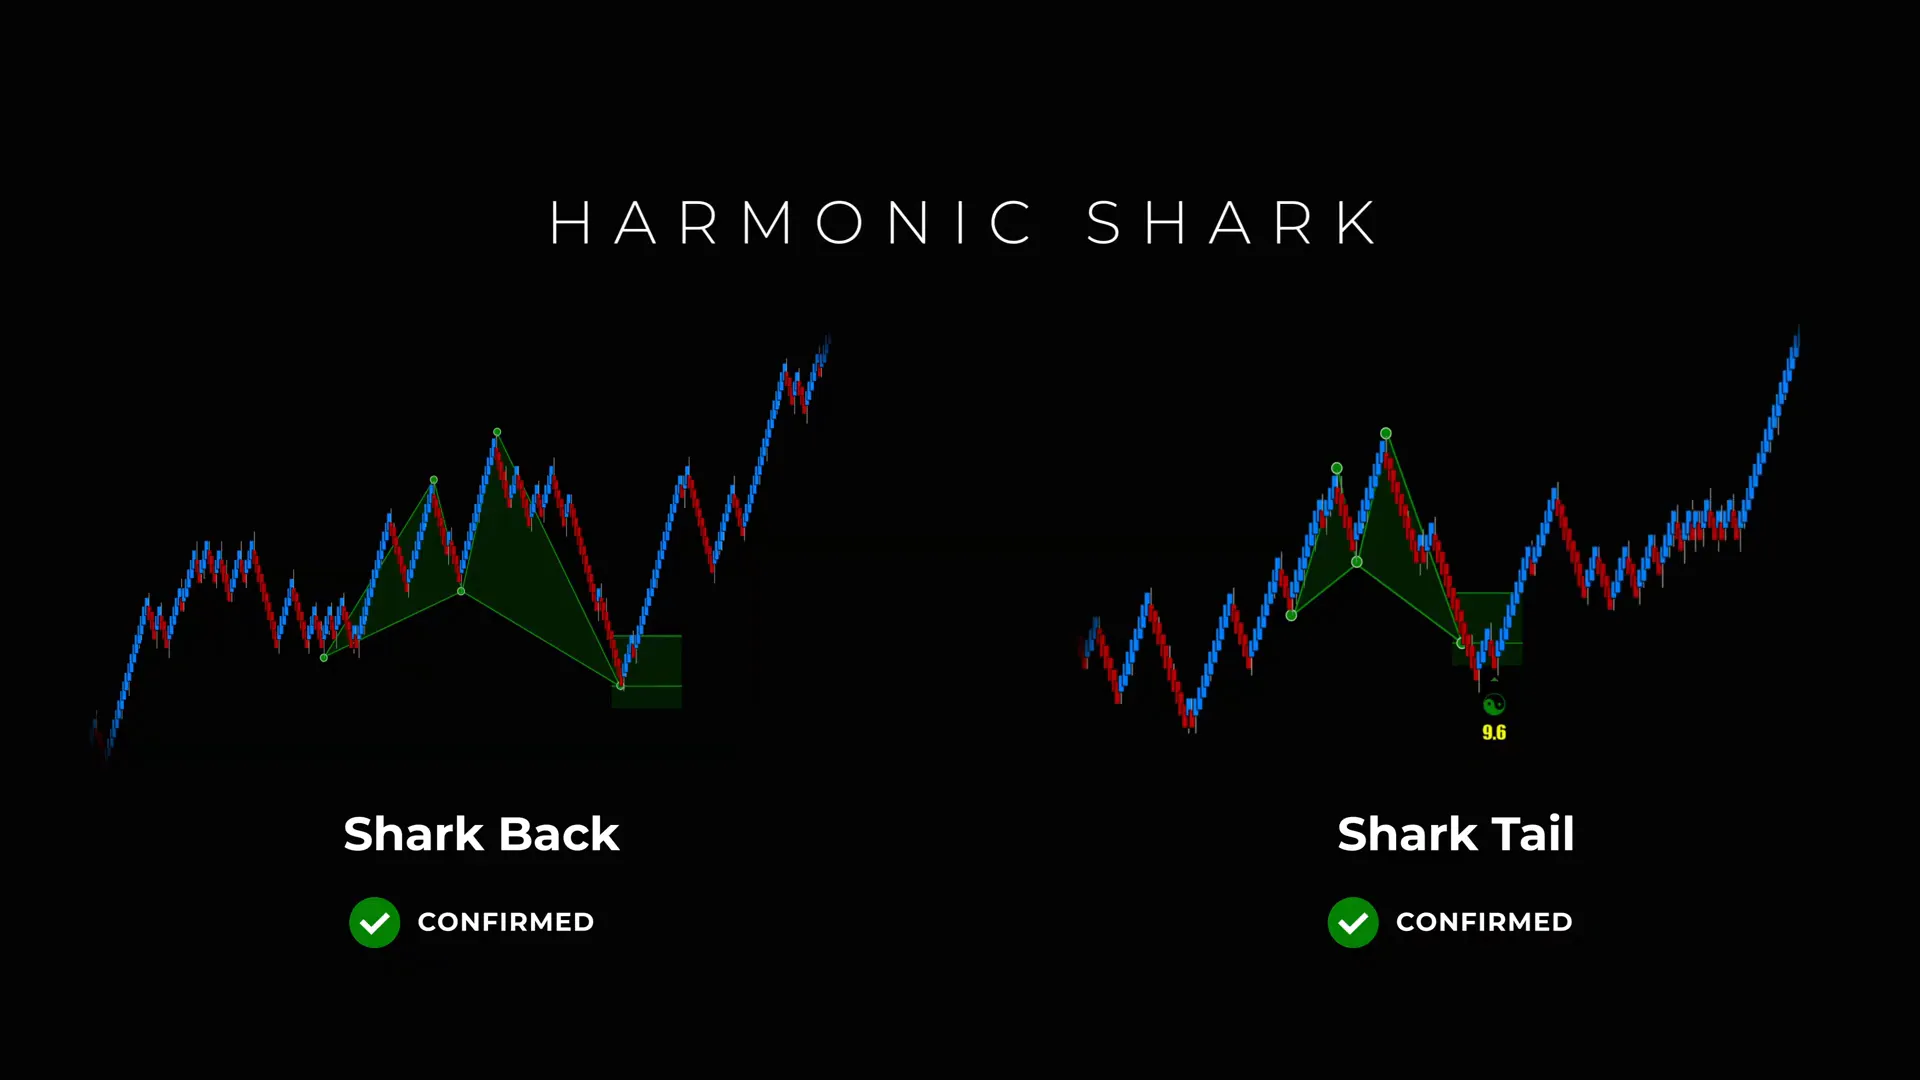
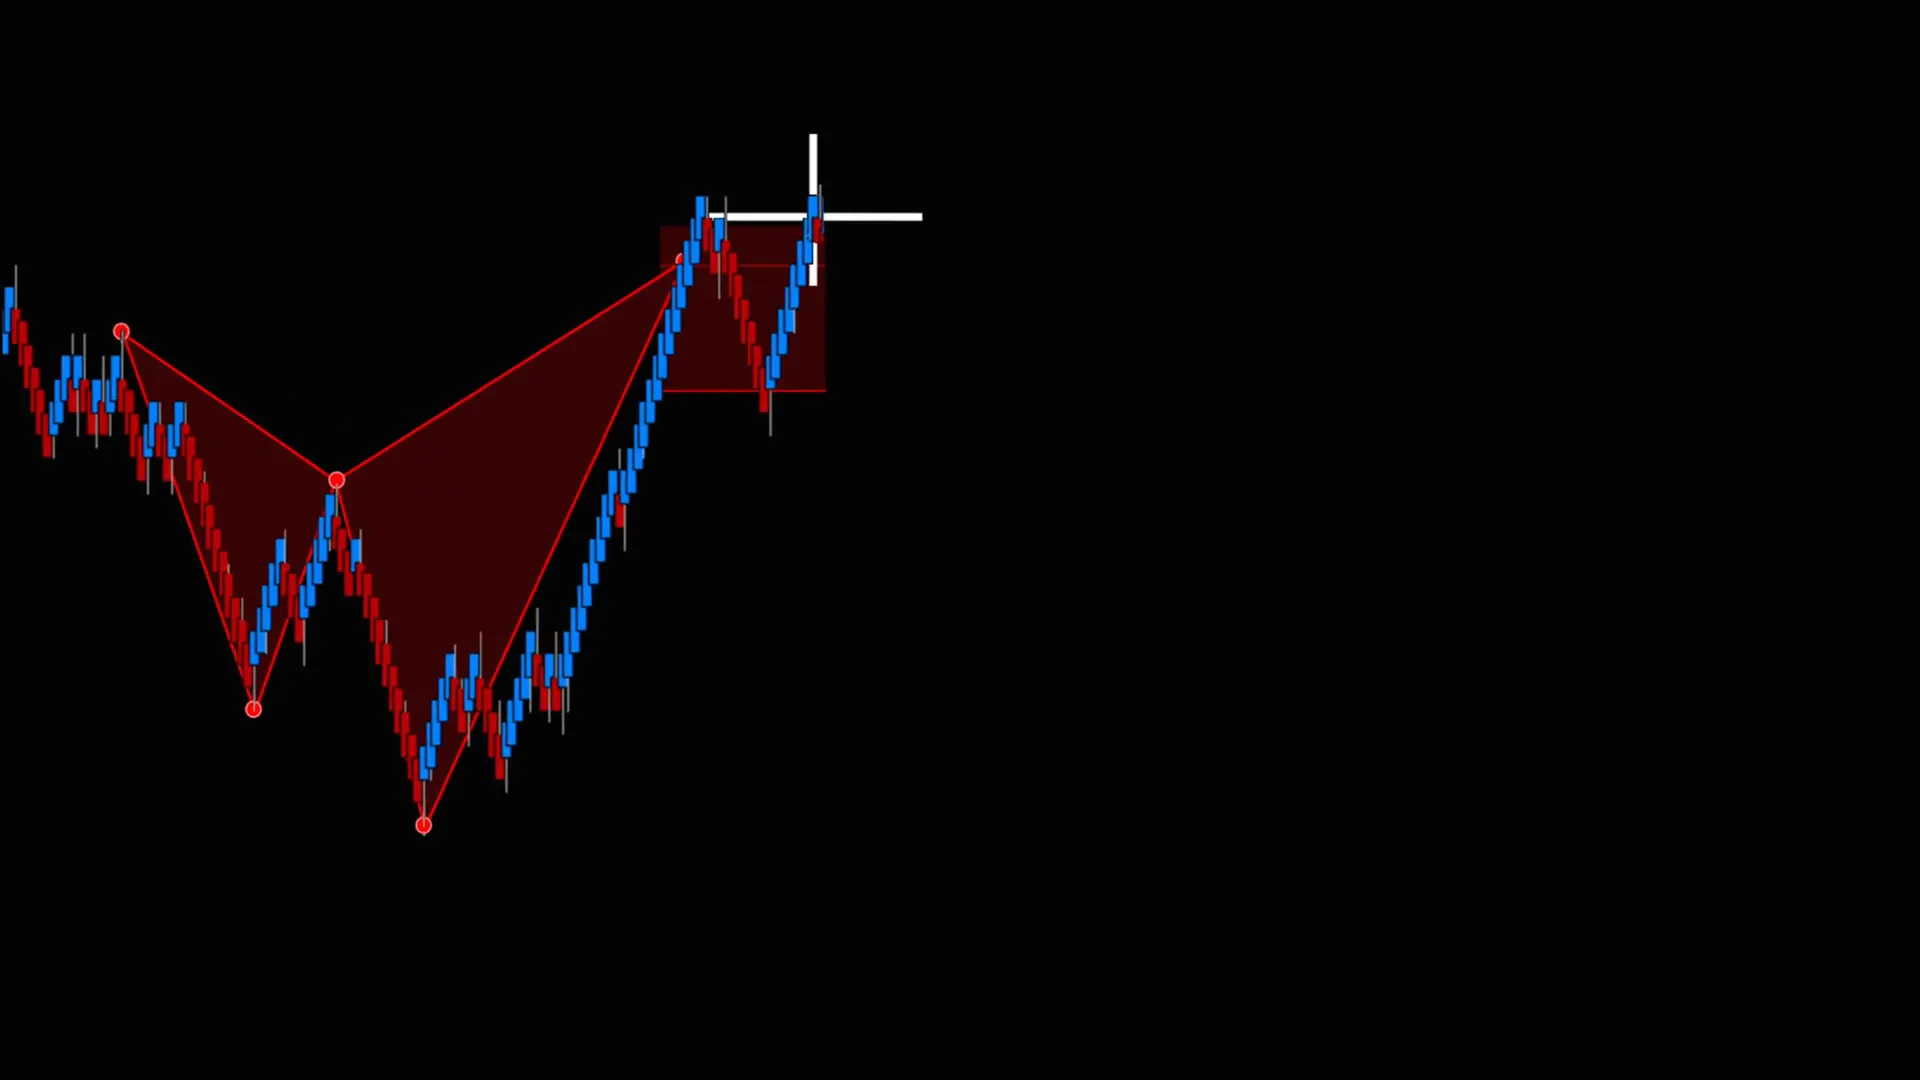
Step 2: Identify the Shark Back Line Inside the PRZ
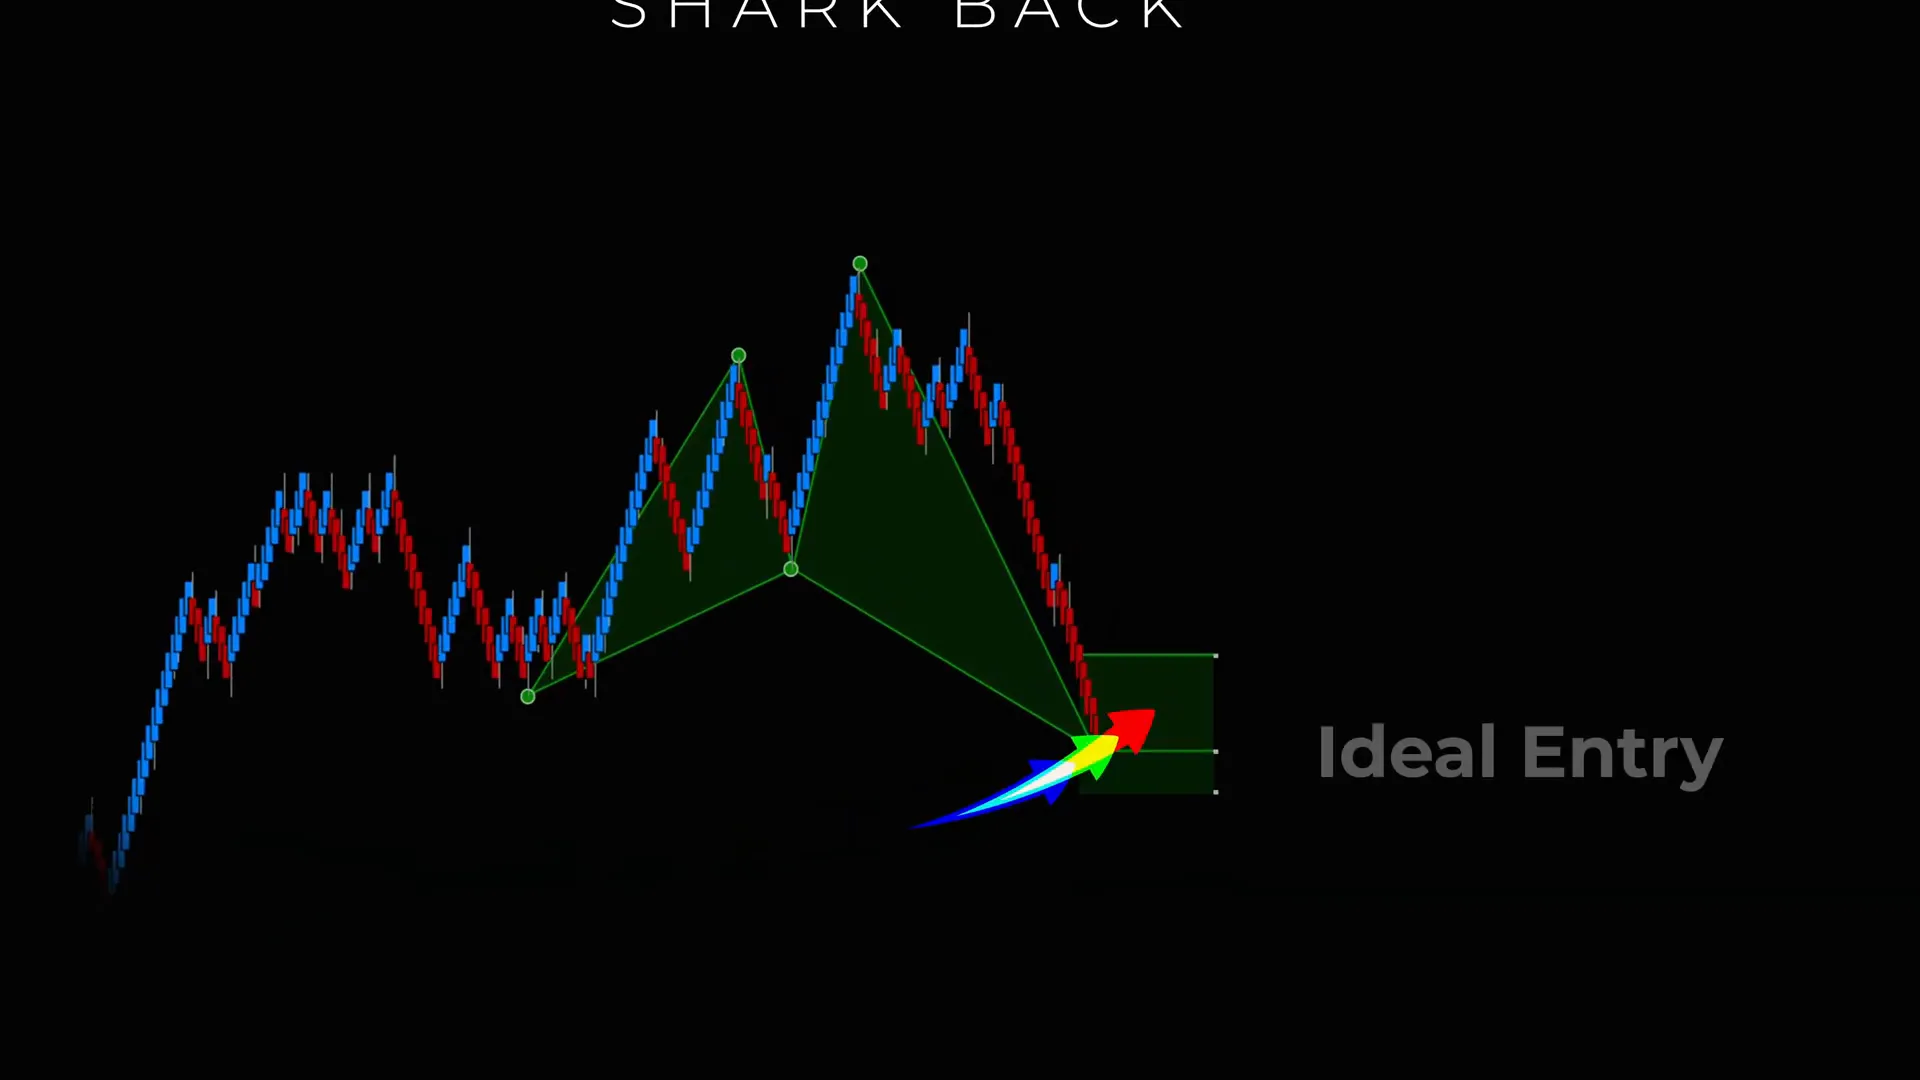
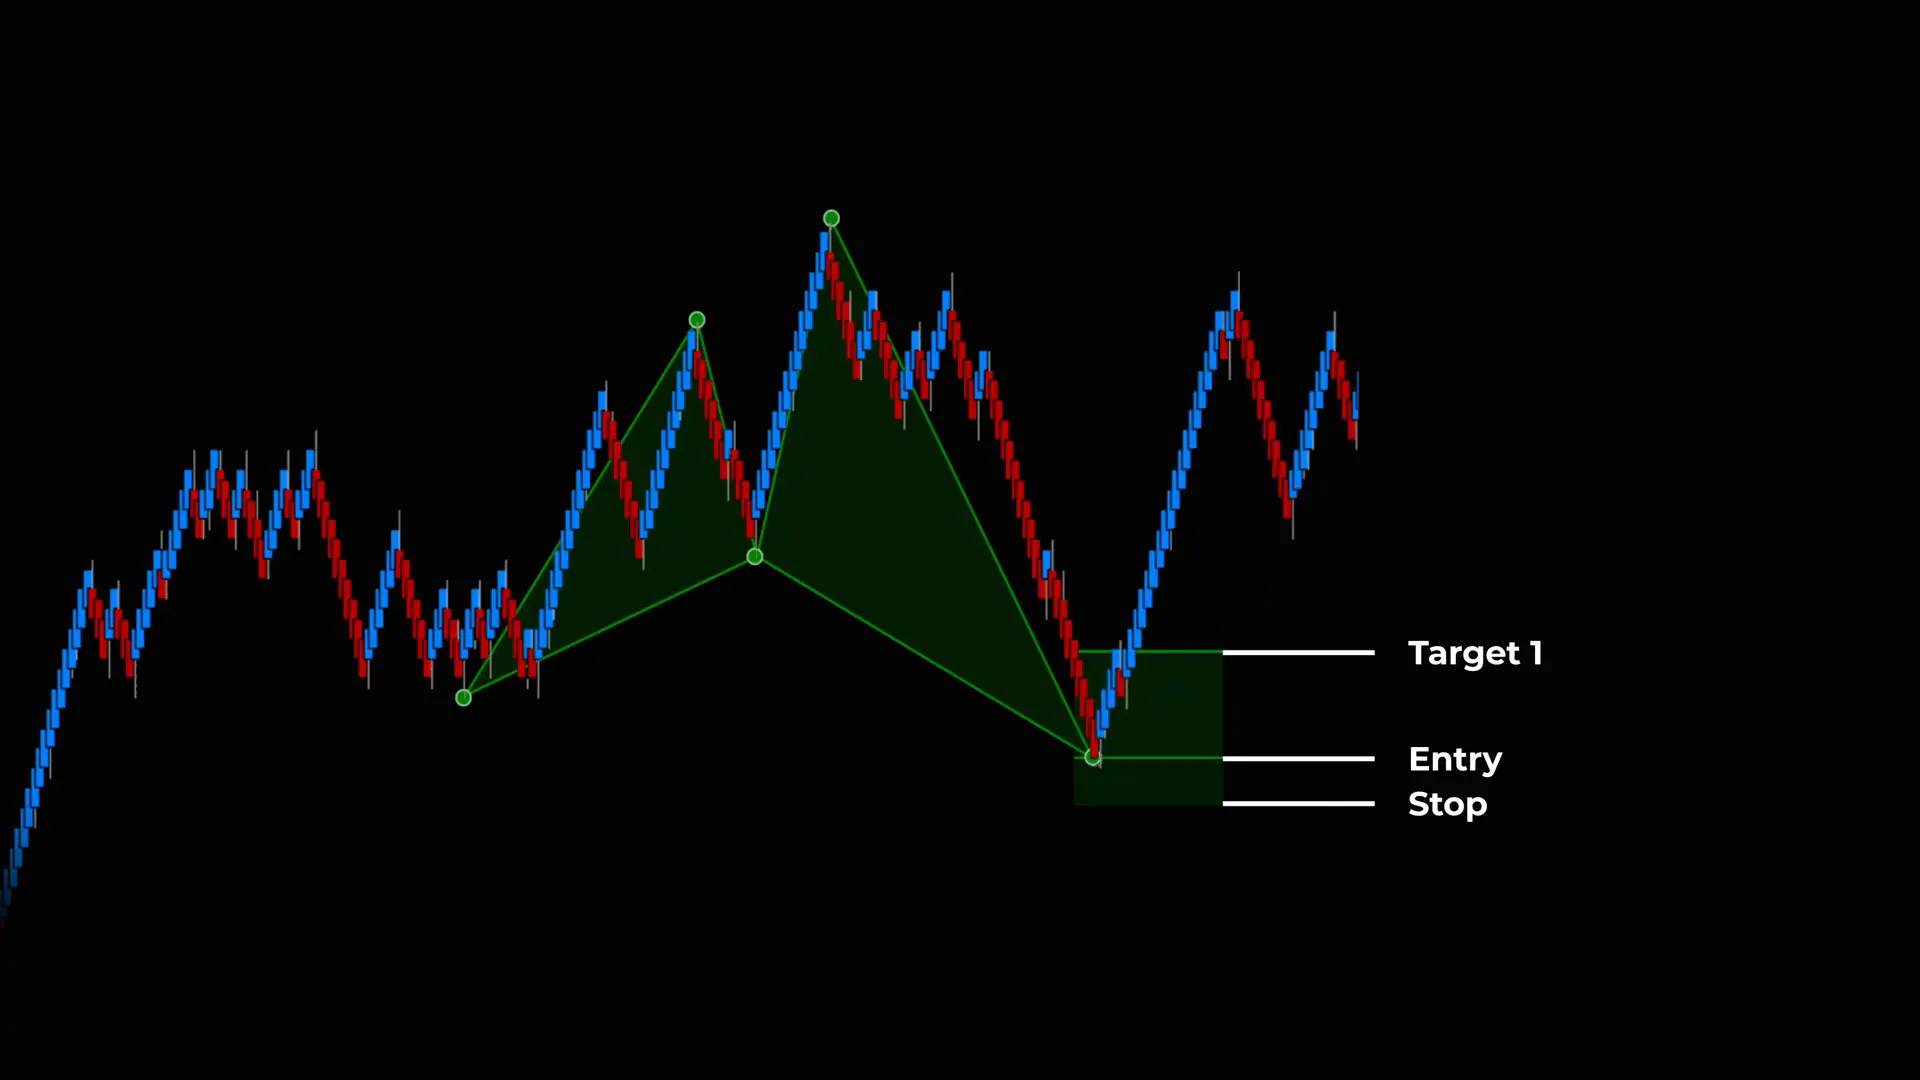
The Shark Back is a specific reference line inside the PRZ—think of it as the “back bone” of the reversal zone. It’s the internal line where price is most likely to react. In the setup I teach, price moving into the PRZ and reaching the Shark Back line is the ideal entry trigger for a reversal trade.
How to identify the Shark Back:
- Map the harmonic legs and draw the PRZ box based on the required Fibonacci confluences for the Shark pattern (or the equivalent harmonic setup you are using).
- Locate the internal reference line that consistently aligns with structural support/resistance or a key Fibonacci level—this is your Shark Back.
- Confirm that the Shark Back corresponds with historical price reactions or areas where orderflow tends to cluster (previous consolidation, gap boundaries, or local highs/lows).
The Shark Back is not an indicator; it’s a structural line you draw from price geometry. When price reaches that line inside the PRZ, I treat it as an actionable area where an entry with a tight stop can be justified, provided price shows the expected reaction.
Step 3: Enter the Trade on the Shark Back — Rules and Execution
When price enters the PRZ and touches the Shark Back line, that constitutes the primary entry signal for the Shark Back setup. But I always require some form of price confirmation — a pivot, a rejection wick, or an indicator agreeing with the move — before committing capital. Here are the rules I use for entering a Shark Back trade:
- Price must trade into the PRZ and reach the Shark Back line.
- Wait for a clean price reaction at that line: a reversal bar, rejection wick, or small consolidation that pivots away from the PRZ.
- Confirm with one simple confluence: volume spike, momentum divergence, or a short-term indicator cross favoring the reversal.
- Enter with a defined stop loss below/above a structurally logical level (just outside the PRZ or below the recent swing low/high depending on direction).
- Set targets using the front of the Shark pattern (the nearest structural reference or Fibonacci projection) and scale out if needed.
Two essential practical points:
- Keep your stop tight relative to the PRZ width. The advantage of the Shark Back is that the PRZ provides a contained zone for risk placement.
- If price holds and pivots in your favor, manage the trade by moving stops to breakeven at predefined milestones, and take partial profits at the front of the Shark.
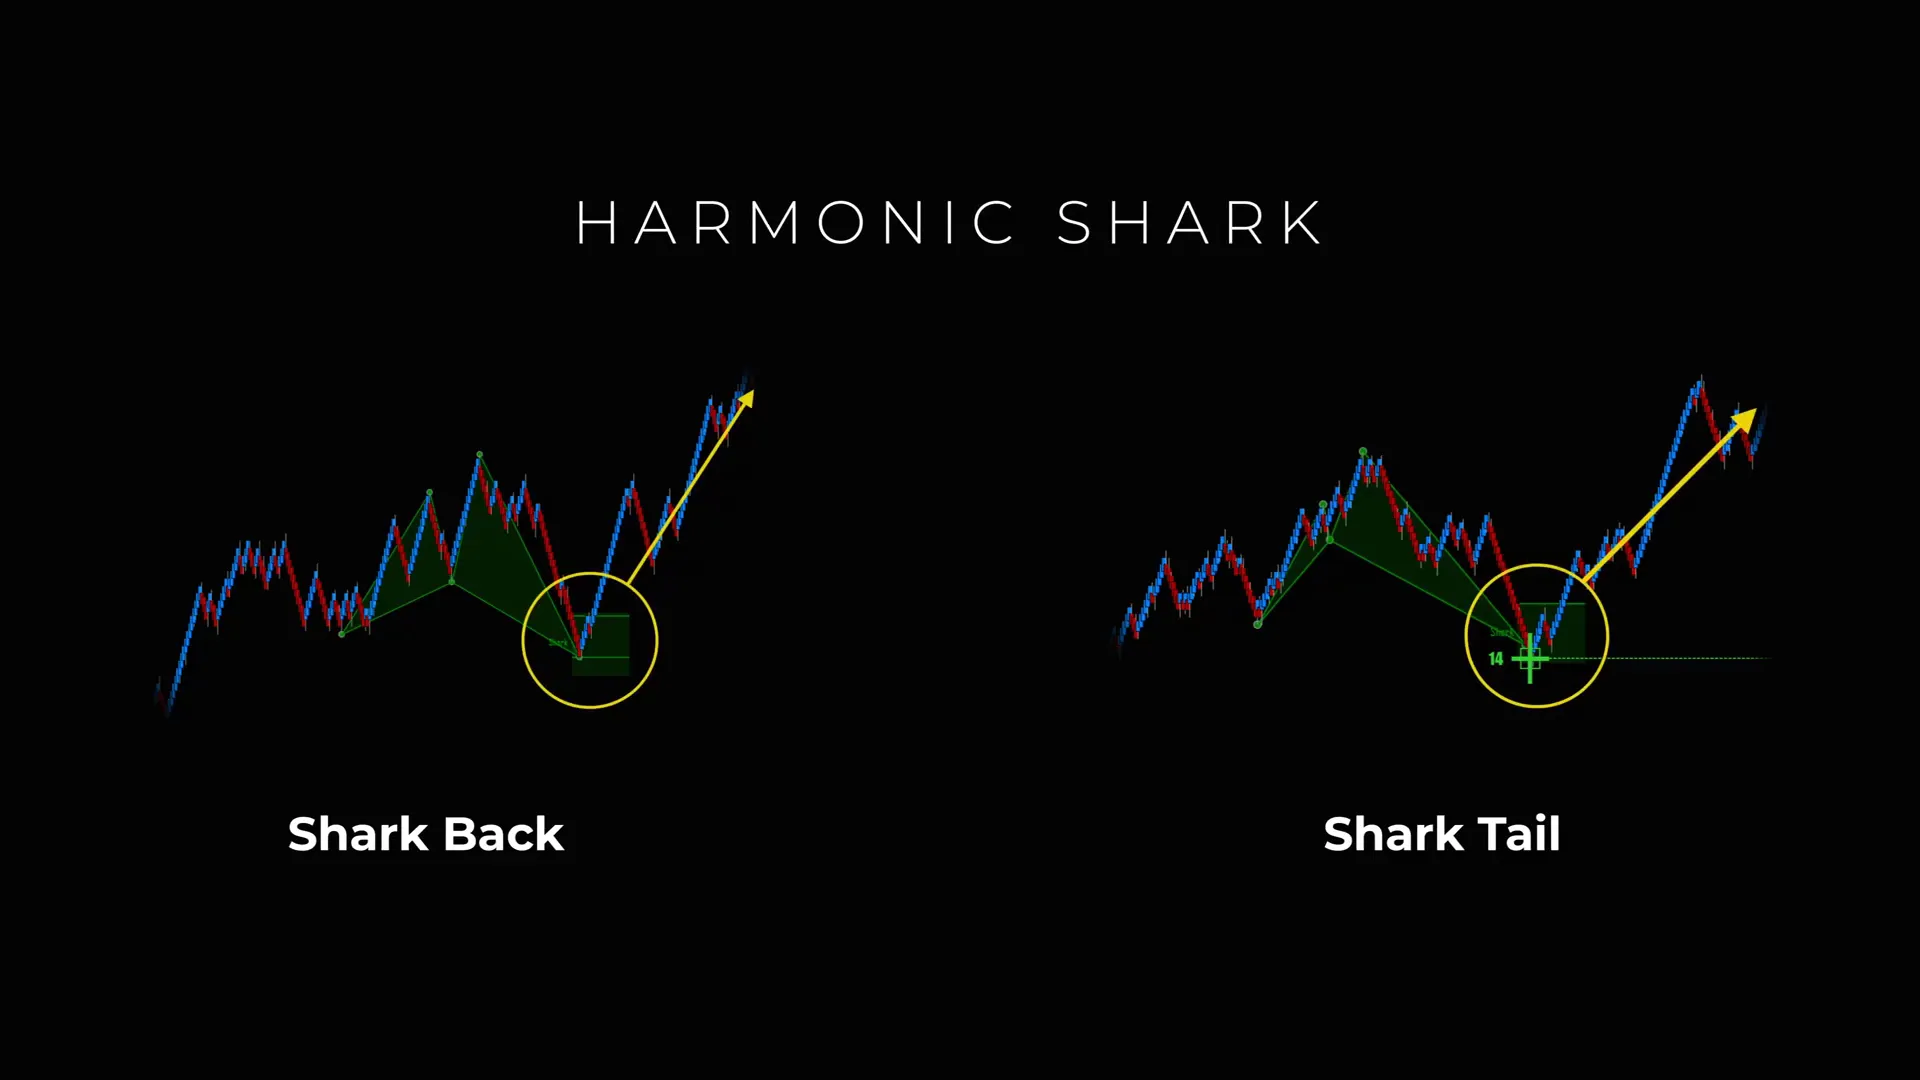
In my experience, this first entry often captures clean reversals. But markets are imperfect, and sometimes price will violate the Shark Back before meaningful momentum develops. That’s where the Shark Tail setup comes into play.
Step 4: Manage Stops and React to a Shark Back Stop-Out
If your Shark Back entry is stopped out, don’t panic. This is a crucial psychological rule I teach: a stop-out at the Shark Back is not the end of the trade idea; it often sets up a second, higher-probability attempt. I call this the “two-try rule.”
How to manage the stop:
- Place your stop just outside the PRZ boundary or beyond the last swing that invalidates the harmonic structure.
- If stopped out, analyze whether the PRZ remains intact (did price simply poke outside or did structure break?).
- A minor poke often yields a Shark Tail opportunity; a structural break means the pattern is likely invalidated.
Emotions after a stop out can cause impulsive behavior. Instead, I recommend maintaining composure and specifically watching for a Shark Tail confirmation. The Shark Tail, when it occurs, gives you a second chance with better confluence because price has already tested the Shark Back and then produced a signal just behind the PRZ.
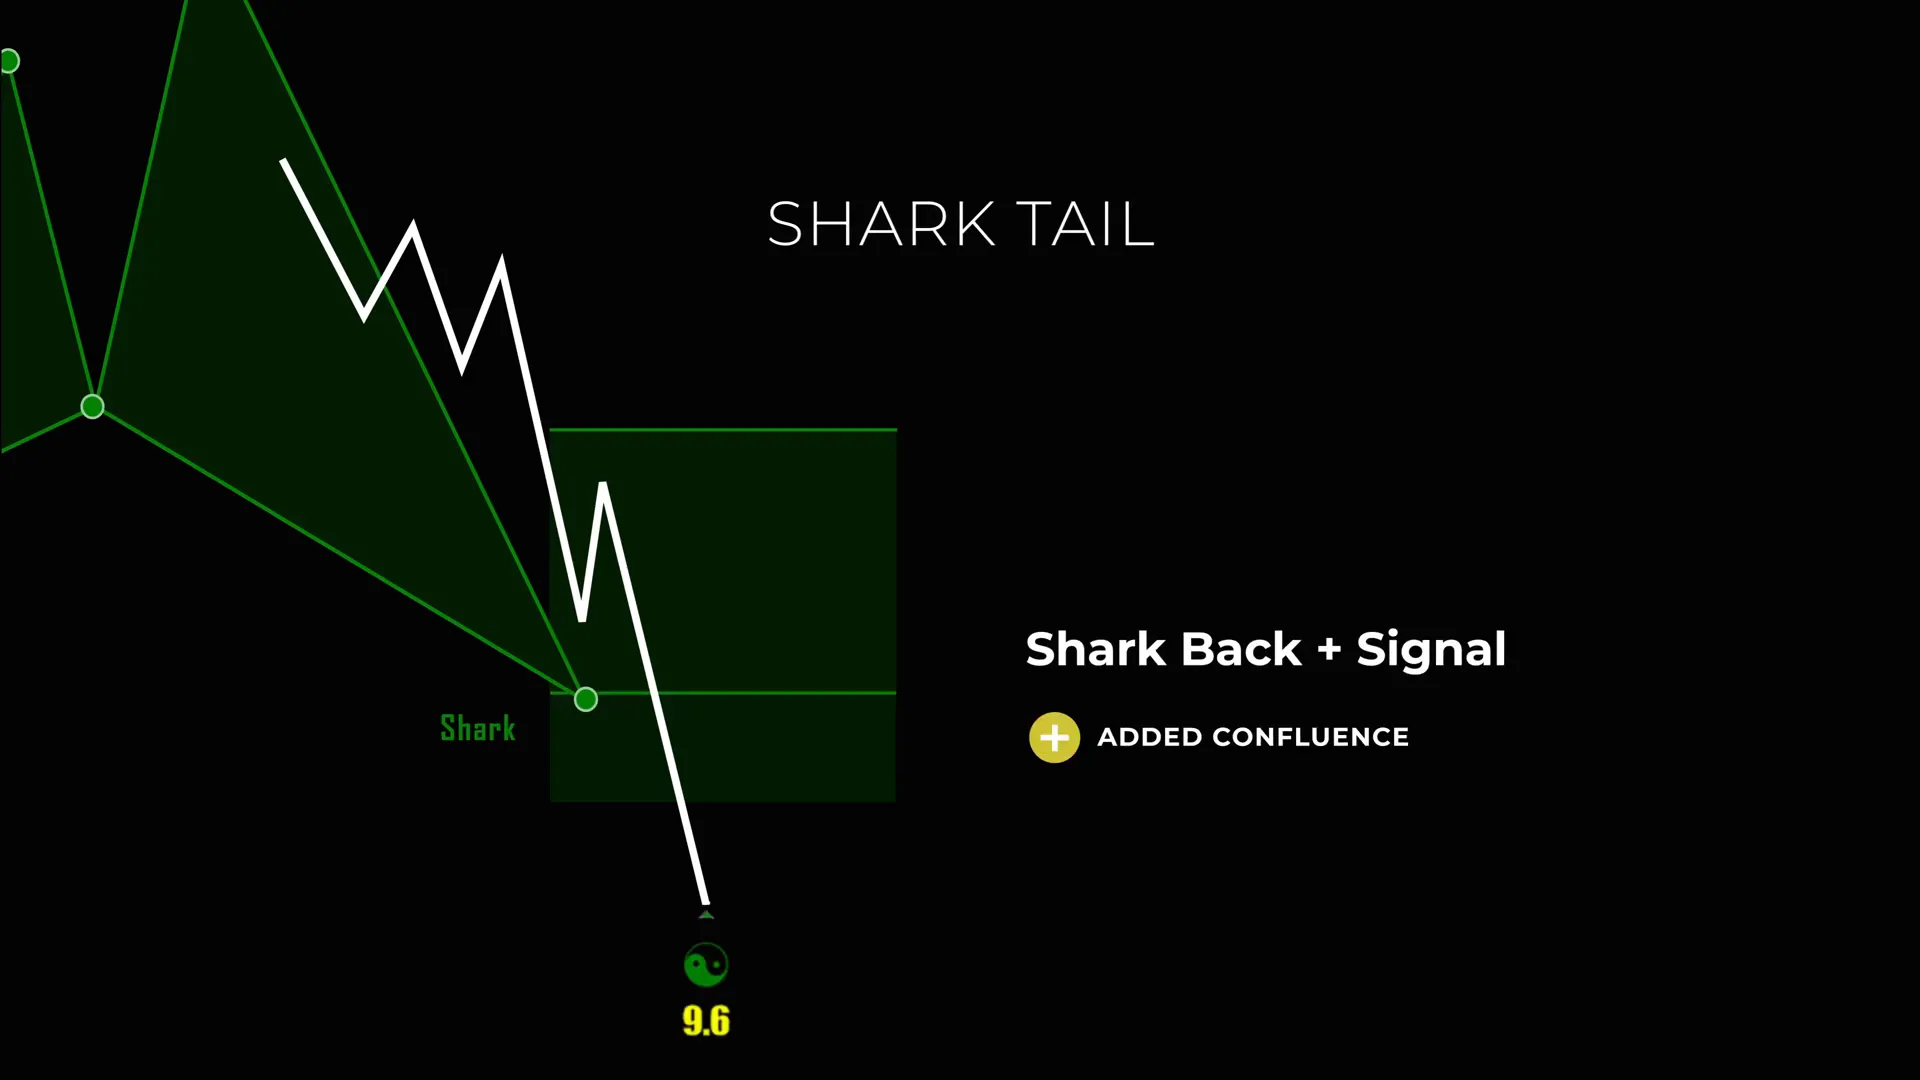
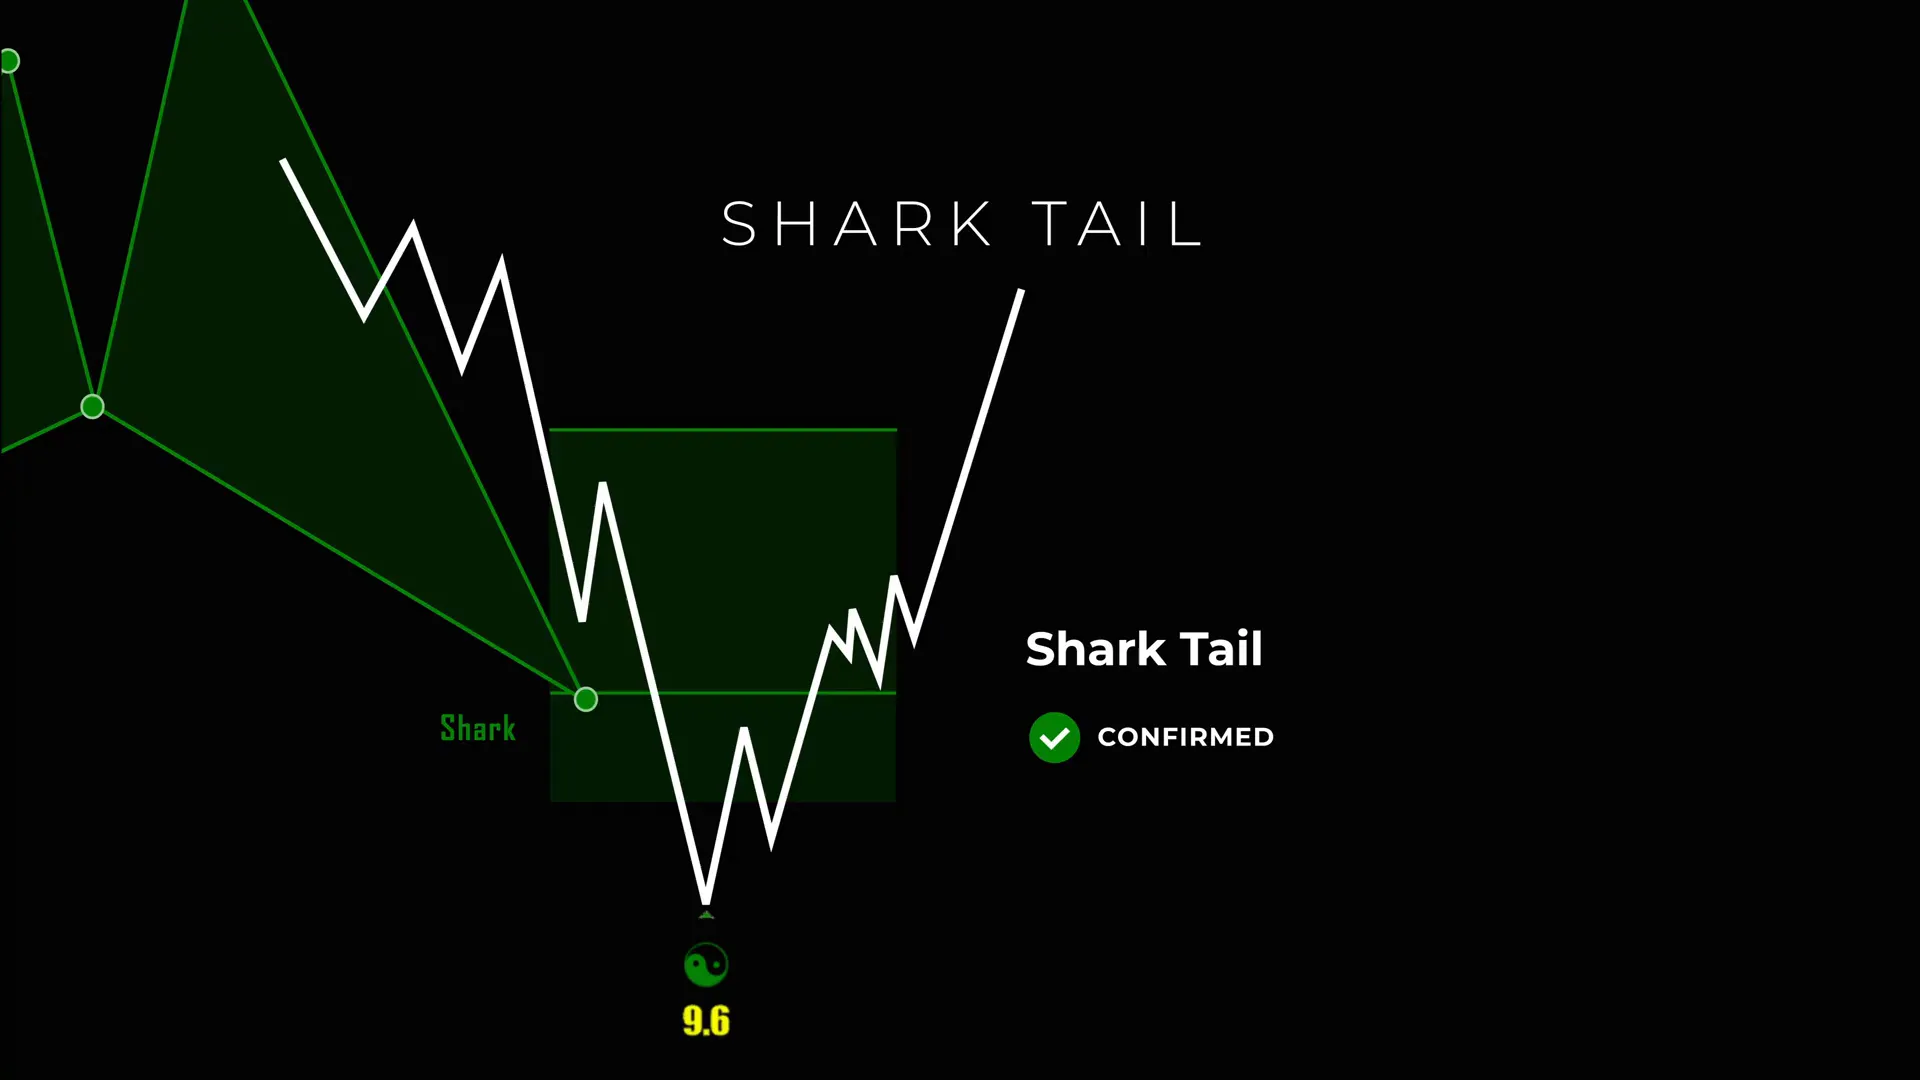
Step 5: Recognize the Shark Tail Setup — Breakthrough and Confirmation
The Shark Tail setup happens when price breaks through the Shark Back line (i.e., pokes past your initial entry), but then an independent confirmation signal appears just behind the PRZ. This is the key confluence point: the market has tested beyond the internal line, failed to continue, and then produced a recognizable signal certifying the reversal.
Important characteristics of the Shark Tail:
- It begins with a breach of the Shark Back — price moves past your initial entry.
- Shortly afterward, a confirmation signal appears just beyond the PRZ, often on the opposite side of the PRZ or the internal line.
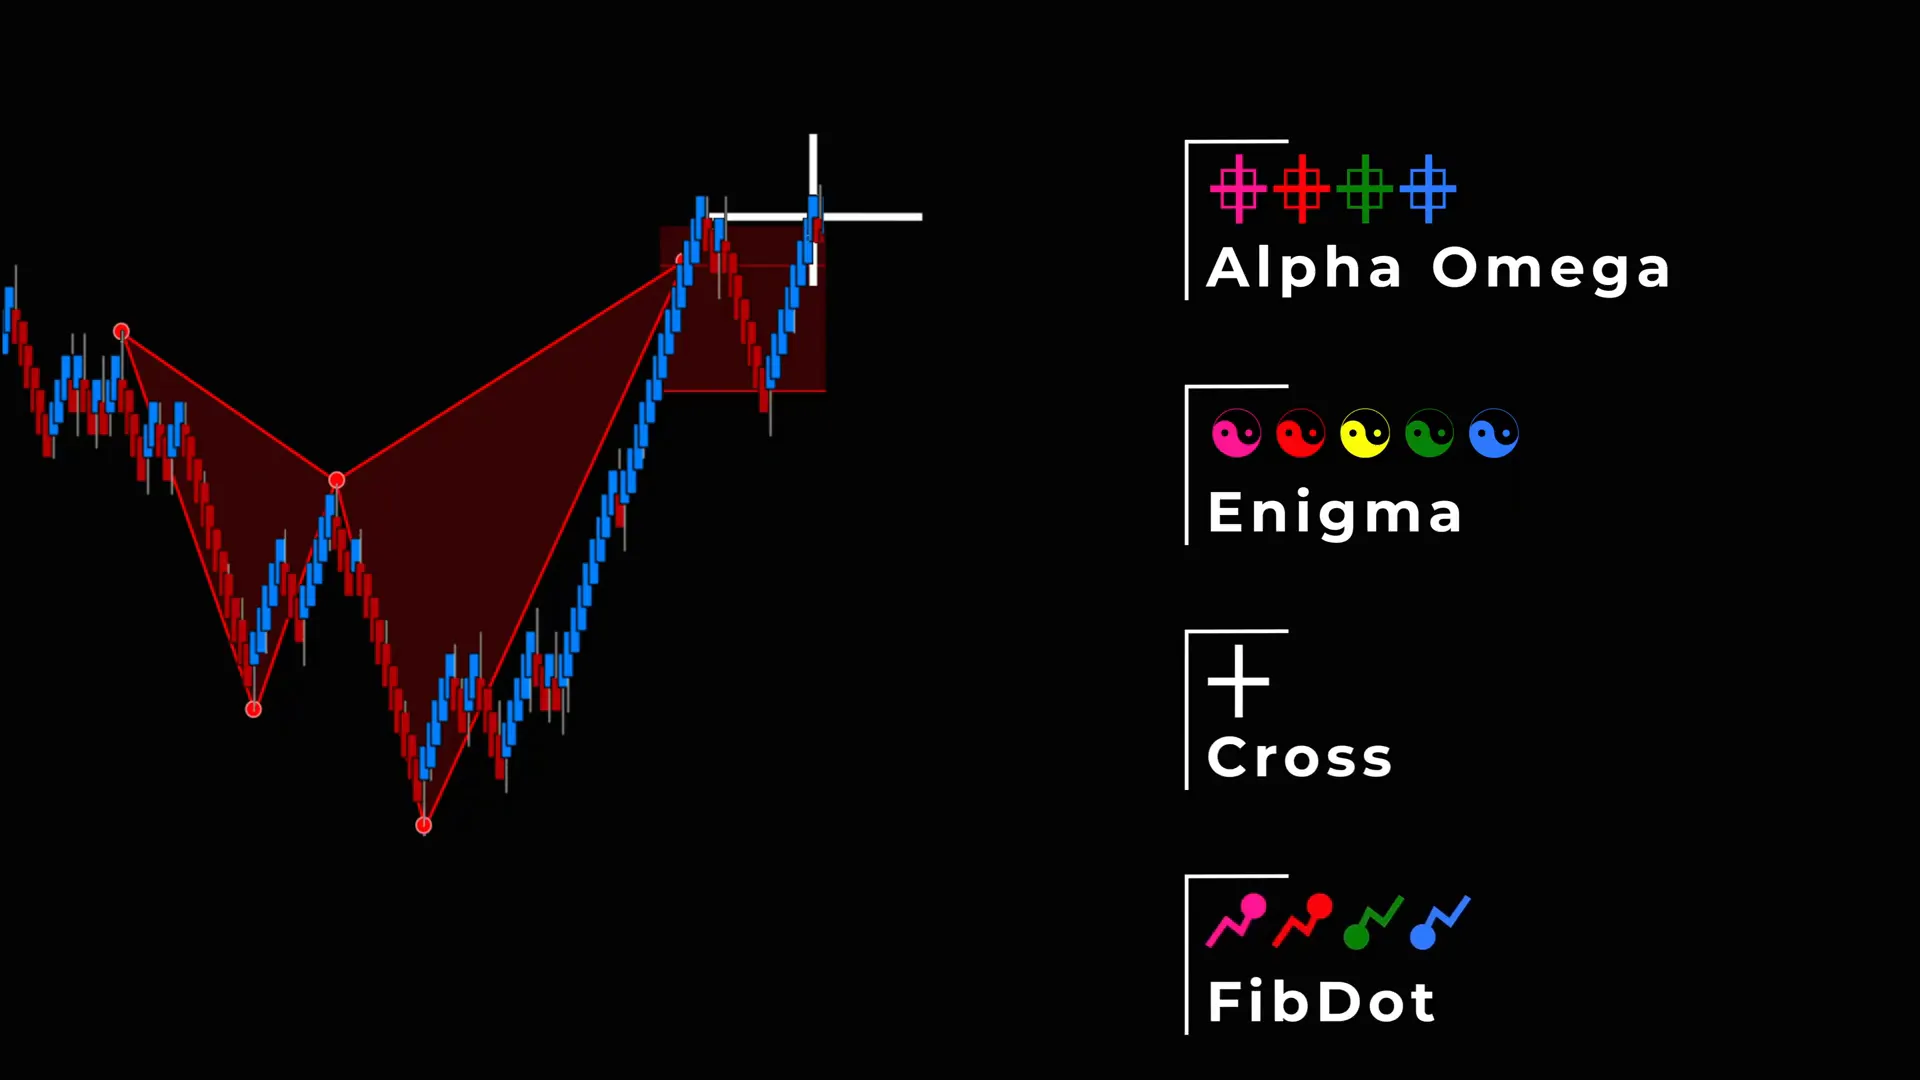
- The confirmation can be one of several signature signals (alpha, omega, enigma, cross, fib dot) depending on your toolkit.
This setup is powerful because it combines two forms of price information: the initial failure to continue beyond the Shark Back and a subsequent confirmation that the move is indeed reversing. The Shark Tail is effectively the market saying, “I tried to push through, but there’s not enough follow-through, so I’m reversing.” Traders who recognize this get to re-enter with stronger conviction.
Step 6: Confirmation Signals — Alpha, Omega, Enigma, Cross, and Fib Dot
In my AlgoBox workflow, I use specific confirmation signals to add confluence to a Shark Tail re-entry. These signals are not magic; they represent patterns, indicator events, or price-action occurrences that historically coincide with reversals. Below I describe each one and how I use it.
- Alpha: A structured reversal bar or cluster of bars showing clear rejection and momentum change. I look for an alpha to indicate that order flow has shifted.
- Omega: A broader structural confirmation, often a higher-timeframe rejection or a failed breakout. Omega is useful when the tail occurs after a strong thrust.
- Enigma: A nuanced signal that often combines divergence with a specific candlestick pattern or volume profile change. Enigma is my “qualifier” when price behavior is ambiguous.
- Cross: A simple indicator cross, such as a short-term moving average crossing a longer moving average or a momentum oscillator crossing a threshold. Cross gives a mechanical confirmation I can backtest.
- Fib Dot: A symbol I use to mark a precise Fibonacci confluence point — for example, the 0.786 retracement or a specific extension — that lines up with the tail for extra geometry-based confirmation.
Each signal is used in context. If the market is volatile, I lean on stronger, structural signals (Omega, Enigma). If the market is range-bound, price-action signals (Alpha, Cross) might be preferable. The point is to add a second, independent reason to re-enter after a Shark Back stop-out.
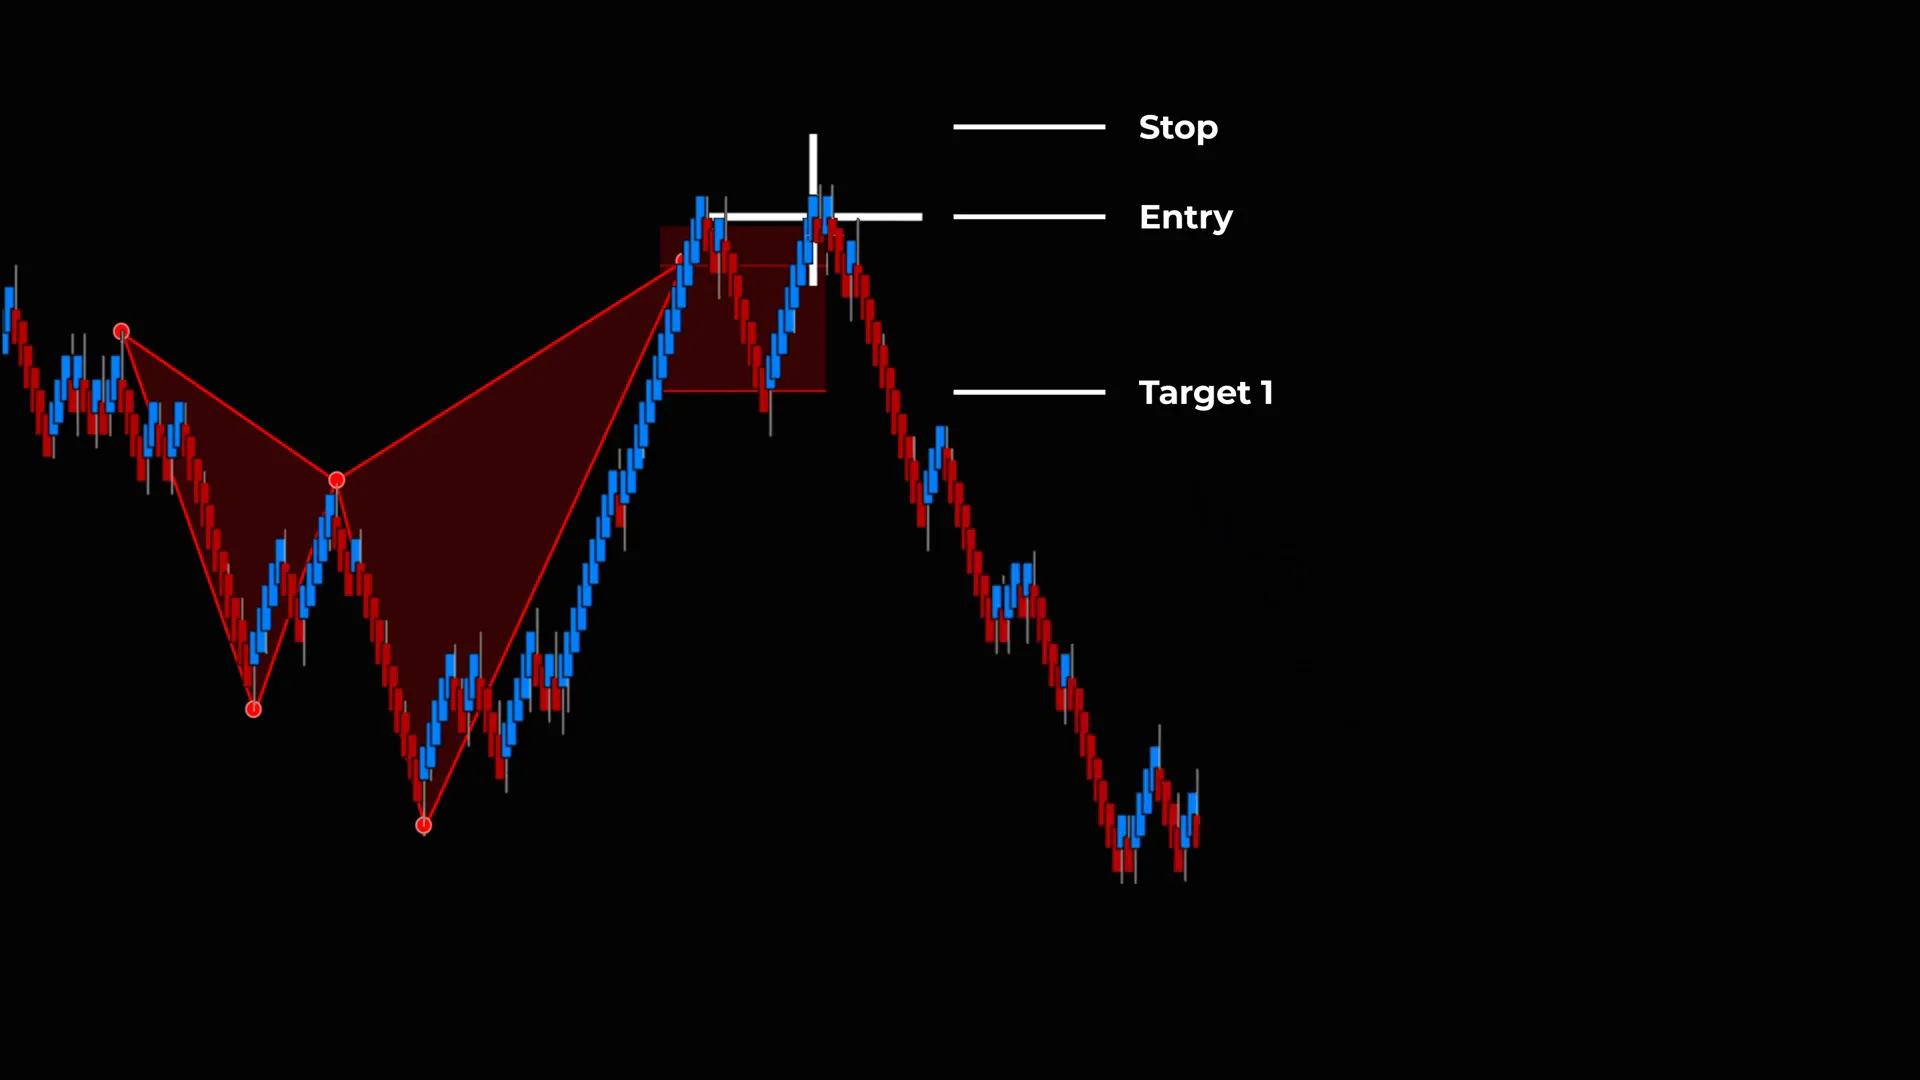
Step 7: Re-entering the Trade on Shark Tail — Entry, Stop, and Target Rules
When a confirmation signal appears behind the PRZ after a Shark Back breach, you have a Shark Tail opportunity to re-enter with enhanced conviction. The re-entry rules are similar to the Shark Back but with added constraints because you are trading the second attempt.
Shark Tail re-entry checklist:
- Confirm that price broke the Shark Back and then produced a valid confirmation signal (Alpha, Omega, Enigma, Cross, or Fib Dot) behind the PRZ.
- Enter on either the confirmation candle close or a favorable pullback toward the PRZ that respects the new structure.
- Place the stop behind the furthest structural invalidation point — often a few ticks or ticks/points beyond the extreme that represented the break.
- Set the primary target at the front of the Shark pattern. This is typically a projected retracement or the nearest structural resistance/support.
- Use partial profit-taking and trailing stops to lock gains; the first partial at 50% of target, the remainder trailed to breakeven then trailed behind subsequent structure.
The Shark Tail frequently offers a better risk-reward because your stop can be narrower relative to the expected swing to the front of the Shark. The reason is that the market has already shown weakness beyond the Shark Back and then capitulated; that capitulation often leads to swift retracements to the pattern’s front.
Step 8: Practical Examples — How I Read the Chart Step by Step
Examples solidify theory. Below I walk through a hypothetical day-trade example that illustrates the entire sequence from PRZ identification to Shark Tail re-entry and exit. This example is deliberately detailed so you can use it as a template on your own charts.
- Market context: The futures contract is in a mean-reverting environment approaching a known supply zone. You identify a Shark pattern on the 5-minute chart with a PRZ between 3,150 and 3,160.
- Shark Back identification: Inside that PRZ you mark a Shark Back line at 3,155 where previous rejections occurred. This is your potential entry area.
- Shark Back entry: Price reaches 3,155 and prints a long upper-wick rejection bar, then a small bullish pivot bar. You enter short at 3,155 with a stop at 3,161 (6 points risk) and a primary target at 3,140 (15 points target), giving a 1:2.5 R:R.
- Stop-out: Price momentarily spikes to 3,162, your stop is triggered. You step back and evaluate: did the PRZ collapse or was this a poke? The PRZ remains intact; volume on the breakout was thin.
- Shark Tail confirmation: At 3,162 price forms a small reversal cluster and then prints an Enigma signal (divergence + rejection) at 3,158, just behind the PRZ. This is your Shark Tail confirmation.
- Re-entry: You re-enter short on the confirmation candle close at 3,158 with a stop at 3,163 (5 points risk). You set the target again at 3,140 and take partials at 3,150 and trail the rest.
- Outcome management: As price moves toward 3,150 you move your stop to breakeven and then trail behind structure, locking profits. The remainder hits or you exit when price reaches the front of the Shark.
This concrete example shows how the Shark Tail can offer a better entry after a stop-out. The initial stop was slightly larger, but the second attempt had improved confluence and a better risk profile relative to the expected move.

Step 9: Trade Management, Psychology, and the Two-Try Rule
Trading is as much psychology as it is technical skill. The Shark Back and Shark Tail framework gives you a structured way to react to adverse price action without blowing your edge. Here are the psychological and management principles I use:
- Accept the stop: A stop-out on the Shark Back is part of the plan. It reduces position and preserves capital. Don’t overtrade to “get back” immediately without a valid signal.
- Wait for confirmation: The Shark Tail provides that confirmation. If it doesn’t appear, move on—there are always more PRZs to trade.
- Two-try rule: I allow the market two attempts to make the expected reversal within the context of the PRZ. The first is the Shark Back; the second is the Shark Tail. If both fail and structure breaks, I consider the setup invalidated.
- Emotional discipline: Re-entries after stop-outs can trigger revenge trading. I combat that by requiring a strict confirmation and a written checklist before re-entry.
- Position sizing: Reduce size on the Shark Tail if the first attempt already consumed a portion of your daily risk budget. Keep the risk per trade consistent with your overall risk plan.
The two-try rule is a framework, not a guarantee. It prevents you from abandoning a trade idea at the first sign of difficulty while simultaneously preventing you from doubling down recklessly. In a live trading environment, this discipline is what separates consistent traders from gamblers.
Step 10: Implementing Shark Back and Shark Tail in AlgoBox and NinjaTrader
AlgoBox provides tools that make marking PRZs and visualizing Shark Back/Tail setups straightforward. Although you can apply these rules on any platform, here’s how I implement the workflow using AlgoBox and NinjaTrader:
- Load the harmonic pattern tool and set your Shark pattern parameters (the tool will help draw the PRZ).
- Mark the Shark Back line manually if needed, aligning it with structural points or the internal Fibonacci level.
- Enable the relevant confluence indicators: volume profiles, momentum oscillators, and the AlgoBox-specific signals (Alpha, Omega, Enigma, Cross, Fib Dot).
- Create alerts for price touching the Shark Back and for any of the confirmation signals appearing behind the PRZ so you can act quickly.
- Use the workspace to save templates so you can quickly apply this setup across multiple futures symbols or forex pairs.
Practical tips for platform execution:
- Backtest the exact rules using historical data before risking real money.
- Use replay mode to practice recognizing Shark Backs and Shark Tails under different market velocities.
- Customize the placement of the PRZ box so it matches your risk tolerance—some traders prefer slightly wider PRZs to reduce stop intensity.
AlgoBox’s signals are helpful, but remember they are tools to assist your judgment, not to replace it. Combine them with price action and context for best results.
Step 11: Common Mistakes and How to Avoid Them
When teaching Shark Back and Shark Tail, I’ve noticed certain recurring mistakes traders make. Knowing these in advance helps you avoid wasted trades and emotional stress.
- Chasing the breakout: Jumping in when price briefly pokes beyond the PRZ without waiting for confirmation is a fast way to lose. Wait for the actual Shark Tail signal.
- Over-tightening stops: While the PRZ allows tight stops, placing stops so tight they are whipsawed by normal noise is counterproductive. Balance tightness with market volatility.
- Ignoring higher-timeframe structure: A Shark Back on a low timeframe is less reliable if the higher timeframe trend strongly contradicts the setup. Use multi-timeframe confirmation.
- Trading too large after a stop-out: Revenge sizing after being stopped on the Shark Back is a common problem. Keep position sizing consistent.
- Skipping the second confirmation: Re-entering without the Shark Tail confirmation because you “feel” it will work often leads to losses. Insist on the signal.
Fix these mistakes by creating a written checklist and following the rule-based approach. Treat the Shark Back as a planned first attempt and the Shark Tail as a conditional second attempt that requires explicit confirmation.
Step 12: Advanced Tips — Combining Shark Strategies with Orderflow
For traders who have access to orderflow tools (footprint charts, DOM, tape), combining Shark setups with orderflow information can dramatically improve accuracy. Here are advanced techniques I use when orderflow data is available:
- Volume clustering at PRZ: Look for heavy volume nodes inside the PRZ. If a Shark Back forms at or near a volume cluster, it increases the likelihood of a meaningful reaction.
- Absorption and exhaustion: When price breaches the Shark Back but the tape shows absorption (aggressive sellers being consumed without follow-through), that often precedes a Shark Tail reversal.
- Large resting orders: Visible resting orders near the front of the Shark give you a specific profit target and evidence of likely resistance/support.
- Orderflow divergence: When price makes a new high/low but the footprint shows fewer aggressive trades, that’s a divergence signal that can add weight to an Enigma confirmation.
Orderflow is not required to trade Shark Back/Tail effectively, but if you have it, use it to refine entries and to scale targets. I treat it as a high-quality confluence input that can turn a good setup into a great one.
Conclusion: Trade Like a Shark — A Systematic Two-Attempt Approach
Both the Shark Back and the Shark Tail are powerful strategies when used together as a two-attempt approach to trading harmonic reversals. The Shark Back is your first, structural entry inside the PRZ. If that fails, the Shark Tail is your disciplined second attempt that requires independent confirmation. Together they form a complete workflow:
- Identify the PRZ and the Shark Back.
- Enter the Shark Back with defined risk and confirmation.
- If stopped, remain calm and look for a Shark Tail confirmation behind the PRZ.
- Re-enter on Shark Tail only with a valid confluence signal and a strict stop and target plan.
- Manage the trade with partials, trailing stops, and a pre-defined exit plan.
The Shark Back gives you a clean, disciplined initial opportunity with a structural edge. The Shark Tail gives you a second, often stronger opportunity if price proves problematic at first. By applying both in a rules-based way, you reduce noise, maintain discipline, and increase your chances of capturing profitable reversals.
Now get out there and trade like a shark—structured, patient, and methodical.
FAQ
Q: What is the difference between the Shark Back and the Shark Tail?
A: The Shark Back is the entry line inside the PRZ where price is expected to react initially. The Shark Tail occurs when price breaches the Shark Back but then produces an independent confirmation signal behind the PRZ, allowing for a re-entry with stronger confluence. Think of the Shark Back as the first attempt and the Shark Tail as the validated second attempt.
Q: Which confirmation signals should I prioritize?
A: Prioritize confirmation signals based on market context. Use Alpha (price-action reversal) and Cross (mechanical indicator cross) for quick, clear confirmations in normal markets. Use Omega (structural failure) and Enigma (divergence-based) in volatile or ambiguous conditions. Fib Dot is useful when you want additional Fibonacci geometry alignment. The key is to use at least one independent confirmation for a Shark Tail re-entry.
Q: How wide should I make the PRZ?
A: The PRZ width should reflect market volatility and the harmonic pattern’s precision. Narrow PRZs offer tighter stops but are more easily taken out by noise. Wider PRZs reduce stoppage but increase risk per trade. I recommend backtesting different PRZ widths for your instrument and time frame, and using the width that optimizes your expectancy while respecting acceptable drawdown.
Q: What timeframes work best for Shark Back and Shark Tail?
A: The strategy works across multiple timeframes. Many day traders use 1- to 15-minute charts for intraday scalps and 1-hour charts for swing trades. The key is multi-timeframe alignment: ensure that the PRZ and the Shark pattern are meaningful on the timeframe you trade and that higher-timeframe structure does not contradict the reversal expectation.
Q: How do I size positions when trading Shark setups?
A: Position size should be determined by risk per trade, not by the attractiveness of a setup. Decide the dollar (or tick/point) risk you are willing to accept per trade, then calculate position size based on your stop width. After a stop-out, reduce sizing for the Shark Tail re-entry if the first attempt consumed a notable portion of your daily risk budget.

Q: Can I automate Shark Back and Shark Tail entries?
A: You can automate parts of the workflow, like alerting when price touches the Shark Back or when confirmation signals appear. However, full automation requires precise rules for pattern recognition and signal validation. Many traders prefer to automate alerts and then make discretionary entries using orderflow and context. If you automate, thoroughly backtest the logic across market conditions.
Q: What do I do if both Shark Back and Shark Tail fail?
A: If both attempts fail and price breaks structure beyond the PRZ in a sustained way, consider the pattern invalidated and step aside. Switching to a trend-following frame or waiting for a pullback into the new structure is usually the correct response. Avoid trying to “rescue” the trade; accept small losses and preserve capital for better setups.
Q: Are these strategies suitable for beginner traders?
A: The principles are straightforward, but harmonic patterns and PRZ identification can have a learning curve. Beginners should practice in a simulator, use clear checklists, and develop discipline around stops and confirmations. Start small, master the rules, and build from there. The two-try structure helps beginners by giving them a clear plan for both initial entries and post-stop behavior.
Q: How do I backtest Shark Back and Shark Tail?
A: Backtest by defining strict entry, stop, and target rules for both the Shark Back and the Shark Tail. Use historical data over different market regimes, record win rate and average R:R, and measure expectancy. Include slippage and commissions in your calculations. Replay mode or automated backtesting frameworks both work; consistency in rules is what produces meaningful results.
Q: Where can I learn more about these setups?
A: Study harmonic pattern theory, practice drawing PRZs, and practice identifying Shark Backs and Shark Tails on replayed market data. Combine that with study of the confirmation signals (alpha, omega, enigma, cross, fib dot) and with risk management best practices. Use platform tutorials for AlgoBox and NinjaTrader if you want to incorporate their specific tools, and always backtest thoroughly.

Final note
I developed this article to codify the Shark Back and Shark Tail approach so you can apply a consistent, high-probability framework to harmonic reversals. Use the checklists, practice the two-try rule, and respect stops. Trade with discipline, and you’ll improve your outcomes over time. Thanks for reading — now get out there and trade like a shark.
This article was created from the video SHARK BACK & SHARK TAIL Strategy 🟪 NinjaTrader Futures | AlgoBox Training with the help of AI.