
Table of Contents
- Step 1: Introduction — Why I Teach the Shark Back & Shark Tail
- Step 2: Understand the Basics — What is a PRZ and Why It Matters
- Step 3: Identify the Shark Back Line — The Ideal First Entry
- Step 4: Entering the Shark Back Trade — Rules, Entry, and First Setups
- Step 5: Managing Stops and Targets for Shark Back Trades
- Step 6: When the Shark Back Fails — Don’t Panic, Watch for the Shark Tail
- Step 7: Recognizing Shark Tail Confirmation Signals
- Step 8: Entering the Shark Tail — Execution Rules
- Step 9: Targeting — The Front of the Shark and Beyond
- Step 10: The Psychology — Stay Calm After a Stop Out
- Step 11: The Two-Try Rule — How It Improves Edge
- Step 12: Practical Application with AlgoBox and NinjaTrader
- Step 13: Backtesting and Data — What to Measure
- Step 14: Common Mistakes and How I Avoid Them
- Step 15: Advanced Tweaks and Variations I Use
- Step 16: My Final Checklist Before Taking a Shark Back or Shark Tail Trade
- Step 17: Example Walkthrough — From PRZ to Shark Tail Execution
- Step 18: Final Thoughts and Risk Disclosures
- Step 19: Where to Go Next — Practice and Further Learning
- Step 20: My Final Encouragement
Step 1: Introduction — Why I Teach the Shark Back & Shark Tail
I created this breakdown because harmonic patterns are one of the most reliable ways I know to anticipate high-probability reversal zones in the market. In my work at ALGOBOX PRO | Automated Trading I focus on practical, repeatable setups that a futures or forex day trader can apply using NinjaTrader and AlgoBox. The Shark Back and Shark Tail strategies are two distinct but complementary harmonic approaches that, when understood and applied correctly, give a trader a meaningful edge.
In short: the Shark Back is the initial structure inside a Potential Reversal Zone (PRZ) where price is expected to react. The Shark Tail is the follow-up, a second-chance setup that appears if the Shark Back is breached and then a strong confirmation forms just behind the PRZ. Together they form a “two-try rule” — a disciplined approach that preserves capital and often improves win rate by waiting for extra confluence when needed.
Step 2: Understand the Basics — What is a PRZ and Why It Matters
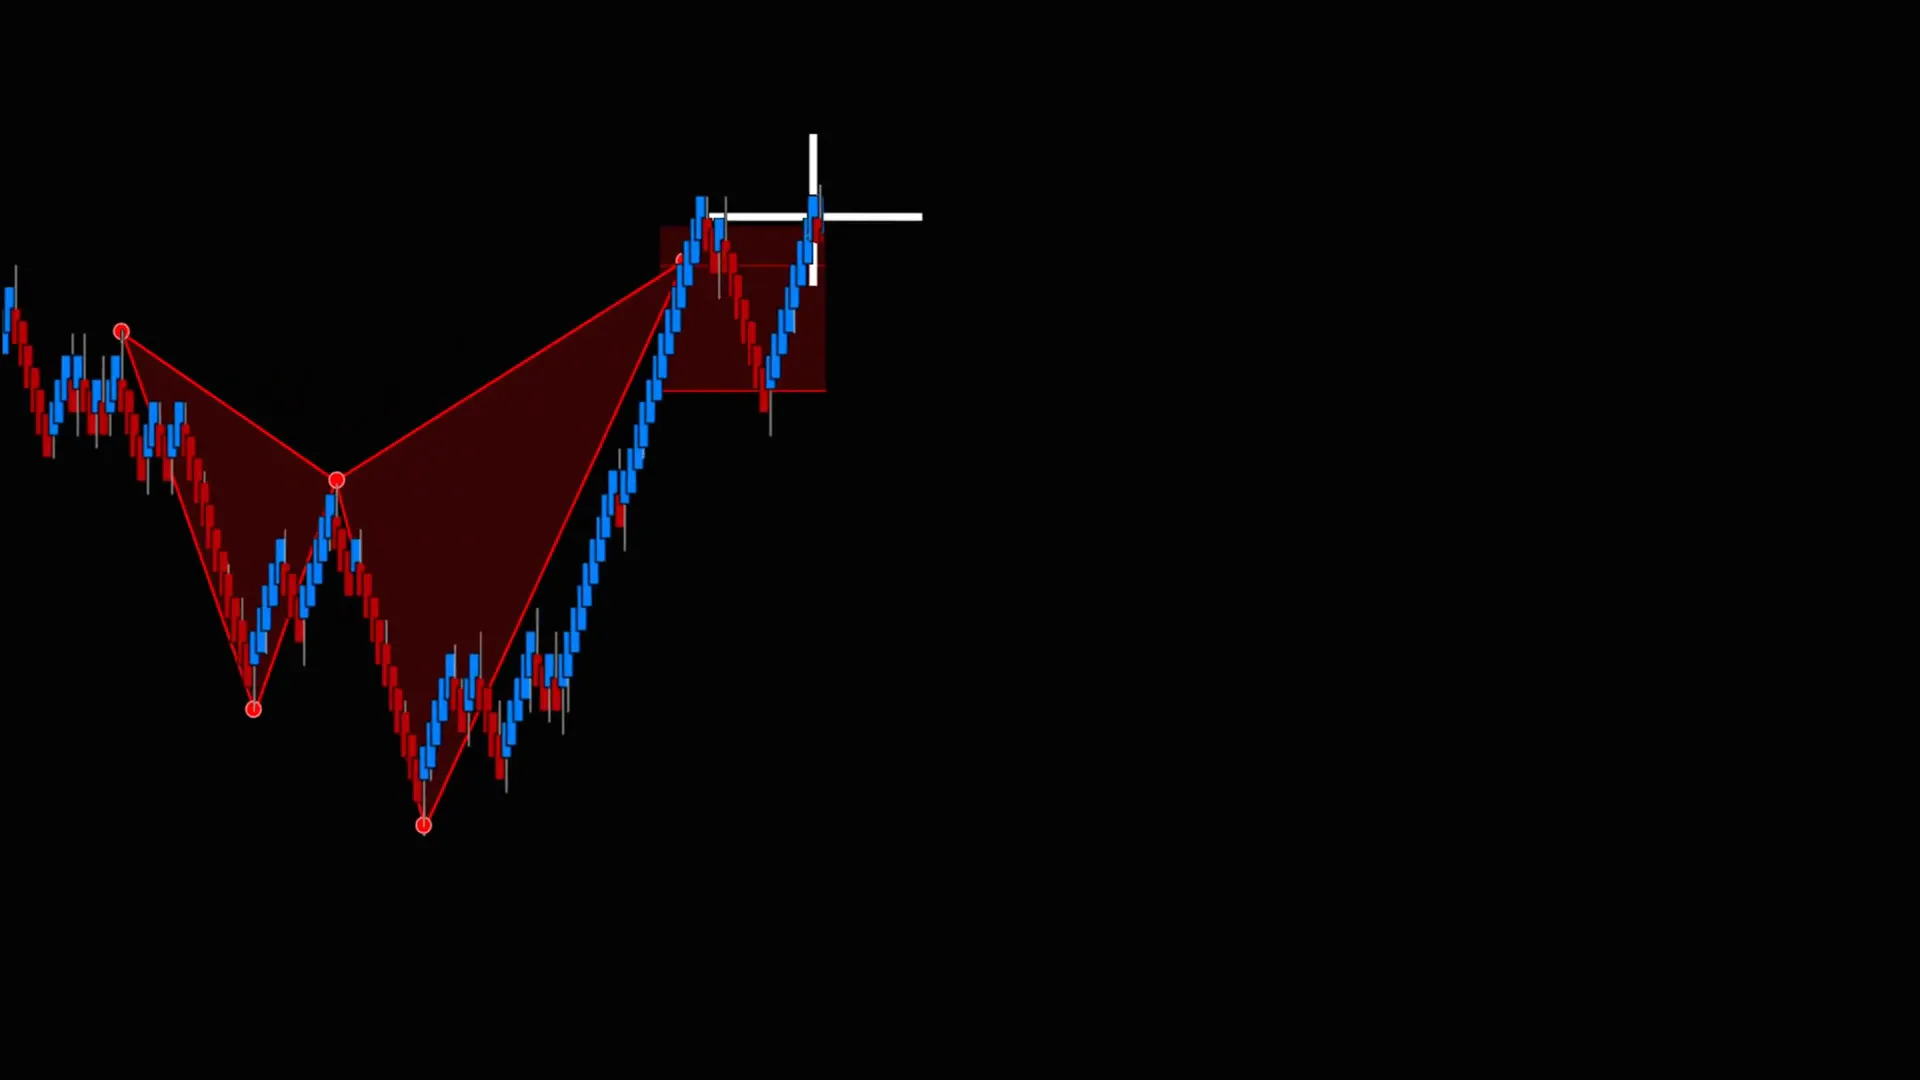
Before I walk through entries and confirmations, it’s important to establish the foundation: the Potential Reversal Zone (PRZ). The PRZ is a range derived from harmonic geometry (specific Fibonacci-derived price relationships) where multiple projections converge and create an area where the odds of a reversal are elevated.
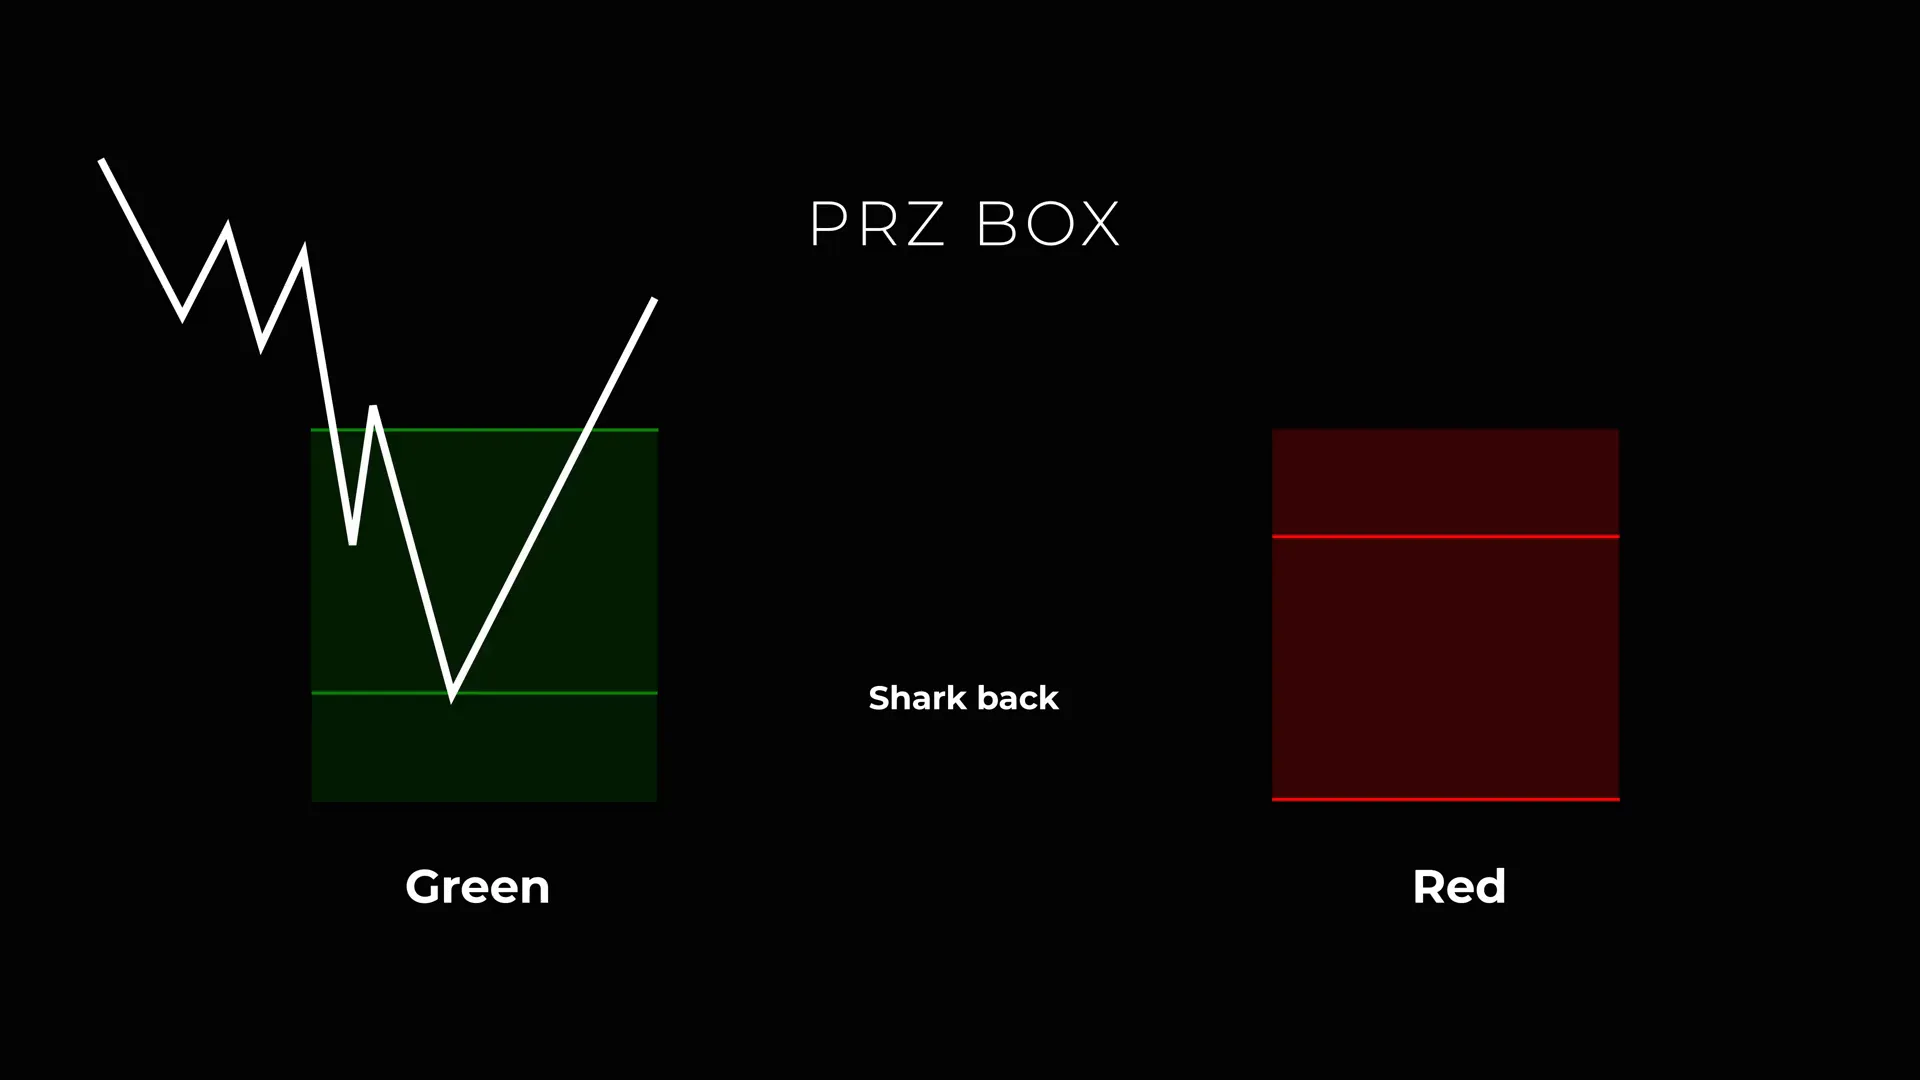
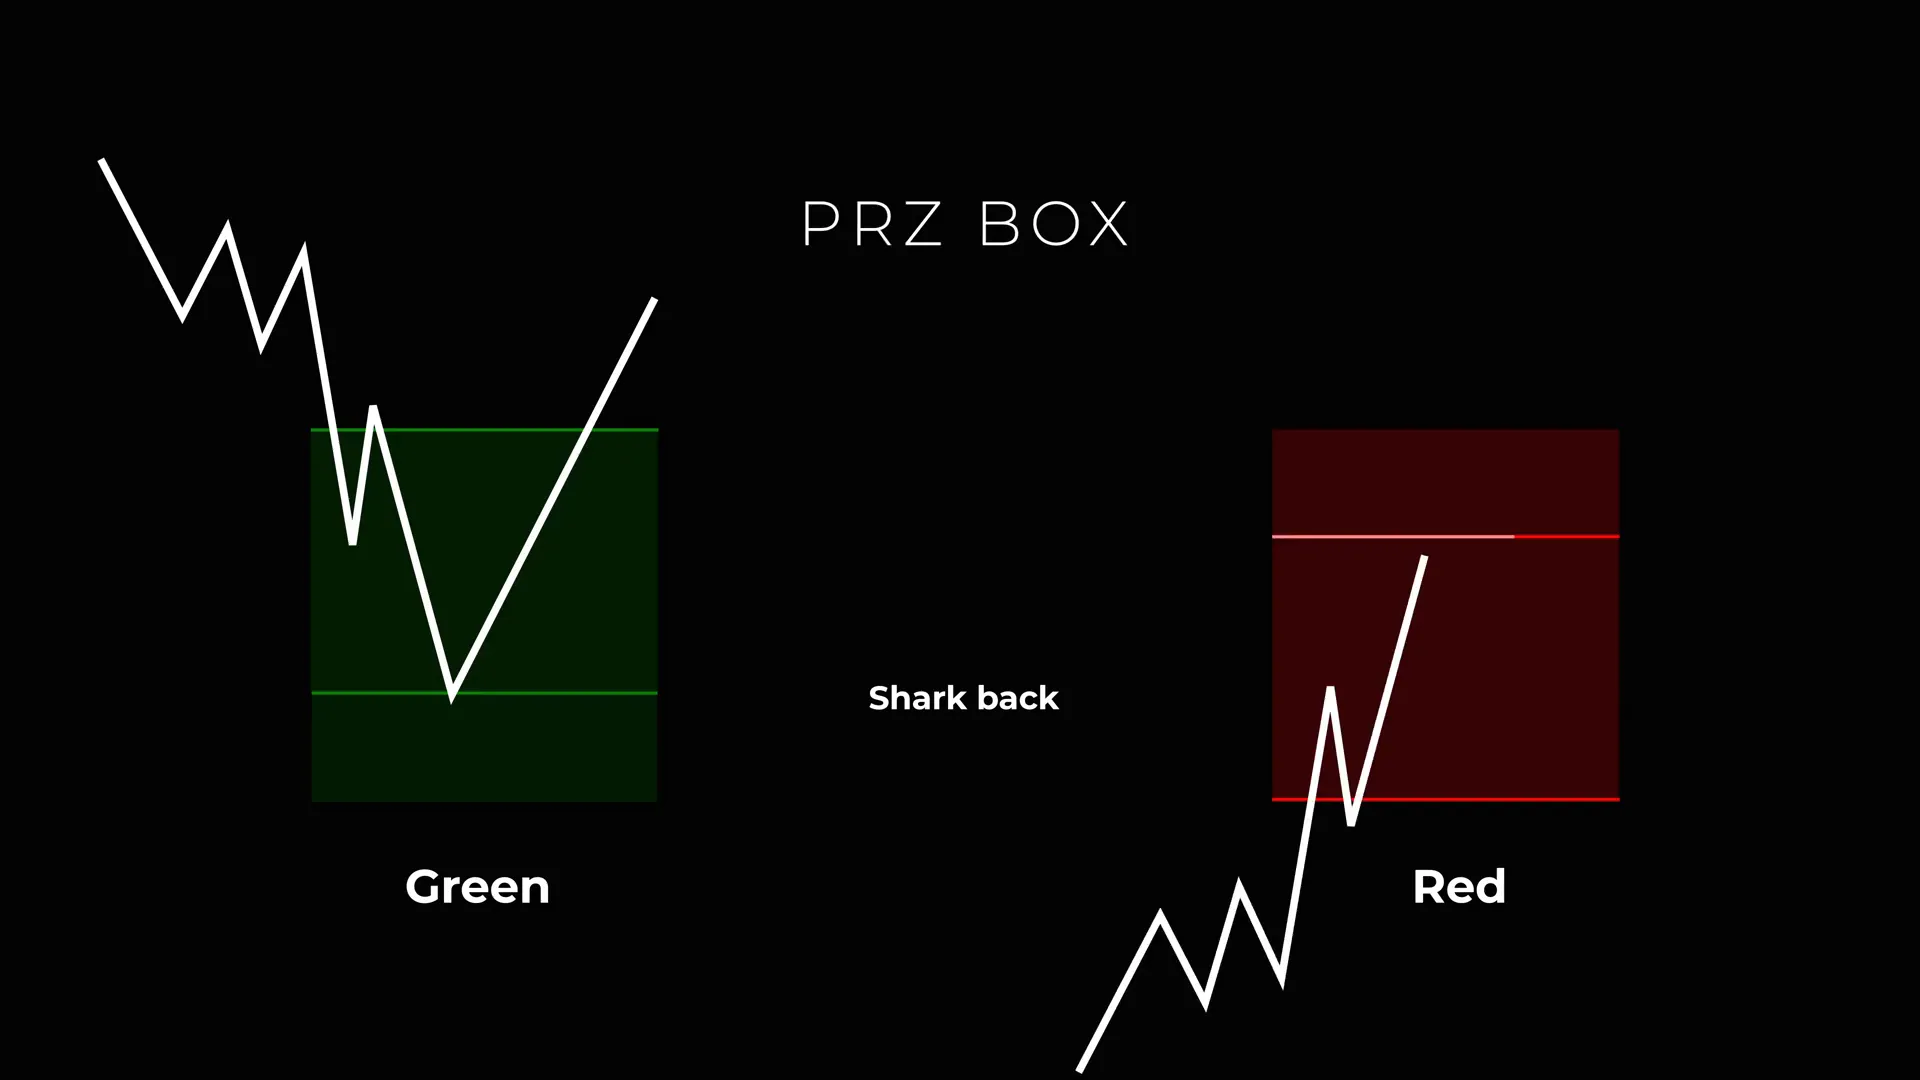
Think of the PRZ as a high-traffic zone where buyers and sellers meet, where institutional flow and retail orders accumulate, and where patterns like the Shark form a coherent structure. The PRZ is not a single price; it’s a box — a zone — and within that zone there are sub-structures and reference lines that matter. The Shark Back line is one of those reference lines.
When I analyze a PRZ, I’m looking for:
- Multiple harmonic projections overlapping (e.g., Fibonacci retracements/extensions)
- Clear structure within the PRZ such as trendlines, previous support/resistance, order blocks, or the Shark Back line
- Context from higher timeframes — is the PRZ aligned with a larger trend or at a meaningful confluence area?
Only after I confirm these elements do I begin planning an entry. Trading a PRZ without structure is speculation; trading it with structure is strategy.
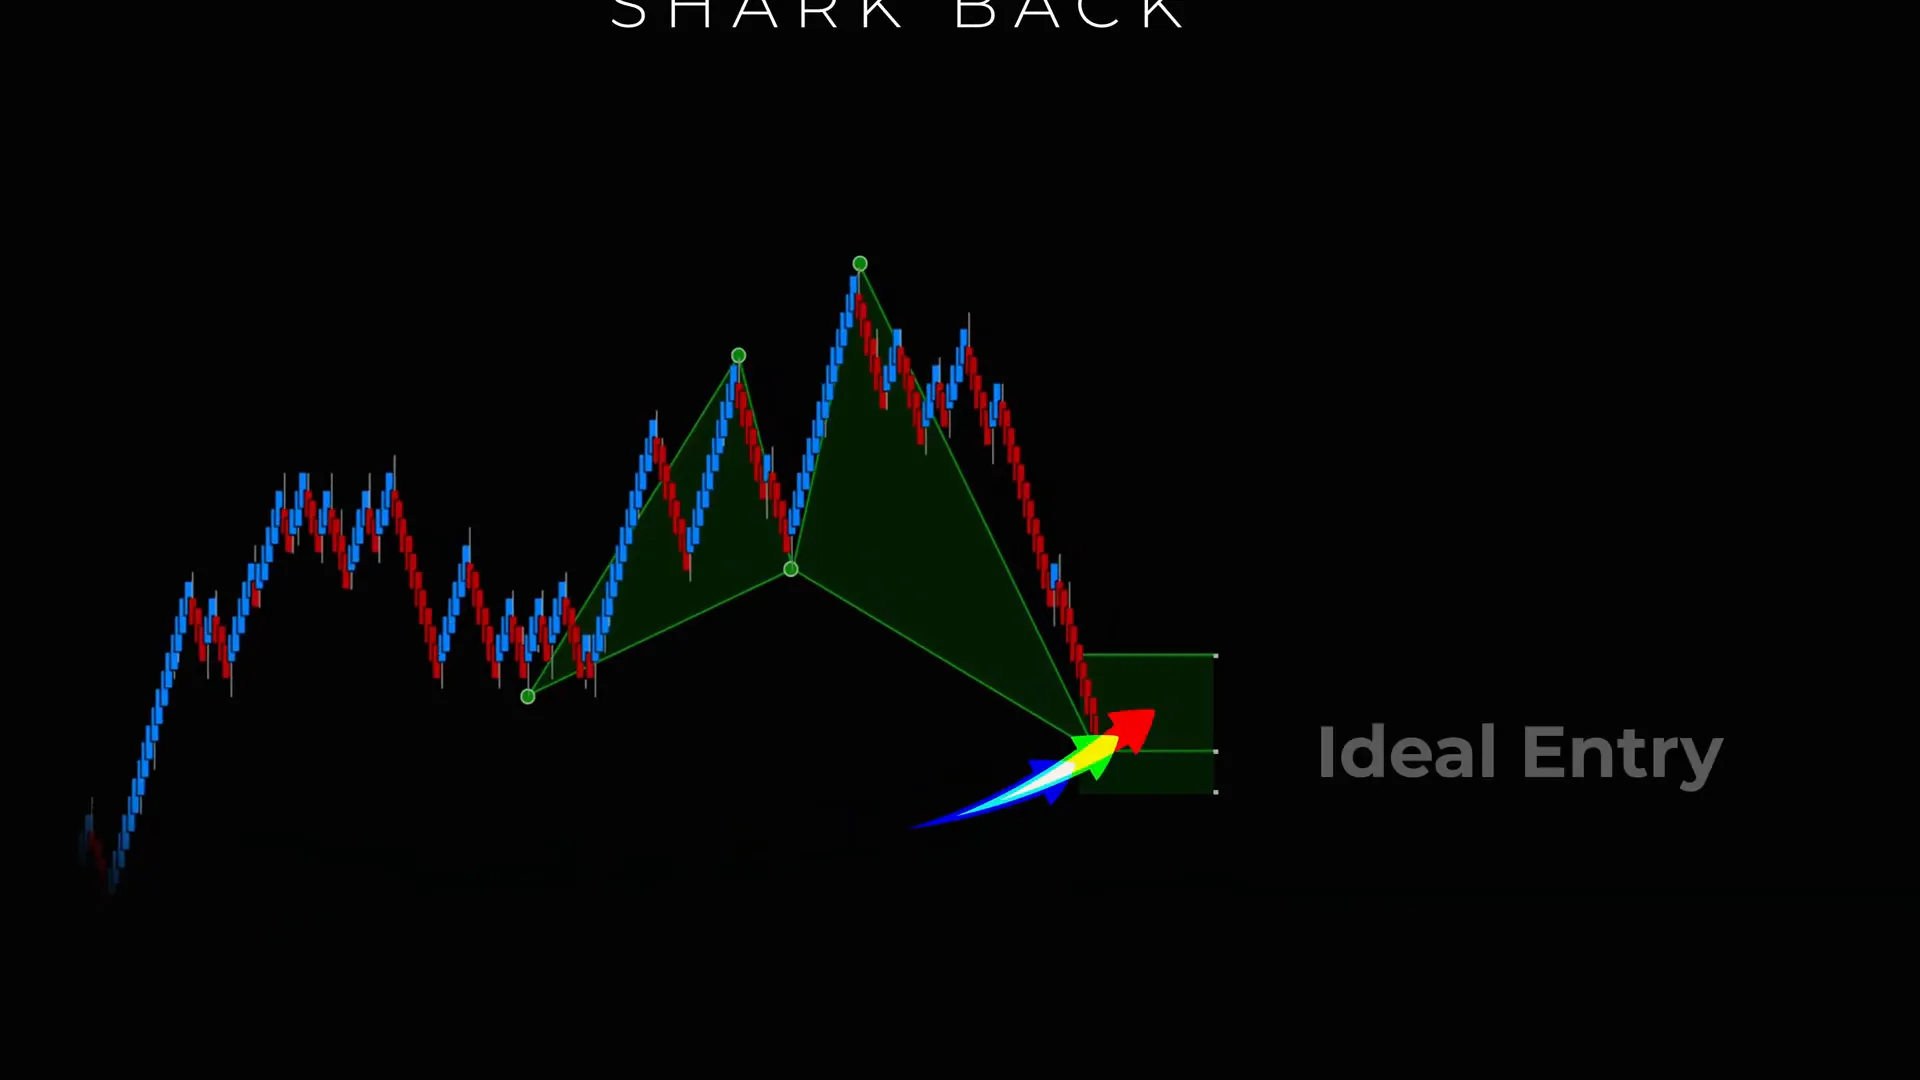
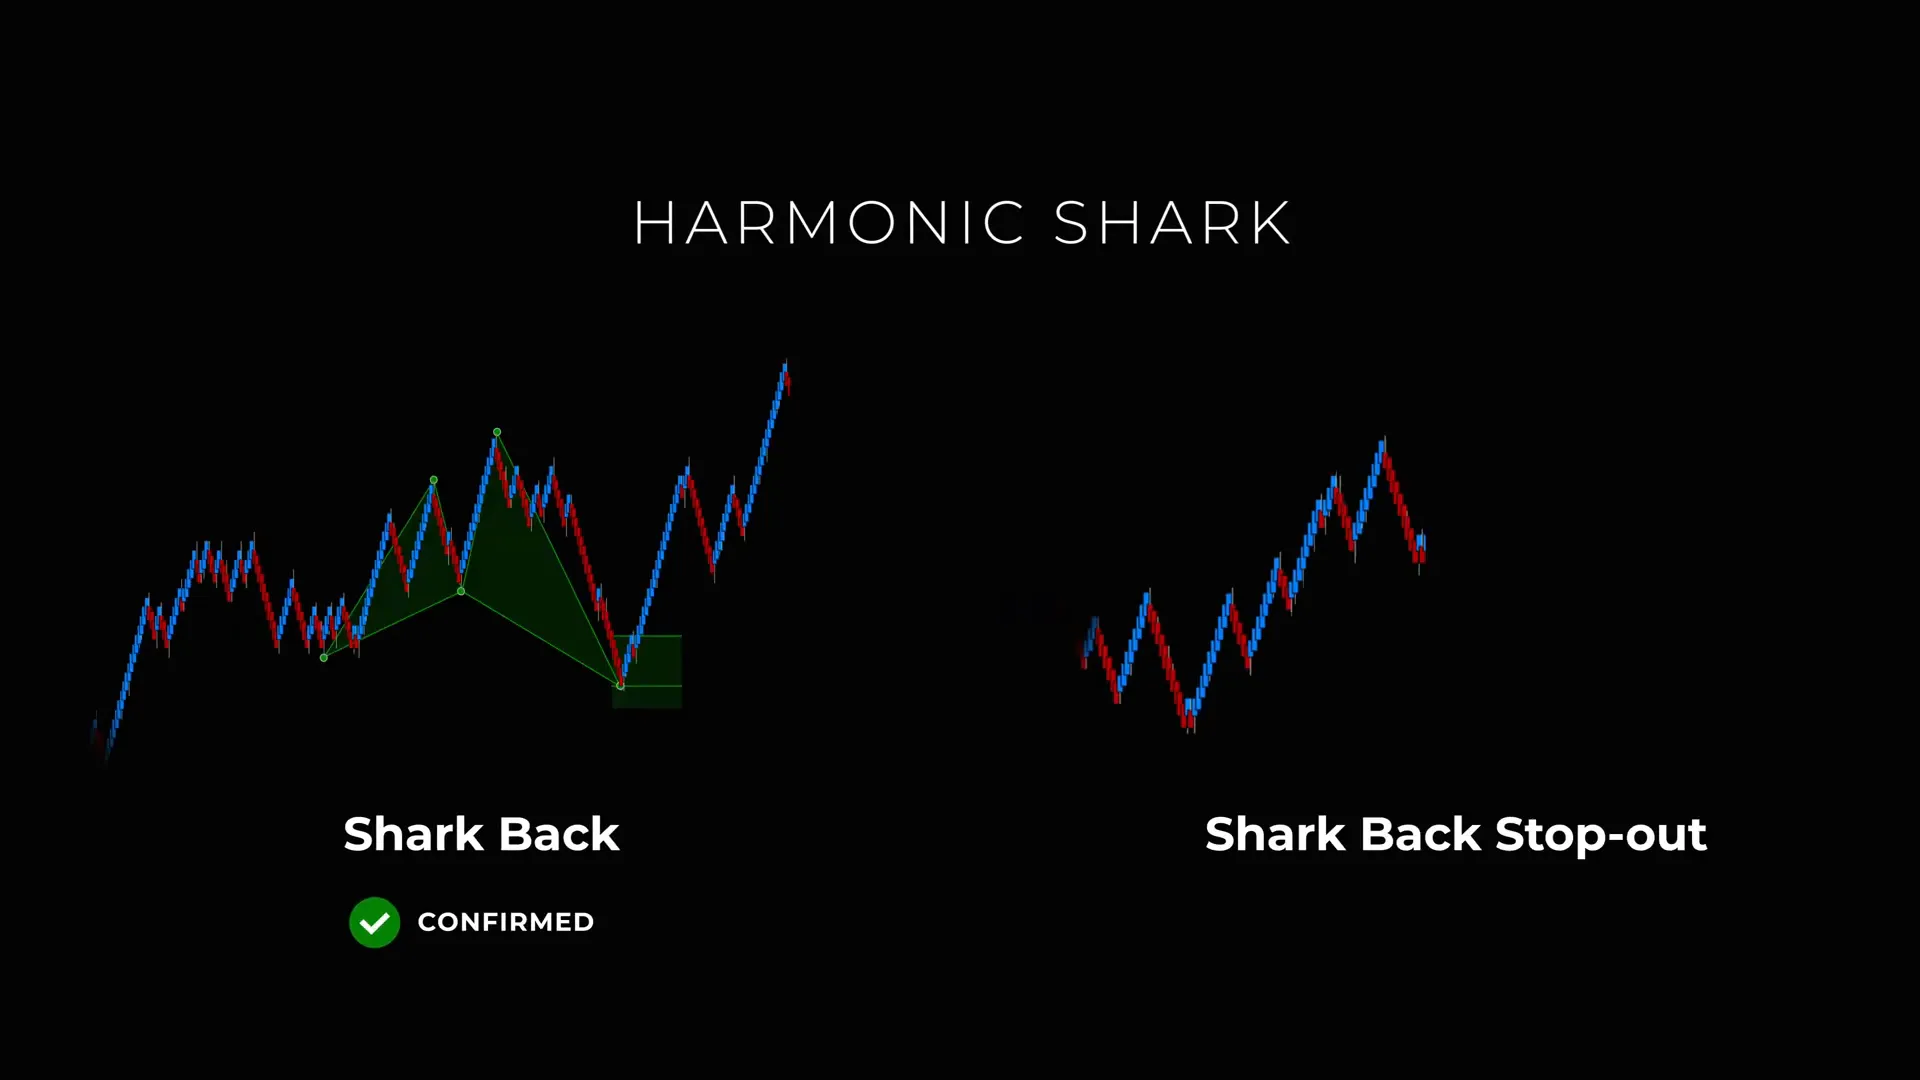
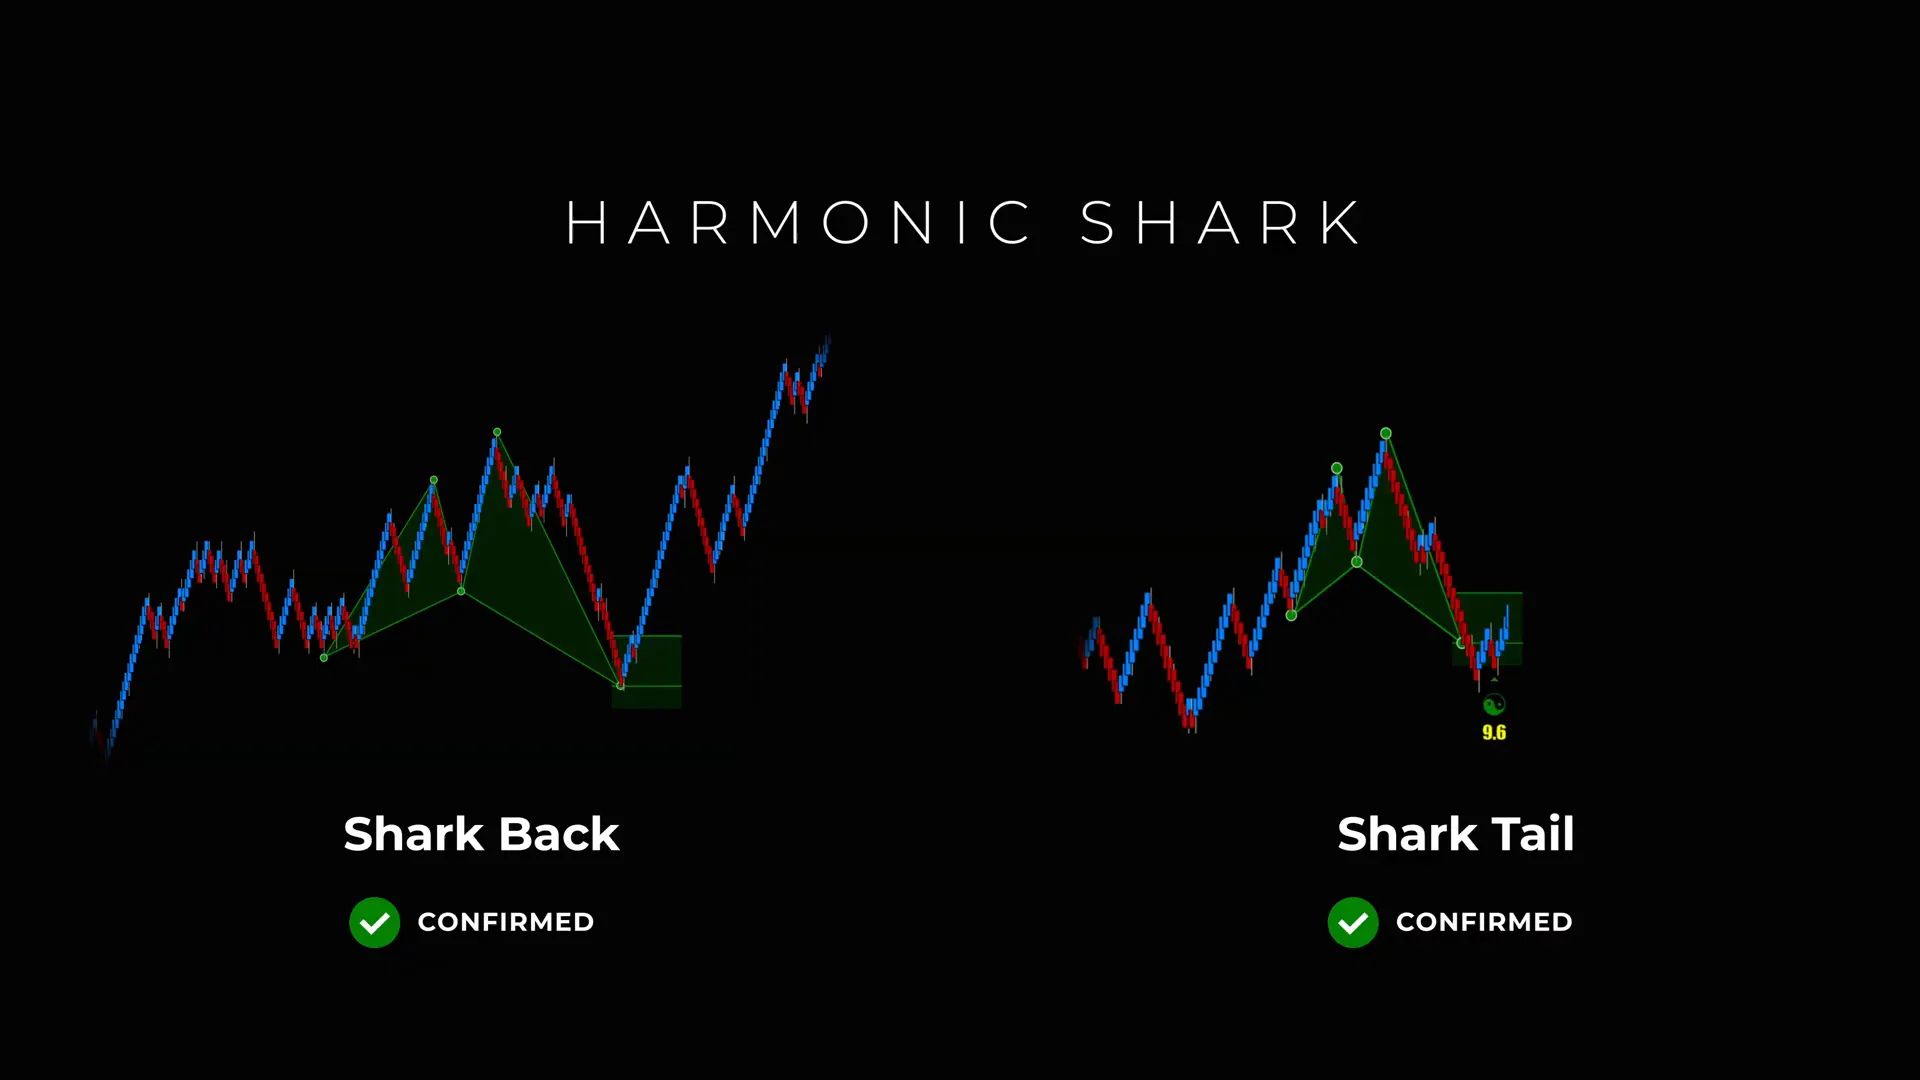
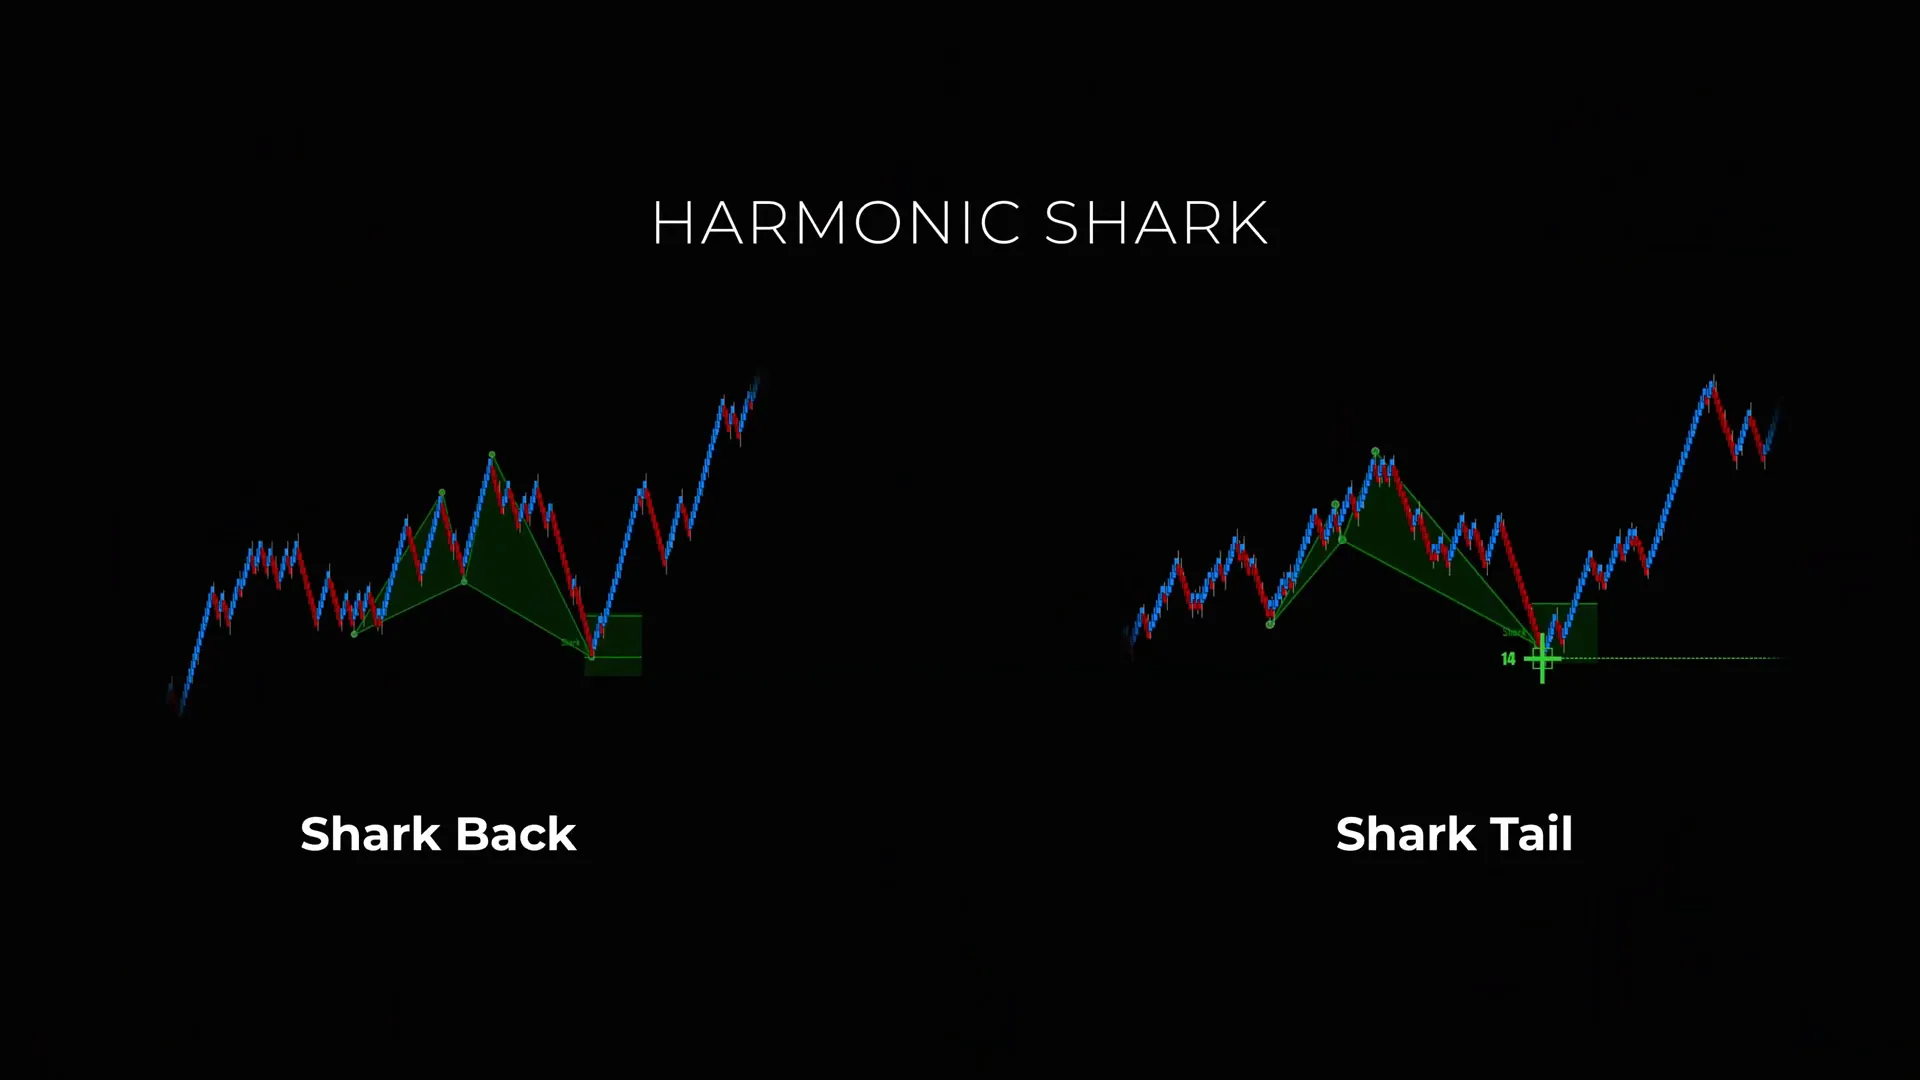
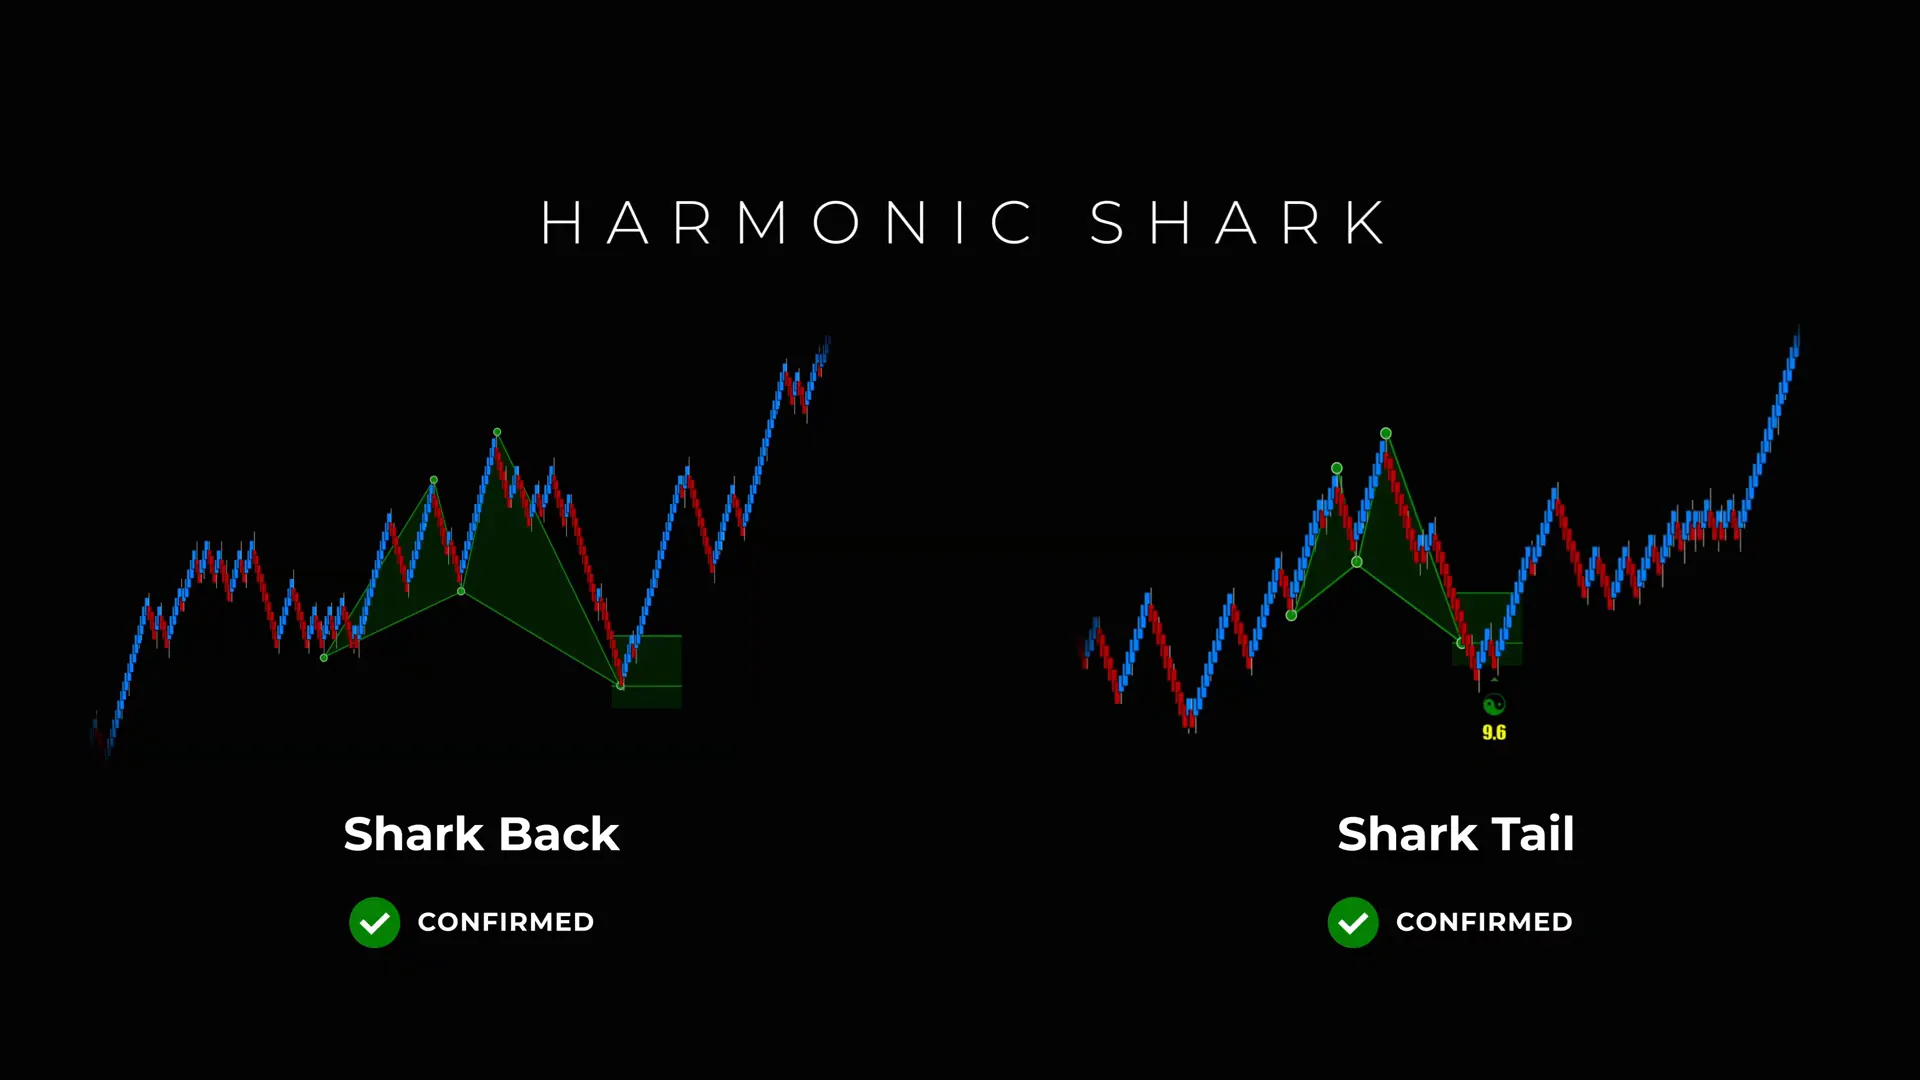
Step 3: Identify the Shark Back Line — The Ideal First Entry
The Shark Back is a very specific internal line inside the PRZ box. I treat it as the primary reaction line — the place where price is expected to slow, find liquidity, and potentially pivot. When price reaches the Shark Back line within the PRZ, that’s my first look for an entry.
How I mark the Shark Back:
- I draw the PRZ box based on harmonic projections (for shark patterns these are typically specific Fibonacci ratios typical to the Shark harmonic family).
- I then identify the internal structure — often a rule-based line or mid-zone marker inside the PRZ that historically shows the most consistent reaction.
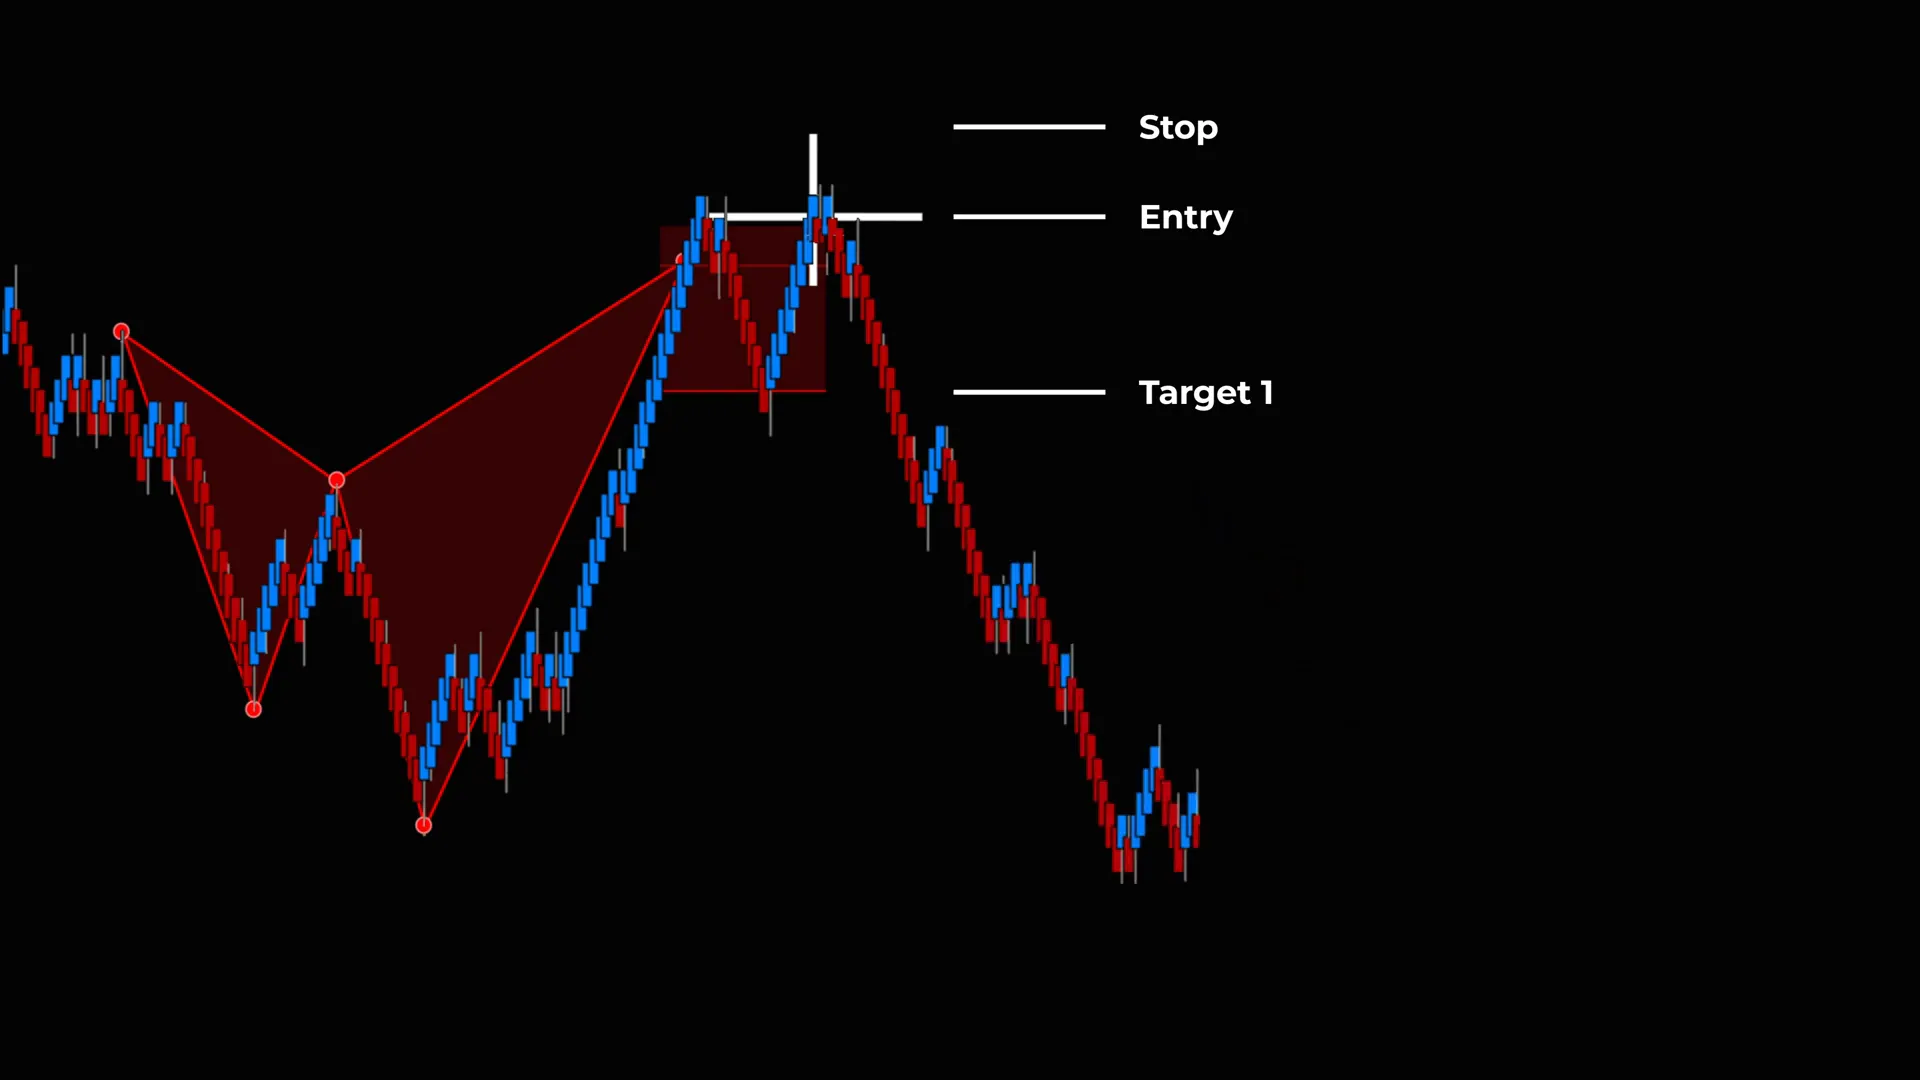
- This line becomes my preferred first-entry area, with a clearly defined stop behind the PRZ.
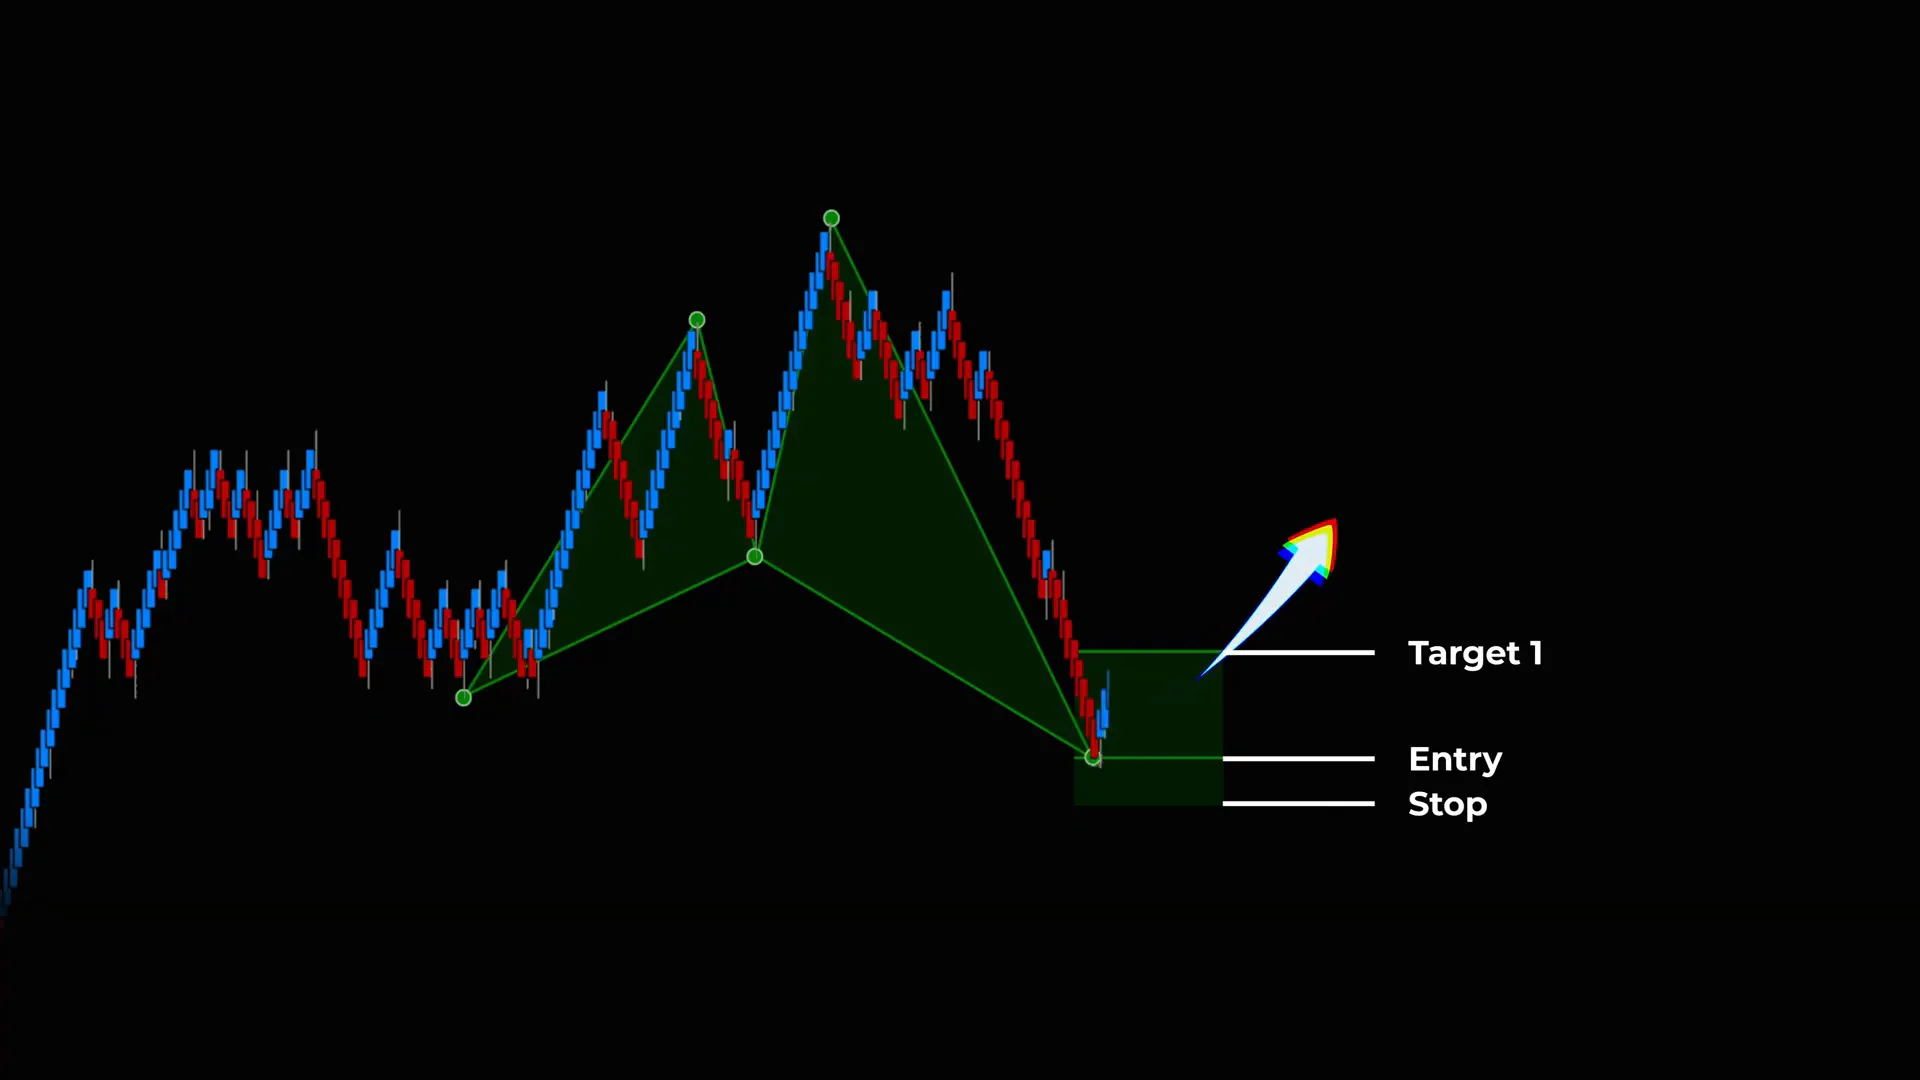
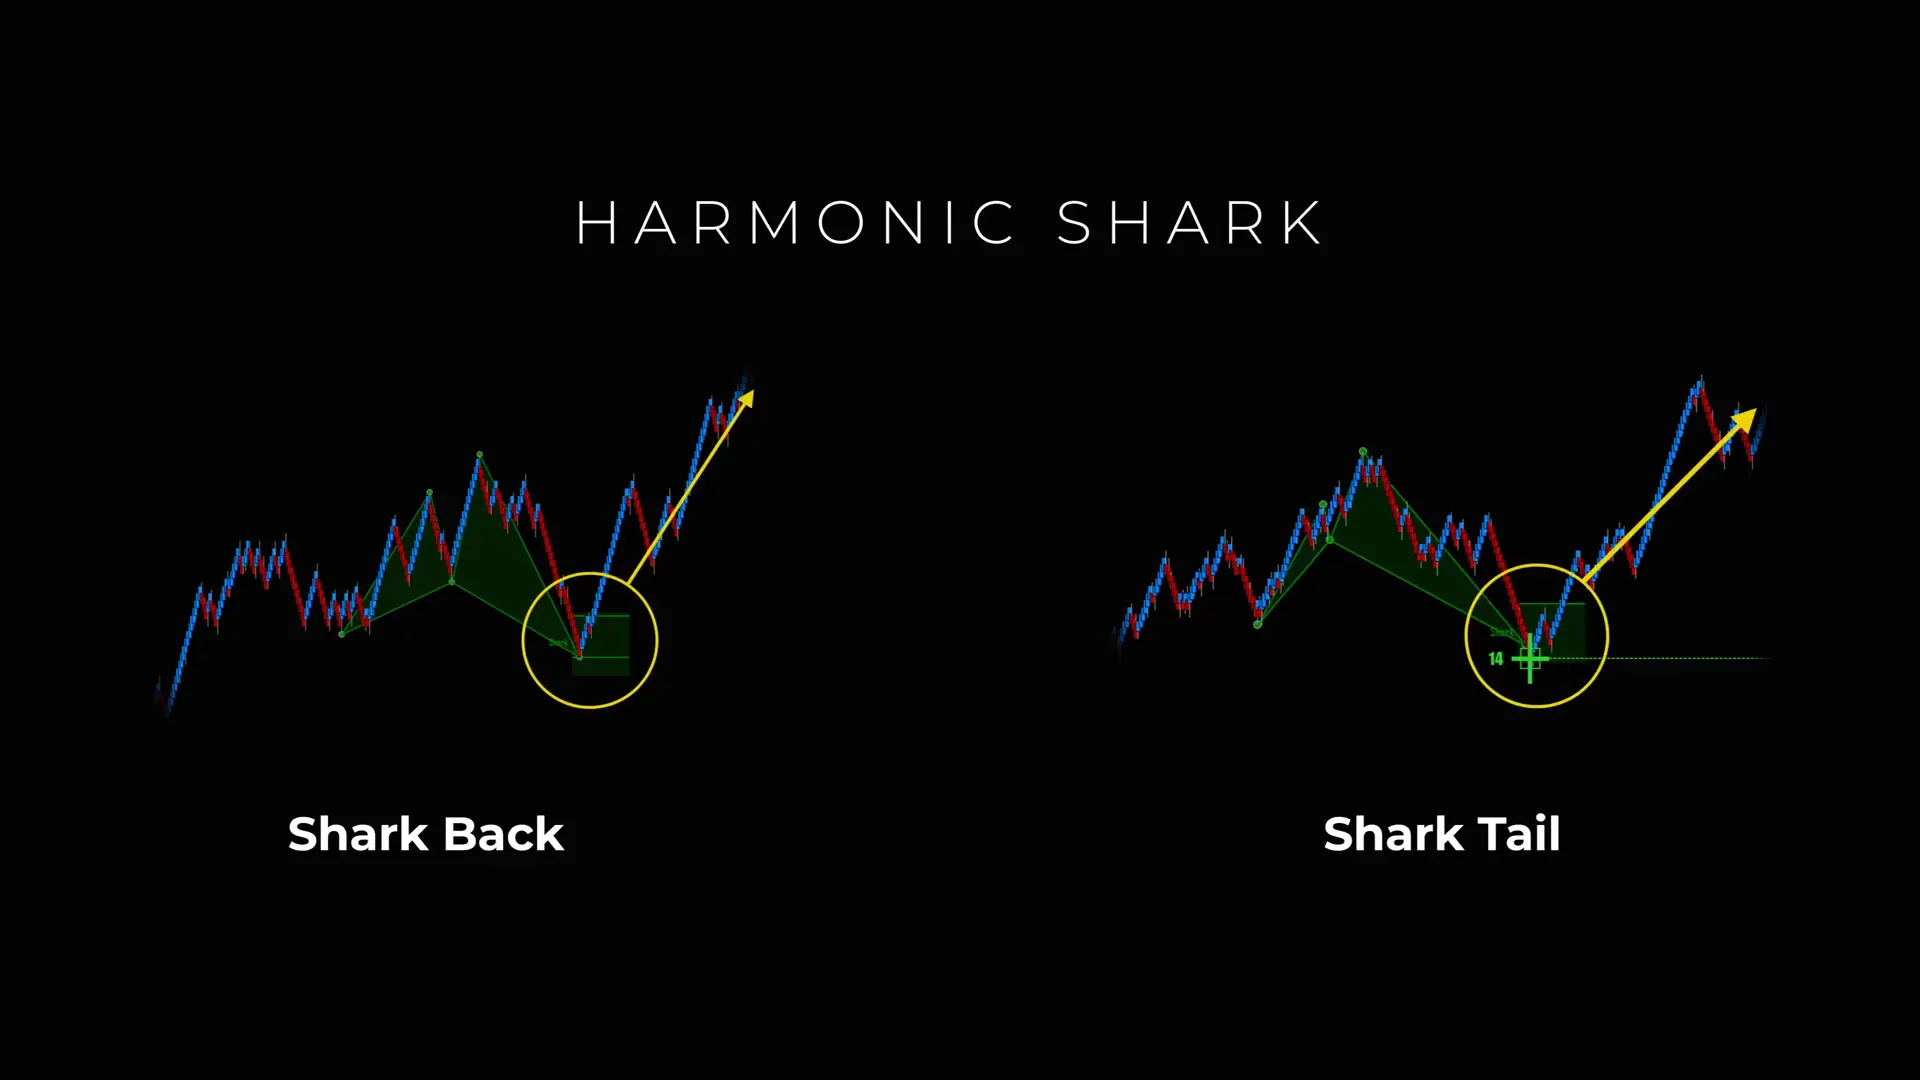
Why this matters: the initial reaction at the Shark Back often provides the best risk-to-reward because you place your stop close behind the PRZ while aiming for the “front of the shark” — a higher reward level. If price reacts here and pivots, the trade is clean and efficient.
Step 4: Entering the Shark Back Trade — Rules, Entry, and First Setups
When I take a Shark Back trade I follow a clear checklist. This makes the setup repeatable and reduces emotion at the moment of entry.
- Confirm the PRZ with overlapping harmonic projections.
- Mark the Shark Back line inside the PRZ.
- Wait for price to move into the PRZ and reach the Shark Back line.
- Look for a short-term reaction or micro-confirmation (e.g., pin bar wick, small momentum divergence, a nice rejection candle).
- Enter on either a market order at my reaction or a limit order within a defined reaction zone at the Shark Back.
- Place a stop behind the PRZ using a multiple of the pattern’s measured invalidation — this is usually slightly beyond the PRZ box.
- Set an initial target at the front of the shark (the logical first target); scale out or trail if price continues.
A few practical notes about entries:
- I prefer entries that show a clear pivot at the Shark Back. A single candle does not always prove a pivot — I’ll often wait for a clean rejection and ideally a follow-through candle that confirms the change in short-term internal structure.
- Use smaller size if you’re entering immediately at the Shark Back without additional confirmation. This allows you to manage risk while keeping exposure to a potential high-probability reversal.
- If your platform offers it, I use an AlgoBox tool integrated with NinjaTrader to scan and mark these PRZs and Shark Back lines automatically — but I still visually confirm each setup.
Step 5: Managing Stops and Targets for Shark Back Trades
Risk management is foundational. For Shark Back trades I set precise levels for stop and target so that each trade has a defined risk profile before I enter.
Stop placement:
- Primary stop: slightly beyond the opposite edge of the PRZ box. The PRZ is the structure that must remain intact for my thesis to hold.
- Optional aggressive stop: if there is a clear micro structure (e.g., a support wedge inside PRZ) I might use a tighter stop, but only with reduced size.
Targets:
- Primary target: the front of the shark — this is the nearest logical take-profit, often a previous structural level.
- Partial exits: I scale out at the front of the shark and hold the remainder if the move shows continuation characteristics visible on momentum and volume.
- Trail stop: if price moves convincingly, I move stops to breakeven and then trail using structure or moving-average confluence.
Example risk/reward profile I like for Shark Back trades:
- Risk: 1 unit (stop beyond PRZ)
- Reward (first target): 1.5–3 units (front of shark)
- Overall: if I can achieve a consistent >1.5:1 R:R across multiple trades while maintaining a reasonable win rate, the strategy is meaningful over time.
Step 6: When the Shark Back Fails — Don’t Panic, Watch for the Shark Tail
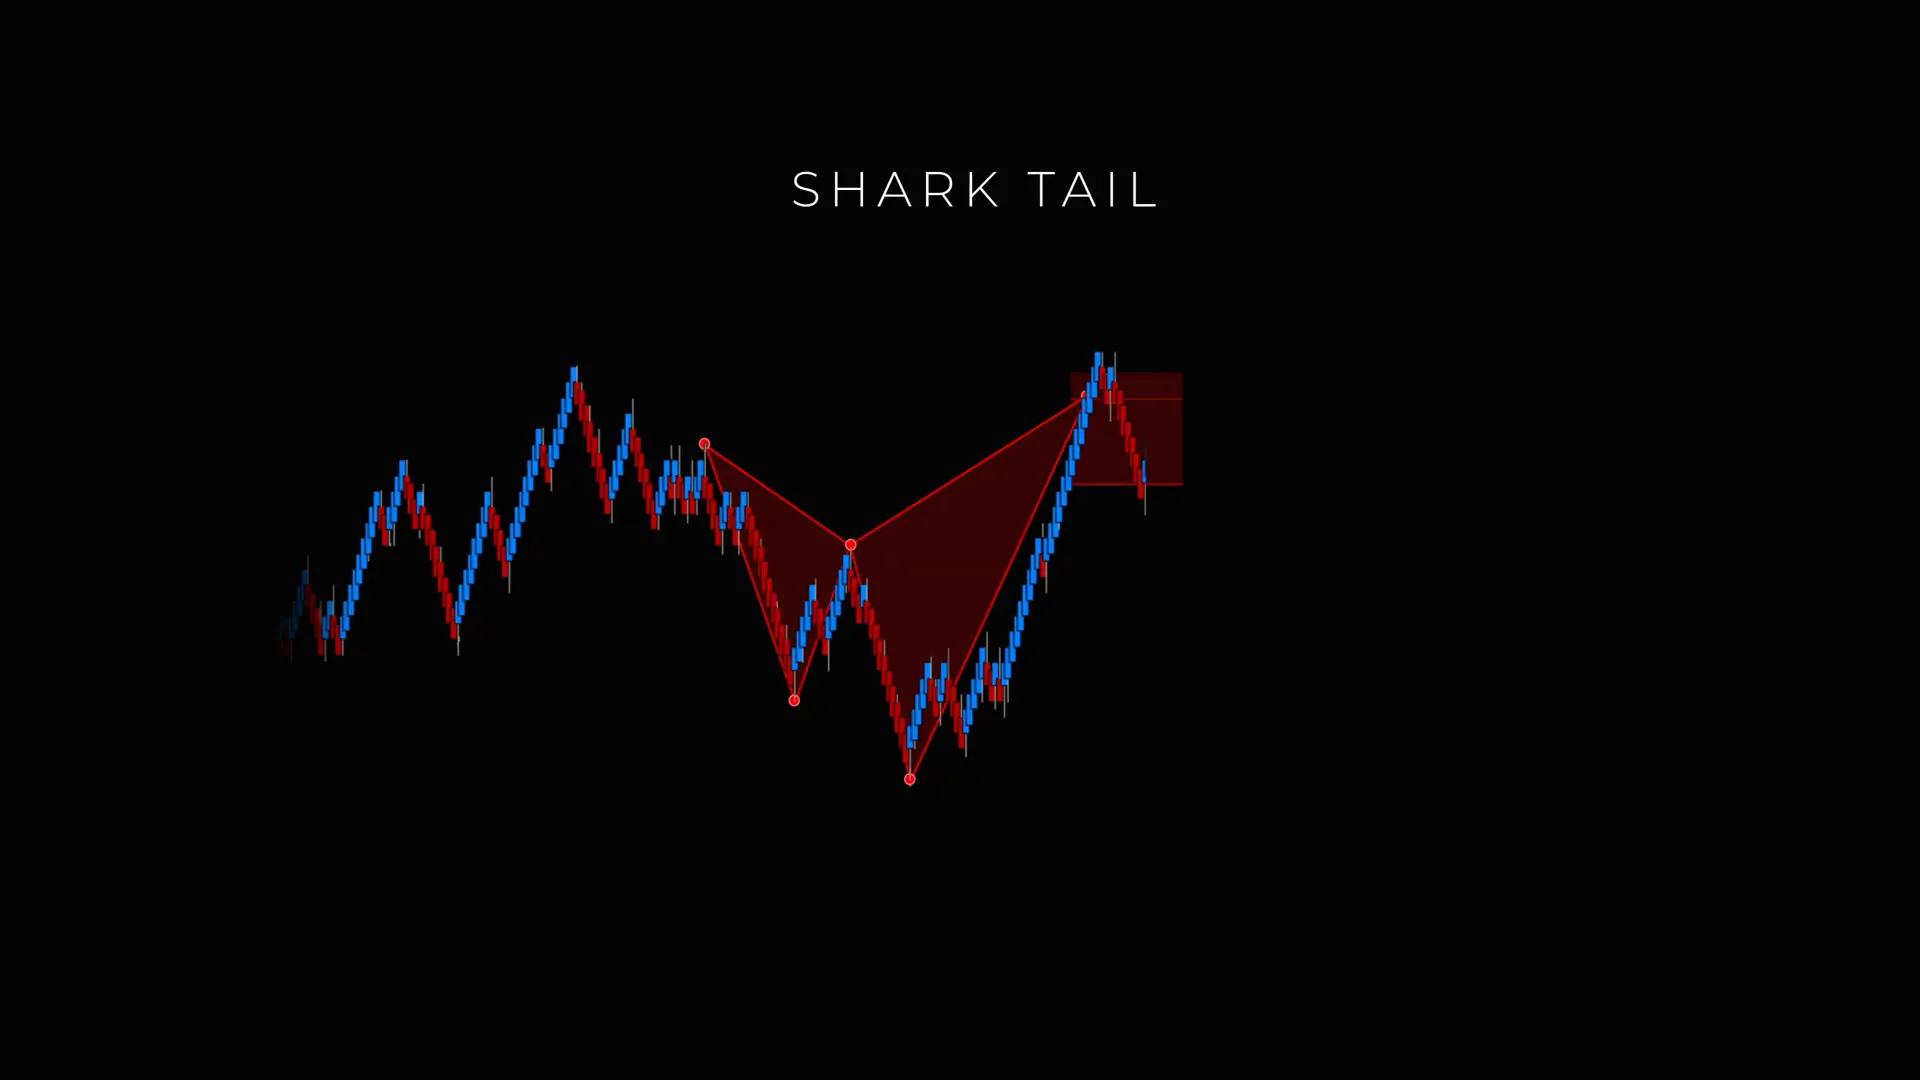
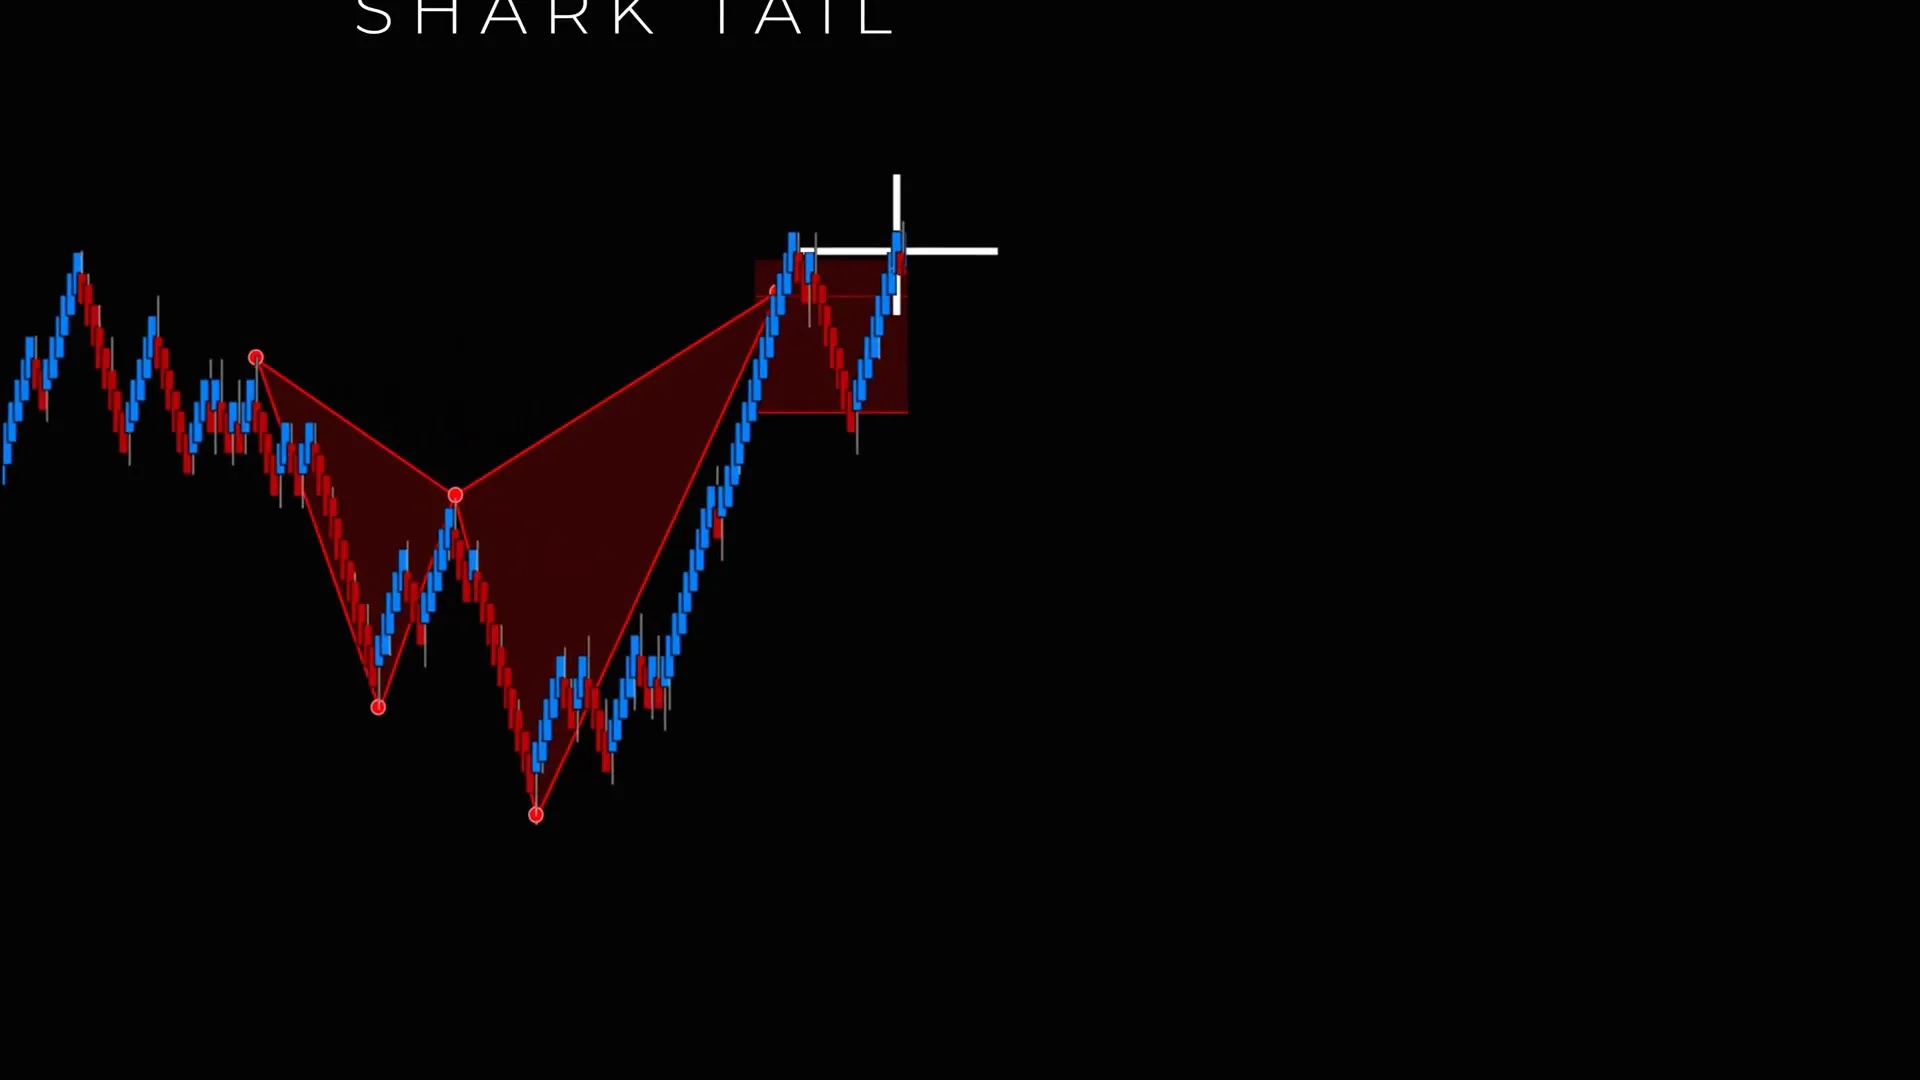
One of the most common mistakes I see in traders — and something I myself had to learn to master — is panicking after an initial stop-out. If price breaches the Shark Back and invalidates the first entry, that does not mean the trade idea was wrong forever. Often price will continue through the PRZ, trigger stops, then create a stronger confirmation just behind the PRZ. That’s where the Shark Tail comes in.
The Shark Tail is effectively a second-chance setup. Price breaks through the Shark Back line, often taking out the first stop, but then forms a confirmation signal just behind the PRZ — a signal that tells us the market rejected the breakout and is now offering a cleaner, more conclusive reversal.
Here’s how I handle the situation:
- If my initial Shark Back is stopped, I do not immediately revenge-trade.
- I wait for a valid Shark Tail confirmation signal that forms behind the PRZ.
- Only after that confirmation will I consider reentering, usually with improved confluence and often with a slightly larger sizing if the probability looks better (but not larger than my risk profile allows).
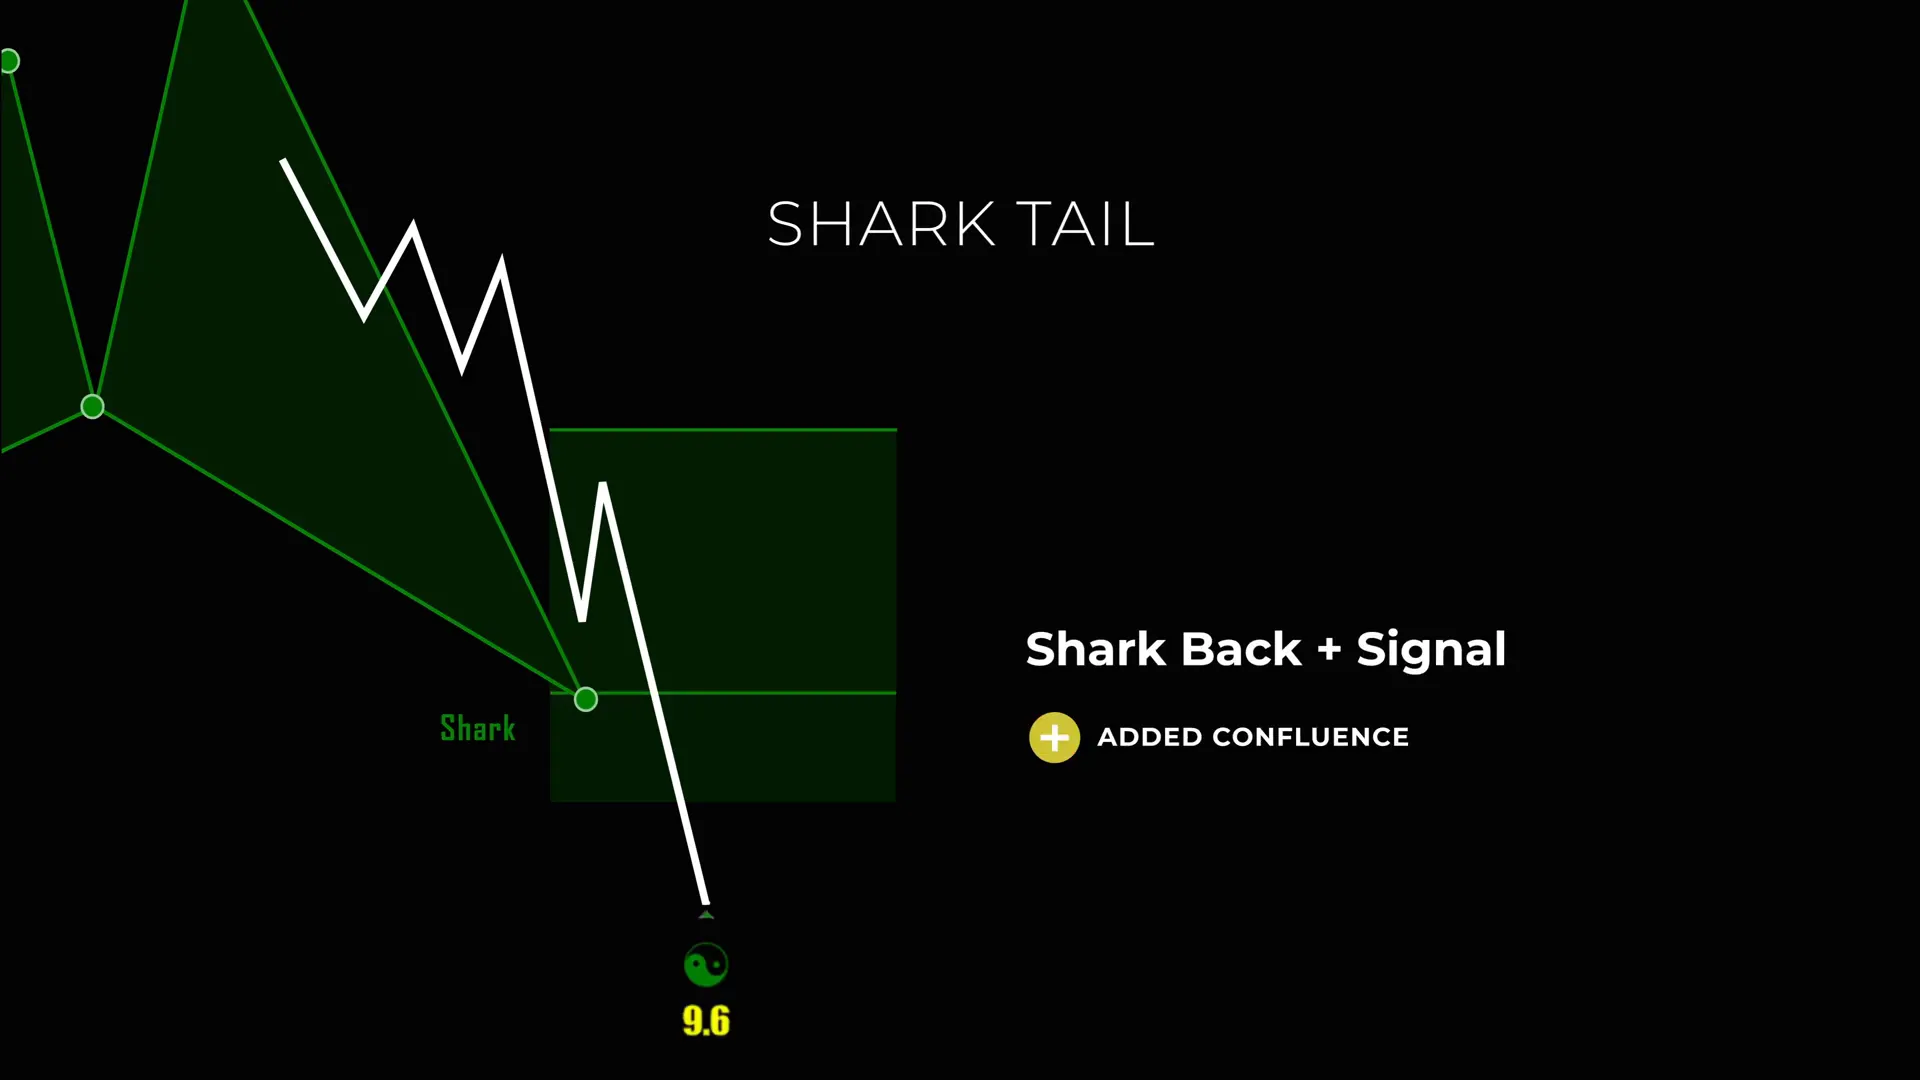
Step 7: Recognizing Shark Tail Confirmation Signals
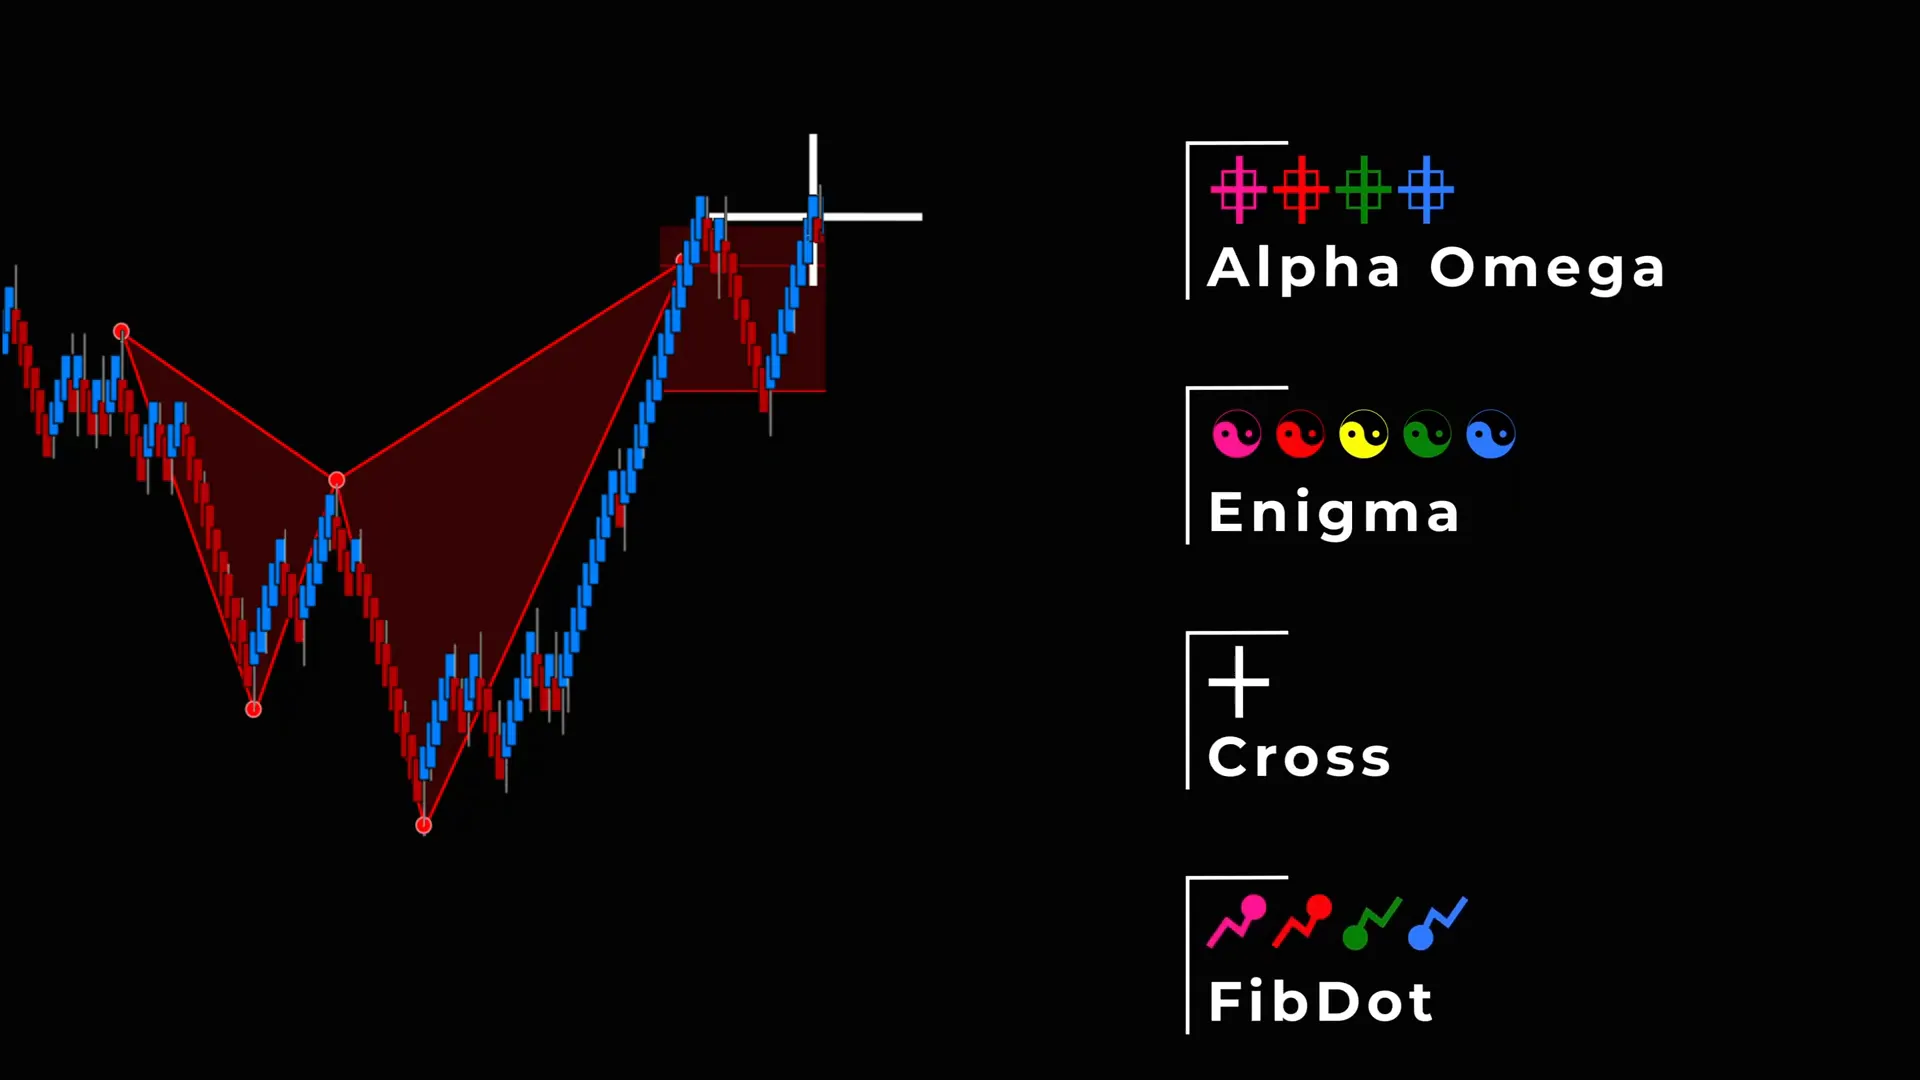
The Shark Tail requires a specific additional confirmation to be a high-probability entry. In my approach I look for one of several reliable signals that I’ve classified and taught in AlgoBox training. These are labeled as alpha, omega, enigma, cross, and fib dot signals. Each signal provides different types of confirmation — structural, momentum, or price-action based.
Here is how I think about each confirmation:
Alpha Signal
The Alpha signal is a classical price-action reversal signal formed just behind the PRZ. This might be a strong engulfing candle, a two-bar rejection, or a clear wick rejection combined with volume. The Alpha signal is about raw rejection: the market shows a pronounced refusal to continue into the zone behind the PRZ.
Omega Signal
Omega is more of a volumetric or order-flow confirmation. It appears when the instruments or platform tools show a surge in buying/selling interest on the rejection behind the PRZ — an order-flow footprint that suggests institutional participation. Omega tells me that larger participants stepped in where retail had thought price would run.
Enigma Signal
Enigma is an intermediate signal that blends structural support/resistance with momentum divergence. You’ll often see a hidden divergence on RSI or MACD with price action forming a neat structural pivot. Enigma is subtle but powerful; it shows that momentum is shifting while the structure lines up.
Cross Signal
Cross is what I call a clean crossover confirmation — this can be a moving-average crossover or a harmonic cross where a fast internal projection crosses a slower structural line. Cross is mechanical and straightforward: a clean crossing of two meaningful lines that implies momentum direction change.
Fib Dot Signal
Fib Dot is a Fibonacci-based confirmation that shows price reacting specifically at an additional Fibonacci level behind the PRZ — for example, a 38.2% that aligns with prior structure and prints a clear reaction candle. Fib Dot is often the most visible for harmonic traders because the whole system is Fibonacci-centric.
In practice, I don’t need all of these to align. Even one strong confirmation behind the PRZ — if it makes sense contextually — can justify taking a Shark Tail entry. But more confirmations equal stronger conviction and often a higher probability setup.
Step 8: Entering the Shark Tail — Execution Rules
When I take a Shark Tail entry, my rules are stricter than for a Shark Back because price has already invalidated the first attempt. The Shark Tail is a reaction against that invalidation, so I demand clear evidence of rejection and prefer entries that allow a tight stop relative to the newly formed structure.
My Shark Tail checklist:
- Confirm that price fully breached the Shark Back and moved beyond the PRZ.
- Wait for a clear confirmation signal behind the PRZ (alpha, omega, enigma, cross, or fib dot).
- Enter on the confirmation candle close or on a retracement to the confirmation level if the market allows.
- Place a stop just beyond the breakout extreme that invalidated the first attempt — this is usually a larger stop than the Shark Back stop, but the entry should have superior confluence.
- Target the front of the shark or a higher structural level if momentum strongly favors the reversal.
Because the Shark Tail often follows a stop sweep, the move can be very powerful. It’s a classic liquidity grab and reversal structure: the market takes out stops (creating liquidity for big players) and then reverses into the newly created space with momentum. That makes the Shark Tail an exceptionally rewarding follow-up when executed with discipline.
Step 9: Targeting — The Front of the Shark and Beyond
Both Shark Back and Shark Tail trades share the same early target: the front of the shark. The “front of the shark” is a conceptual target zone where the initial leg of the pattern would logically end based on structure and prior price action.
How I scale my targets:
- Primary target: front of the shark — take partial profits here.
- Secondary target: a measured move based on the harmonic structure or a confluence area on the higher timeframe.
- Final target: strong structural level (previous swing, daily open, or a key moving average) if momentum continues.
When I trade the Shark Tail, I sometimes aim for a deeper target than the Shark Back because the Shark Tail often carries the added momentum of a stop-triggered reversal. But I only press beyond the front of the shark if the trade has clear evidence of continuation — e.g., higher timeframe alignment, increasing volume, or lack of nearby resistance.
Step 10: The Psychology — Stay Calm After a Stop Out
One of the greatest advantages of understanding Shark Back vs Shark Tail is psychological. Having a predefined two-try rule helps me stay composed when the market does something unexpected. If my Shark Back gets stopped, I don’t immediately chase; I watch for Shark Tail confirmation. This reduces revenge trades and allows me to trade with better probability on the second attempt.
Key mental rules I follow:
- Accept the stop — it’s part of the strategy.
- Wait for confirmation before taking a second attempt.
- Treat the Shark Tail as a new trade, not a recovery attempt — size it according to its own risk and probability.
- Use journaling to track how often the Shark Tail appears and the outcomes versus the Shark Back. Over time, this drives confidence and reduces emotion-driven decisions.
Step 11: The Two-Try Rule — How It Improves Edge
The two-try rule is a simple but powerful behavioral mechanic I teach: allow the market two logical opportunities to prove a reversal. The first is the Shark Back; the second (if needed) is the Shark Tail. If both fail, I accept the market’s message and move on.
Why the two-try rule works:
- It prevents overtrading. You don’t chase the market after a single failed attempt.
- It increases your chance to catch the real reversal because many reversals require an initial stop sweep to flush liquidity.
- It creates a systematic response so you’re less likely to make emotionally-driven size increases or impulsive trades.
The two-try rule also provides a framework for post-trade review. When I journal, I tag trades as “Shark Back”, “Shark Tail”, or “Both Failed.” Over time this produces clarity about which patterns and confirmations produce the best results in which markets and timeframes.
Step 12: Practical Application with AlgoBox and NinjaTrader
I’ve integrated these rules into AlgoBox indicators and automation so you can see Shark Back lines and PRZs on NinjaTrader charts. Whether you’re scanning for setups or practicing manually, here’s how I recommend using technology to support the strategy — not replace your discretion.
How I use AlgoBox with NinjaTrader:
- I run a PRZ scanner across the instruments I trade to spot potential harmonic zones automatically.
- AlgoBox can draw the Shark Back line inside the PRZ and flag when price approaches it.
- I configure alerts for the specific confirmation signals (alpha, omega, enigma, cross, fib dot) so I don’t miss potential Shark Tail setups.
- I use replay mode in NinjaTrader to practice entries and stops so that muscle memory develops under realistic market conditions.
Practical tips when applying the strategy in the platform:
- Backtest both Shark Back and Shark Tail separately and together across multiple instruments and timeframes. Don’t assume one timeframe generalizes to all.
- Always visually confirm AlgoBox signals — the indicator provides confluence but should not be the sole reason for taking the trade.
- Use simulated trading to practice the two-try rule before using live capital. This ensures you can handle stop-outs and reentry patterns without emotional interference.
Step 13: Backtesting and Data — What to Measure
To refine this strategy, measure the right statistics. My favorite metrics to track when backtesting Shark Back and Shark Tail setups are:
- Win rate for Shark Back entries vs. Shark Tail entries.
- Average R:R per trade for both setups.
- Maximum drawdown experienced when scaling position size across consecutive trades.
- How often a Shark Back stop is followed by a valid Shark Tail confirmation within a defined time window.
- Time of day and instrument correlation — certain instruments and session times favor harmonic reversals more consistently.
When I backtest I use both tick charts and time-based charts to see subtle differences in how price behaves near the PRZ. I also track the type of confirmation leading to the best outcomes — for example, Omega confirmations (order flow) might outperform in more liquid instruments, while Alpha (price-action) may be more reliable in less volatile markets.
Step 14: Common Mistakes and How I Avoid Them
Over years of trading and teaching, I’ve seen recurring mistakes. Here’s how I personally avoid them and how I recommend you do the same:
- Chasing after a stop: Don’t immediately reenter. Wait for Shark Tail confirmation and treat it as a new trade.
- Overleveraging: Respect the stop sizes. If Shark Tail requires a larger stop, reduce position size accordingly.
- Ignoring higher timeframe context: A PRZ aligned with the higher timeframe trend gives a much better chance at sustained moves.
- Blindly following indicators: Use AlgoBox as a tool, not an oracle. Always validate signals with price structure.
- Lack of journaling: Track Shark Back vs Shark Tail outcomes so you know which setups work for your instruments and timeframes.
Step 15: Advanced Tweaks and Variations I Use
Once you’ve mastered the basics, there are ways to refine the strategy for specific styles of trading:
- Multi-timeframe entry refinement: Use a lower timeframe to refine entries after an initial Shark Back pivot on a higher timeframe.
- Combining with market profile or volume profile: The Shark Tail is especially powerful when it forms at a value area or POC that was previously tested.
- Time-of-day filters: I prefer Shark Tail trades during liquidity windows (e.g., market open or economic data windows) when stop sweeps and liquidity grabs are more likely.
- Filter by volatility regime: Reduce size in low volatility regimes or when event risk is unknown.
These tweaks are optional but can meaningfully improve outcomes if implemented with discipline.
Step 16: My Final Checklist Before Taking a Shark Back or Shark Tail Trade
I always run through this checklist in my head (and in my trade journal) before placing any trade based on these setups:
- Is the PRZ clearly defined and based on valid harmonic projections?
- Have I marked the Shark Back line correctly inside the PRZ?
- Is the market context (higher timeframe) aligned with the intended reversal?
- For Shark Back: Do I see a clean pivot or rejection at the Shark Back line?
- For Shark Tail: Has price broken the Shark Back and formed a specified confirmation (alpha/omega/enigma/cross/fib dot) behind the PRZ?
- Do my stop and target reflect the trade idea and are they sized properly for my account?
- Am I prepared to accept the stop and move on if both tries fail?
Step 17: Example Walkthrough — From PRZ to Shark Tail Execution
Here’s a practical example I often use when teaching. Imagine the following sequence on a 5-minute chart for a futures contract:
- PRZ forms across 1.272 extension and a 0.886 retracement. I draw the PRZ box and the Shark Back line near the mid-zone.
- Price moves into the PRZ and prints a rejection candle exactly at the Shark Back line. I take a Shark Back entry with a tight stop behind the PRZ.
- Price fails to hold and acts to the downside, crossing the Shark Back and taking my stop.
- After the stop, price continues a bit lower into a cluster of stops, then prints an Omega-like surge in buy volume behind the PRZ, followed by an Alpha engulfing candle.
- I treat this as a Shark Tail confirmation and reenter with an appropriately sized position and a stop beyond the new swing high created by the breakout.
- Price reverses sharply and reaches the front of the shark, where I scale out and manage the remainder of the position based on momentum.
The net result in this scenario is often a clean win despite the initial stop. And even when the Shark Tail fails, the rules prevented emotional resizing and revenge trading.
Step 18: Final Thoughts and Risk Disclosures
Trading harmonic patterns like the Shark Back and Shark Tail requires discipline, a clear set of rules, and careful risk management. These strategies are not perfect, but they provide a structured way to trade reversals with a defined edge.
Key takeaways I want you to remember:
- The Shark Back is your first, preferred entry inside the PRZ — it often gives the best R:R.
- The Shark Tail is the disciplined second attempt after a breach — it often appears with stronger confluence and momentum.
- The two-try rule helps maintain composure and prevents revenge trading.
- Confirmation signals (alpha, omega, enigma, cross, fib dot) give additional confluence and should be used to qualify Shark Tail entries.
- Always manage risk and size trades relative to stop distance and confidence in the setup.
Trading contains substantial risk. You can lose more than your initial investment, and nothing contained in this article should be construed as investment advice. Use risk capital only and practice strategies extensively before applying them with live funds.
Step 19: Where to Go Next — Practice and Further Learning
If you want to put this into practice, I recommend the following progression:
- Watch replay sessions in NinjaTrader to observe how PRZs, Shark Back lines, and Shark Tail confirmations form in live action.
- Backtest across multiple instruments and timeframes to identify where the strategy performs best.
- Create a simple tracking sheet for Shark Back vs Shark Tail trades and review weekly to refine rules.
- Consider integrating AlgoBox tools to automate detection and reduce the time required to find setups, but always validate visually.
Learning to trade like a shark is about being opportunistic, disciplined, and patient. Use the two-try rule as your comportment tool — accept the first attempt can and will fail at times; the tail may bring the real move.
Step 20: My Final Encouragement
I use these patterns every day, and I’ve seen them produce consistent results when applied with structure and discipline. Whether you’re day trading futures on NinjaTrader or scalping forex, understanding the interplay between the Shark Back and Shark Tail will improve your ability to read reversal zones and manage risk.
Study the PRZ carefully, mark the Shark Back line, trade the initial reaction when appropriate, and if stopped, calmly wait for a Shark Tail confirmation. That two-try discipline is what separates systematic traders from reactionary ones.
Now get out there and trade like a shark.

Disclaimer: This material is educational and informational in nature and should not be considered investment advice. Futures and forex trading contain substantial risk and are not suitable for every investor. Past performance is not indicative of future results. Always manage risk carefully and only use funds you can afford to lose.